NAME
Imager::File::SIXEL::Examples - examples for reading and writing SIXEL images with Imager
DESCRIPTION
Task-oriented examples for Imager::File::SIXEL, with figures that show what each write option does to the image. The reference documentation of every option is in Imager::File::SIXEL; how the SIXEL format is read and written in detail is in Imager::File::SIXEL::Format. Complete programs are listed in "EXAMPLE PROGRAMS" in Imager::File::SIXEL.
The snippets on this page assume that these lines come first:
use Imager;
use Imager::File::SIXEL;
$img stands for any Imager image, for example one read with
Imager->new(file => 'photo.png'). Each snippet starts with a
fresh $img: the sixel_ options of one snippet stay on the image
and would apply to the next one, see
"Write the same image again with other settings (options are remembered)".
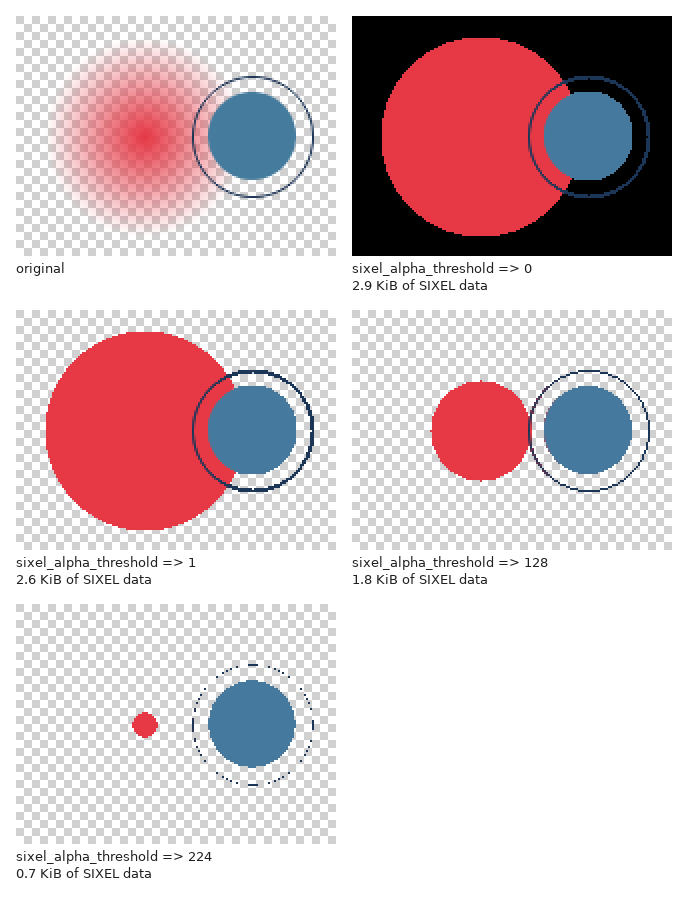
The figures show what each setting does. They use two test pictures: a
sunset, and for transparency a picture with transparent areas. The
panel labeled original shows the test picture as it is. Every other
panel shows the test picture written with the options in its label and
read back, which are the pixels a terminal receives; the label also
gives the size of the SIXEL data. A list in square brackets in a label
describes the colors passed, instead of quoting them. The figure for
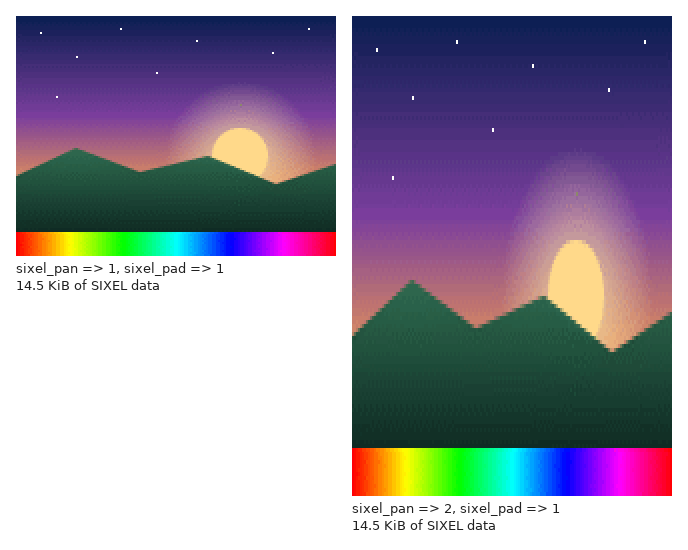
the pixel aspect ratio differs; its section explains how. The panels
are enlarged to twice their size without smoothing, so that single
pixels are visible. The script tools/make-images in the distribution
creates the figures.
The figures appear in the HTML versions of this documentation, such
as on MetaCPAN and GitHub. In a terminal, perldoc shows the name of
the figure file instead; the files are in the images directory of
the distribution.
SHOWING AND SAVING IMAGES
Show an image in the terminal
use Imager;
use Imager::File::SIXEL;

my $img = Imager->new(file => 'photo.jpg')
  or die Imager->errstr;

# Shrink large images to at most 800 x 600 pixels,
# keeping the aspect ratio.
if ($img->getwidth > 800 || $img->getheight > 600) {
  $img = $img->scale(xpixels => 800, ypixels => 600, type => 'min');
}

$img->write(fh => \*STDOUT, type => 'sixel')
  or die $img->errstr;
print "\n";
The terminal draws the image at the cursor position. The final
print "\n" makes sure that the next output, such as the shell
prompt, starts on the line below the image. With fh, Imager
writes through the handle's I/O layers and buffer, like print, so
text printed before the image appears before it. See
"DISPLAYING IMAGES IN A TERMINAL" in Imager::File::SIXEL for more.
Encode into a string
my $sixel = '';
$img->write(data => \$sixel, type => 'sixel')
  or die $img->errstr;

binmode STDOUT, ':raw';    # see DISPLAYING IMAGES IN A TERMINAL in Imager::File::SIXEL
print $sixel;
$sixel holds plain ASCII text. Encoding into a string is useful to
send the data somewhere else, to cache it, or to print it at a chosen
moment, as in "ANIMATION" in Imager::File::SIXEL.
To hand the data to your own code piece by piece instead, use a
callback. Your callback receives each chunk and must return true;
a false return makes the write fail:
$img->write(type => 'sixel', callback => sub {
  my ($chunk) = @_;
  $socket->print($chunk);    # any output of your choice
}) or die $img->errstr;
Save a SIXEL file and read it back
$img->write(file => 'picture.six')
  or die $img->errstr;

my $copy = Imager->new(file => 'picture.six')
  or die Imager->errstr;
Neither call needs a type option: the extension .six (or
.sixel) selects SIXEL for writing, and the content is recognized
when reading. To show the file later, print it to the terminal, for
example with cat picture.six.
Convert a SIXEL file to PNG
my $img = Imager->new(file => 'picture.six')
  or die Imager->errstr;
$img->write(file => 'picture.png')
  or die $img->errstr;
The PNG has the same pixels as the SIXEL image. If the SIXEL image has a transparent background, the PNG has an alpha channel. See "The decoded image" in Imager::File::SIXEL::Format.
Write several images into one file (write_multi)
Imager->write_multi({ file => 'slides.six', type => 'sixel' }, @images)
  or die Imager->errstr;
The images are written one after another, each as a complete SIXEL
image, and nothing is written between them. Printing the file shows
them below one another. Reading the file with read_multi() returns
the images again.
The palette is not shared between the images: each image gets its own
palette, computed from that image, unless you pass
colors or sixel_palette => 'webmap', which give all images the same one. How the options apply
to the individual images is described in "Write
options are stored on the image" in Imager::File::SIXEL.
READING SIXEL DATA
Read SIXEL data from a string or a pipe
# From a string: without a type, the data must start with ESC P.
my $img = Imager->new(data => $sixel)
  or die Imager->errstr;

# From standard input, for example: img2sixel photo.png | perl show.pl
my $piped = Imager->new(fh => \*STDIN, type => 'sixel')
  or die Imager->errstr;
Pass type => 'sixel' whenever the data may start with something
other than ESC P, for example with text; see
"Loading the module" in Imager::File::SIXEL.
Read one image of a file that holds several
my $third = Imager->new(file => 'recording.six', type => 'sixel', page => 2)
  or die Imager->errstr;
page counts from 0, so page => 2
reads the third SIXEL image. Text and other terminal control sequences
between the images are skipped. If the data holds fewer than three
images, the read fails with SIXEL page 2 not found.
Read every image of a file
my @images = Imager->read_multi(file => 'recording.six', type => 'sixel')
  or die Imager->errstr;

for my $n (0 .. $#images) {
  $images[$n]->write(file => sprintf('frame-%03d.png', $n))
    or die $images[$n]->errstr;
}
read_multi() returns the images in the order in which they appear.
It fails as a whole, returning an empty list, if any image cannot be
decoded.
Read data that is cut off (truncated)
my $img = Imager->new(file => 'partial.six', type => 'sixel',
                      allow_incomplete => 1)
  or die Imager->errstr;

if ($img->tags(name => 'i_incomplete')) {
  warn "The image is incomplete.\n";
}
Without allow_incomplete, an
image that ends before its terminating ESC \ makes the read fail
with premature end of SIXEL data. With it, you get the part that was
transferred, and the tag i_incomplete is set to 1.
Read untrusted data safely (limit memory and time)
Imager->set_file_limits(width => 4096, height => 4096,
                        bytes => 64 * 1024 * 1024);

my $file = shift;    # a file from an untrusted source
die "Input too large\n" if -s $file > 10 * 1024 * 1024;
my $img = Imager->new(file => $file, type => 'sixel')
  or die Imager->errstr;
A few bytes of SIXEL data can describe a very large image, and the same
pixels can be painted over many times. Before you decode data from
untrusted sources, limit the image size with
Imager->set_file_limits, and check the size of the input
yourself. See "Resource limits" in Imager::File::SIXEL::Format.
CHANGING THE LOOK OF THE OUTPUT
Make the SIXEL data smaller
The size of the SIXEL data decides how long the terminal takes to receive and draw an image. Ways to make it smaller:
- Scale the image down to the size at which it should appear, with
$img->scale(...); see "Show an image in the terminal". The data shrinks roughly with the number of pixels. - Use fewer colors with
sixel_max_colors. - Turn dithering off with
sixel_dither => 'none', at the cost of visible bands in gradients; seesixel_dither. - Combine
sixel_dither => 'none'with the webmap palette,sixel_palette => 'webmap'. On the test picture this gives about a fifth of the SIXEL data of the default settings, but it changes the colors more than the other settings; seesixel_palette.
How much each setting saves depends on the image. The labels of the figures in the next sections give the data size for the test picture, and "PERFORMANCE" in Imager::File::SIXEL gives sizes for a photograph.
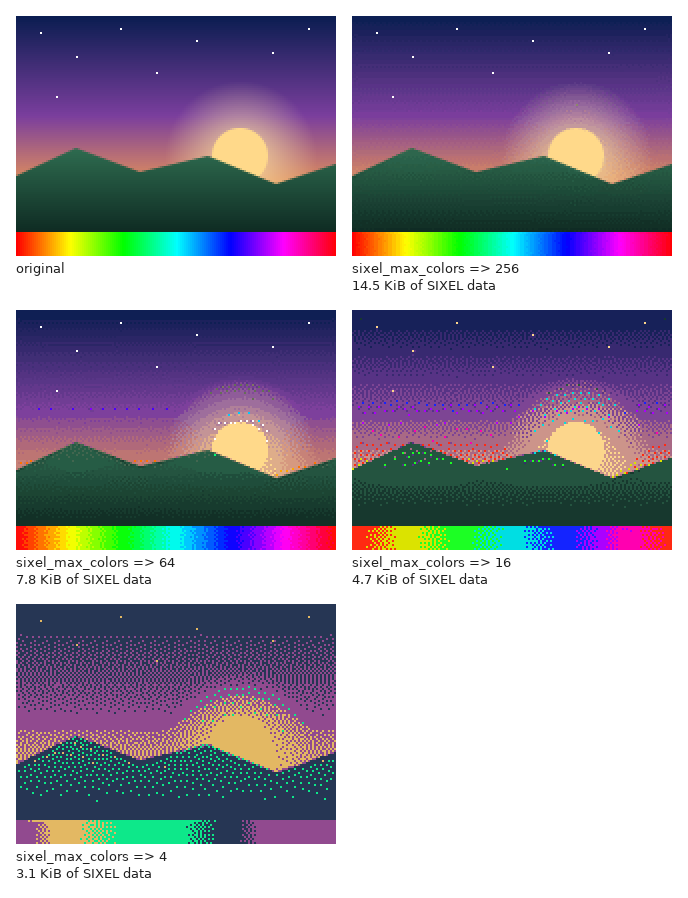
Reduce the number of colors (sixel_max_colors)
$img->write(file => 'small.six', sixel_max_colors => 16)
  or die $img->errstr;
sixel_max_colors limits the
palette that the encoder computes for the image. Fewer colors give
smaller SIXEL data and faster drawing, and let the image display
correctly on terminals with few color registers, at the cost of
quality:
Choose how colors are approximated (sixel_dither)
$img->write(file => 'ordered.six', sixel_dither => 'ordered')
  or die $img->errstr;
sixel_dither decides what
happens to colors that are not in the palette. The figure uses a
palette of 16 colors (sixel_max_colors => 16), which makes the
differences easy to see:
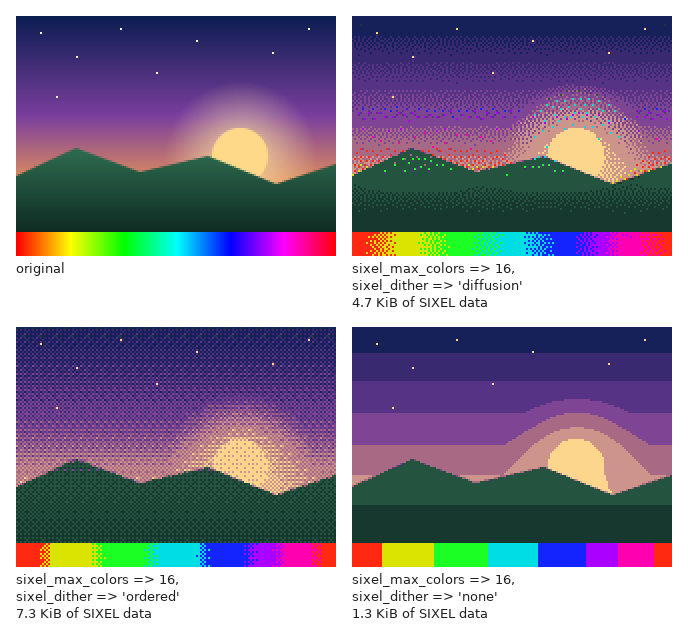
'diffusion'(the default) gives the best still images.'ordered'gives a regular pattern. With a fixed palette (webmap orcolors), the pattern of an area stays the same as long as that area does not change, which suits animations. Its SIXEL data can be larger or smaller than that of'diffusion', depending on the image; see the table in "PERFORMANCE" in Imager::File::SIXEL.'none'usually gives the smallest SIXEL data of the three, especially with a fixed palette, but gradients turn into visible bands.
Use the fixed webmap palette (sixel_palette)
$img->write(file => 'web.six', sixel_palette => 'webmap')
  or die $img->errstr;
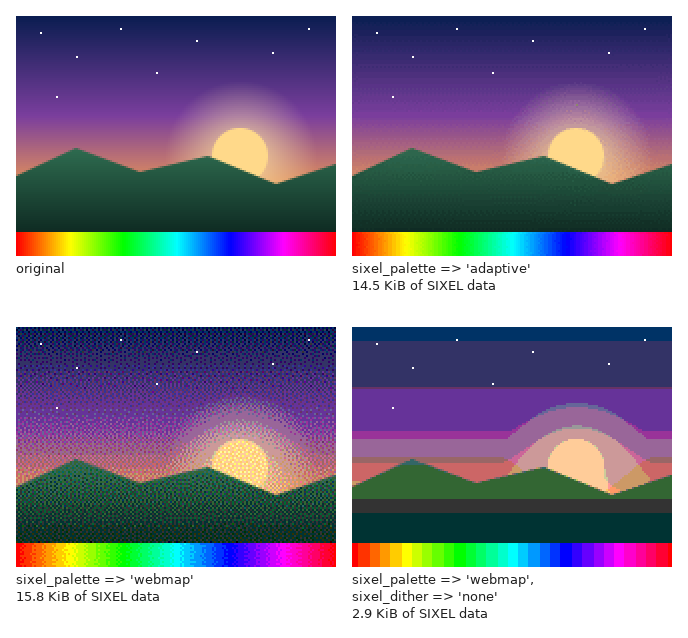
sixel_palette => 'webmap' uses the same 216 colors for every
image instead of computing a palette from the image. That saves the
time of computing a palette and keeps the colors stable from one
animation frame to the next, but it fits most images worse than a
computed palette. With the default dithering its SIXEL data can even
be larger than with a computed palette:
Use your own (custom) palette (colors)
# The eight colors of a basic terminal, in the different
# notations that the colors option accepts.
my @palette = (
  '#000000', '#FF0000', [0, 255, 0], 'yellow',
  Imager::Color->new(0, 0, 255), '#FF00FF', '#00FFFF', '#FFFFFF',
);
$img->write(file => 'basic.six', colors => \@palette)
  or die $img->errstr;
colors sets the palette to exactly the
colors you list, 1 to 256 of them. Every pixel is written in one of
these colors, approximated as set by
sixel_dither:
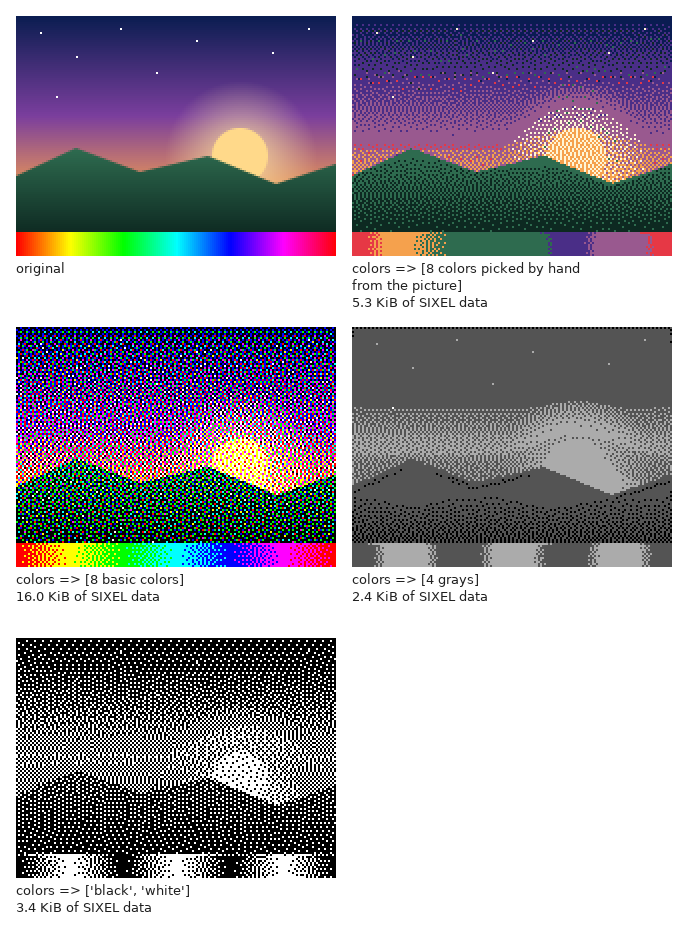
A fixed palette is also the best choice for animations: compute it once from a few sample frames and pass it with every frame, see "ANIMATION" in Imager::File::SIXEL.
Use the palette of a paletted image
my $paletted = $img->to_paletted(
  make_colors => 'mediancut',
  max_colors  => 32,
  translate   => 'errdiff',
) or die $img->errstr;

$paletted->write(file => 'mine.six')
  or die $paletted->errstr;
If the image is a paletted image whose color table has at most
sixel_max_colors entries,
the encoder uses that color table as the palette, unchanged apart from
the rounding to SIXEL percentages, and does not dither: color register
n gets color table entry n. An entry that rounds to the same
color as an earlier entry uses the earlier entry's register instead.
This lets you control the colors with
any of Imager's methods, see "to_paletted()" in Imager::ImageTypes.
Images read from SIXEL data are paletted when they have at most 256
colors (see "Image type" in Imager::File::SIXEL::Format); images read
from GIF files are usually paletted too. "How the
palette is chosen" in Imager::File::SIXEL lists all rules.
Images with transparency (sixel_alpha_threshold)
my $logo = Imager->new(file => 'logo.png')    # has an alpha channel
  or die Imager->errstr;
$logo->write(fh => \*STDOUT, type => 'sixel', sixel_alpha_threshold => 64)
  or die $logo->errstr;
SIXEL has no partial transparency. A pixel is either painted in its
color or not painted at all, in which case the terminal background
shows through. For images with an alpha channel,
sixel_alpha_threshold
decides: pixels whose alpha value is below the threshold are not
painted. The checkerboard in the figure marks the pixels that are not
painted:
Painted pixels always get their full color: the encoder does not blend a semi-transparent pixel with any background, because it cannot know the terminal's background color. To get soft edges against a known background, compose the image onto that background first:
my $background = Imager->new(xsize => $logo->getwidth,
                             ysize => $logo->getheight);
$background->box(filled => 1, color => '#1E1E1E');
$background->rubthrough(src => $logo);
$background->write(fh => \*STDOUT, type => 'sixel')
  or die $background->errstr;
Non-square pixels (sixel_pan, sixel_pad)
$img->write(file => 'tall.six', sixel_pan => 2, sixel_pad => 1)
  or die $img->errstr;
sixel_pan and
sixel_pad set the pixel aspect
ratio written into the image: each pixel is sixel_pan / sixel_pad
times as high as it is wide. Terminals that honor the ratio stretch the
image when they draw it; terminals that ignore it draw square pixels.
To find out what your terminal does, write an image with sixel_pan => 2 and look at it. The right panel shows how a terminal that
honors the ratio draws an image written with sixel_pan => 2; the
pixel data of both panels is identical:
When reading, the decoder does not stretch the image. It reports the
ratio in the tags sixel_pan and sixel_pad, and you can stretch
the image yourself:
my $img = Imager->new(file => 'old-vt340.six')
  or die Imager->errstr;
my $pan = $img->tags(name => 'sixel_pan');
my $pad = $img->tags(name => 'sixel_pad');
if ($pan != $pad) {
  $img = $img->scale(
    xpixels => $img->getwidth,
    ypixels => int($img->getheight * $pan / $pad + 0.5),
    type    => 'nonprop',
  );
}
scale() does not copy tags, so the stretched image has no
sixel_pan and sixel_pad tags and is written with square pixels
again.
OPTIONS, ERRORS AND ANIMATION
Write the same image again with other settings (options are remembered)
$img->write(file => 'a.six', sixel_dither => 'none')
  or die $img->errstr;

# Still writes with sixel_dither => 'none': the option was stored
# on the image as the tag sixel_dither.
$img->write(file => 'b.six')
  or die $img->errstr;

# Remove the stored setting to get the default again, either
# with deltag() or by passing undef.
$img->deltag(name => 'sixel_dither');
$img->write(file => 'c.six')
  or die $img->errstr;
$img->write(file => 'd.six', sixel_dither => undef)
  or die $img->errstr;
Options whose names start with sixel_ stay on the image after a
write and are used again by the next write. See
"Write options are stored on the image" in Imager::File::SIXEL.
Handle errors
my $sixel = '';
unless ($img->write(data => \$sixel, type => 'sixel', sixel_dither => 'random')) {
  # dies with: Cannot encode: unknown sixel_dither value 'random'
  die 'Cannot encode: ', $img->errstr, "\n";
}

my $in = Imager->new(file => 'broken.six')
  or die 'Cannot decode: ', Imager->errstr, "\n";
Like all Imager methods, read() and write() return false on
failure and leave the message in $img->errstr. Methods called on
the class, such as Imager->new(file => ...), Imager->read_multi(...) and Imager->write_multi(...), leave
it in Imager->errstr. Invalid options are detected before any
SIXEL data is written; with file, the file has already been created
or emptied by then. "DIAGNOSTICS" in Imager::File::SIXEL lists the
messages.
Play an animation
See "ANIMATION" in Imager::File::SIXEL for a complete loop that draws frames at a fixed position and frame rate.
SEE ALSO
Imager::File::SIXEL, Imager::File::SIXEL::Format, "EXAMPLE PROGRAMS" in Imager::File::SIXEL, Imager.
AUTHOR
davenonymous dave@davenonymous.com
COPYRIGHT AND LICENSE
Copyright (C) 2026 davenonymous.
This library is free software; you can redistribute it and/or modify it under the same terms as Perl itself.