NAME
Dancer::Plugin::Auth::Google - Authenticate with Google
SYNOPSIS
package MyApp;
use Dancer ':syntax';
use Dancer::Plugin::Auth::Google;

auth_google_init;  # <-- don't forget to call this first!

get '/' => sub {
    if (session('google_user')) {
        return 'you are logged in, ' . session('google_user')->{name};
    }
    else {
        return redirect auth_google_authenticate_url;
    }
};

get '/fail' => sub {
    "Oh, noes! Your authentication failed :("
};
DESCRIPTION
This plugin provides a simplpe way to authenticate your users through Google's OAuth API. It provides you with a helper to build easily a redirect to the authentication URI, defines automatically a callback route handler and saves the authenticated user to your session when done.
PREREQUISITES
In order for this plugin to work, you need the following:
Session backend
For the authentication process to work, you need a session backend so the plugin can store the authenticated user's information.
Use the session backend of your choice, it doesn't make a difference, see Dancer::Session for details about supported session engines, or search the CPAN for new ones.
Google Application
Anyone with a valid Google account can register an application. Go to http://console.developers.google.com, then select a project or create a new one. After that, in the sidebar on the left, select "Credentials".
First, go to the OAuth consent screen tab and set it up with you website's logo, desired credentials (the "email" and "profile" ones are granted by default) and, specially, your authorized domains. We'll need those for the next step!
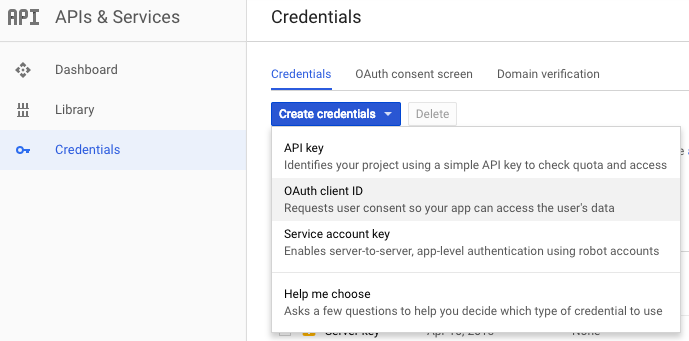
Now go to the Credentials tab and click the Create credentials button/dropdown and select OAuth client ID.
A dialog will appear. In the "Application type" section of the dialog, select "Web application".
Under the "Authorized JavaScript origins" field, put the domains of both your development server and your production one (e.g.: http://localhost:3000 and http://mywebsite.com). You will only be able to include domains listed under your authorized domain list, which you set on the previous step (though localhost domains are ok).
Same thing goes for the "Redirect URIs": those **MUST** be the same as you will set in your app and Google won't redirect to any page that is not listed (don't worry, you can edit this later too).
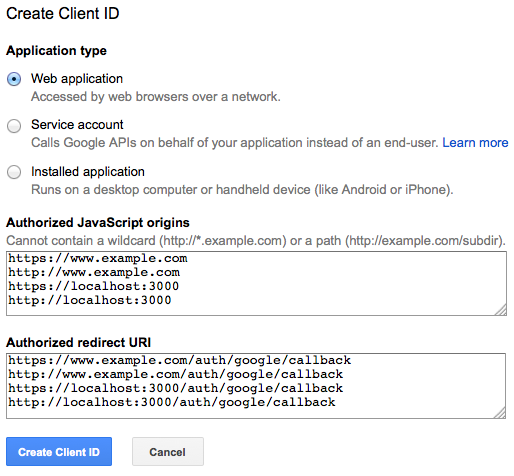
Again, make sure the "Redirect URIs" contains both your development url (e.g. http://localhost:3000/auth/google/callback) and production (e.g. http://mywebsite.com/auth/google/callback). It's usually a good practice to add both HTTP and HTTPS callback urls.
After you're finished, copy the "Client ID" and "Client Secret" data of your newly created app. It should be listed on that same panel (you can check it anytime by going to the "Credentials" option)
Configuration
After you set up your app, you need to configure this plugin. To do that, copy the "Client ID" and "Client Secret" generated on the previous step into your Dancer's configuration under Plugins / Auth::Google, like so:
# config.yml
plugins:
    'Auth::Google':
        client_id:        'your-client-id'
        client_secret:    'your-client-secret'
        scope:            'profile'
        access_type:      'online'
        callback_url:     'http://localhost:3000/auth/google/callback'
        callback_success: '/'
        callback_fail:    '/fail'
        legacy_gplus:     0
Of those, only "client_id", "client_secret" and "callback_url" are mandatory. If you omit the other ones, they will assume their default values, as listed above.
Specifically, it is a good practice to change the callback_url depending on whether you're on a development or production environment. Dancer makes this trivial by letting you split your settings, leaving the basic plugin settings on config.yml and specific callback_url definitions on environments/development.yml and environments/production.yml:
# environments/development.yml
plugins:
    'Auth::Google':
        callback_url:   'http://localhost:3000/auth/google/callback'
And
# environments/production.yml
plugins:
    'Auth::Google':
        callback_url:   'http://myproductionserver.com/auth/google/callback'
Setting your permissions' scope
Since this plugin is meant mainly for authentication, the default scope is 'profile'. That should give you general profile data for the user, such as full name, id, profile url, etc. See https://developers.google.com/identity/protocols/googlescopes for available scopes to chose from. You can set as many as you like, separated by space. A usual combination is 'profile email'. If you want a Google-specific scope (i.e. those with a "." in the name) make sure you add the full URL as specified in the link above. For example, the proper way to ask for restricted Google Drive access is "https://www.googleapis.com/auth/drive.file", not just "drive.file".
EXPORTS
The plugin exports the following symbols to your application's namespace:
auth_google_init
This function should be called before your route handlers in order to initialize the underlying object and set up the proper routes. It will read your configuration and create everything that it needs.
auth_google_authenticate_url
This function returns an authorization URI for redirecting unauthenticated users. You should use this in a before filter like the "SYNOPSIS" demo above.
Google allows you to send additional key=value data to preserve state in your application throughout the OAuth2 process, via the state variable. To do so, simply tweak the URI object with that additional info:
use URI::Escape;

if (!session('google_user')) {
    my $state = 'CSRF=my-special-token&other=whatever';

    my $uri = auth_google_authenticate_url;
    $uri->query_form(
        $uri->query_form, # <-- required so we ADD instead of REPLACE
        state => URI::Encode->new->encode($state),
    );

    return redirect $uri;
}
If you do this, the "state" data will be sent back to you on the callback as a request parameter. You can then use it to direct your user to the proper resource or check it against forgery attacks - assuming you also stored it in a session variable of some sort.
ROUTE HANDLERS
The plugin defines the following route handler automatically:
/auth/google/callback
This route handler is responsible for catching back a user that has just authenticated herself with Google's OAuth2. The route handler saves tokens and user information in the session and then redirects the user to the URI specified by callback_success.
If the validation of the token returned by Google failed or was denied, the user will be redirected to the URI specified by callback_fail. Otherwise, this route will point the user to callback_success.
What data is under session('google_user')?
After getting basic authentication data, this module uses the Google Identity Platform API, to fetch basic user profile data, like a unique id, email, name and picture. session('google_user') looks like so (random hash order!):
{
    access_token   => 'THIS IS THE ACCESS TOKEN TO USER',
    expires_in     => 3920,  # seconds!
    token_type     => 'Bearer',
    refresh_token  => 'USE THIS TO REFRESH ACCESS WITHOUT NEW AUTH',
    name           => "FirstName LastName",
    given_name     => "FirstName",
    family_name    => "LastName",
    picture        => "https://SOME-GOOGLE-URL/photo.jpg",
    locale         => "en",
    gender         => "female", # or "male", or "other"
    email          => "email@example.com",
    link           => "https://OLD-GOOGLE-PLUS-PROFILE-THIS-MIGHT-GO-AWAY",
    id             => "NUMERIC UNIQUE USER ID HERE",
    hd             => "HOSTED DOMAIN",
    verified_email => 1,
}
NOTE: G+ is no more. Add 'legacy_gplus: 1' to keep old code running.
Up to version 0.06 of this module the session('google_user') data structure was as returned by Google Plus' API. Google decided to discontinue G+ and its API on March 7th 2019, so since version 0.07 we fetch user information from Google's oauth2/v2/userinfo endpoint.
Those two structures are very different, so you will need to update your code if you used any version of this module prior to 0.07. If you don't want to, add the legacy_gplus option to your configuration with a true value and session('google_user') will instead return a data structure as closely matched as possible to the old version. Note that some data may not be available anymore (particularly, circleByCount and etag), in which case the structure will return undef - but you tested those fields already, right?
ACCESSING OTHER GOOGLE APIS
As noted above, once the user is authenticated your session data will contain the access token:
my $token = session('google_user')->{access_token};You can use that access token to make calls to a Google API on behalf of the user (provided the user authorized the related scope. See https://developers.google.com/identity/protocols/OAuth2WebServer for more information on this.
BUGS
Please submit any bug reports or feature requests to Github.
ACKNOWLEDGEMENTS
This plugin was written following the same design as Dancer::Plugin::Auth::Twitter and Dancer::Plugin::Auth::Facebook.
COPYRIGHT AND LICENCE
Copyright (C) 2014-2019, Breno G. de Oliveira
This library is free software; you can redistribute it and/or modify it under the same terms as Perl itself.