NAME
Excel::Writer::XLSX - Create a new file in the Excel 2007+ XLSX format.
SYNOPSIS
To write a string, a formatted string, a number and a formula to the first worksheet in an Excel workbook called perl.xlsx:
use Excel::Writer::XLSX;

# Create a new Excel workbook
my $workbook = Excel::Writer::XLSX->new( 'perl.xlsx' );

# Add a worksheet
$worksheet = $workbook->add_worksheet();

#  Add and define a format
$format = $workbook->add_format();
$format->set_bold();
$format->set_color( 'red' );
$format->set_align( 'center' );

# Write a formatted and unformatted string, row and column notation.
$col = $row = 0;
$worksheet->write( $row, $col, 'Hi Excel!', $format );
$worksheet->write( 1, $col, 'Hi Excel!' );

# Write a number and a formula using A1 notation
$worksheet->write( 'A3', 1.2345 );
$worksheet->write( 'A4', '=SIN(PI()/4)' );

$workbook->close();
DESCRIPTION
The Excel::Writer::XLSX module can be used to create an Excel file in the 2007+ XLSX format.
Multiple worksheets can be added to a workbook and formatting can be applied to cells. Text, numbers, and formulas can be written to the cells.
Excel::Writer::XLSX and Spreadsheet::WriteExcel
Excel::Writer::XLSX uses the same interface as the Spreadsheet::WriteExcel module which produces an Excel file in binary XLS format.
QUICK START
Excel::Writer::XLSX tries to provide an interface to as many of Excel's features as possible. As a result there is a lot of documentation to accompany the interface and it can be difficult at first glance to see what it important and what is not. So for those of you who prefer to assemble Ikea furniture first and then read the instructions, here are four easy steps:
1. Create a new Excel workbook (i.e. file) using new().
2. Add a worksheet to the new workbook using add_worksheet().
3. Write to the worksheet using write().
4. close() the file.
Like this:
use Excel::Writer::XLSX;                                   # Step 0

my $workbook = Excel::Writer::XLSX->new( 'perl.xlsx' );    # Step 1
$worksheet = $workbook->add_worksheet();                   # Step 2
$worksheet->write( 'A1', 'Hi Excel!' );                    # Step 3

$workbook->close();                                        # Step 4
This will create an Excel file called perl.xlsx with a single worksheet and the text 'Hi Excel!' in the relevant cell. And that's it. Okay, so there is actually a zeroth step as well, but use module goes without saying. There are many examples that come with the distribution and which you can use to get you started. See "EXAMPLES".
Those of you who read the instructions first and assemble the furniture afterwards will know how to proceed. ;-)
WORKBOOK METHODS
The Excel::Writer::XLSX module provides an object oriented interface to a new Excel workbook. The following methods are available through a new workbook.
new()
add_worksheet()
add_format()
add_chart()
add_shape()
add_vba_project()
set_vba_name()
close()
set_properties()
set_custom_property()
define_name()
set_tempdir()
set_custom_color()
sheets()
get_worksheet_by_name()
set_1904()
set_optimization()
set_calc_mode()
get_default_url_format()
read_only_recommended()
If you are unfamiliar with object oriented interfaces or the way that they are implemented in Perl have a look at perlobj and perltoot in the main Perl documentation.
new()
A new Excel workbook is created using the new() constructor which accepts either a filename or a filehandle as a parameter. The following example creates a new Excel file based on a filename:
my $workbook  = Excel::Writer::XLSX->new( 'filename.xlsx' );
my $worksheet = $workbook->add_worksheet();
$worksheet->write( 0, 0, 'Hi Excel!' );
$workbook->close();
Here are some other examples of using new() with filenames:
my $workbook1 = Excel::Writer::XLSX->new( $filename );
my $workbook2 = Excel::Writer::XLSX->new( '/tmp/filename.xlsx' );
my $workbook3 = Excel::Writer::XLSX->new( "c:\\tmp\\filename.xlsx" );
my $workbook4 = Excel::Writer::XLSX->new( 'c:\tmp\filename.xlsx' );
The last two examples demonstrates how to create a file on DOS or Windows where it is necessary to either escape the directory separator \ or to use single quotes to ensure that it isn't interpolated. For more information see perlfaq5: Why can't I use "C:\temp\foo" in DOS paths?.
It is recommended that the filename uses the extension .xlsx rather than .xls since the latter causes an Excel warning when used with the XLSX format.
The new() constructor returns a Excel::Writer::XLSX object that you can use to add worksheets and store data. It should be noted that although my is not specifically required it defines the scope of the new workbook variable and, in the majority of cases, ensures that the workbook is closed properly without explicitly calling the close() method.
If the file cannot be created, due to file permissions or some other reason, new will return undef. Therefore, it is good practice to check the return value of new before proceeding. As usual the Perl variable $! will be set if there is a file creation error. You will also see one of the warning messages detailed in "DIAGNOSTICS":
my $workbook = Excel::Writer::XLSX->new( 'protected.xlsx' );
die "Problems creating new Excel file: $!" unless defined $workbook;
You can also pass a valid filehandle to the new() constructor. For example in a CGI program you could do something like this:
binmode( STDOUT );
my $workbook = Excel::Writer::XLSX->new( \*STDOUT );
The requirement for binmode() is explained below.
See also, the cgi.pl program in the examples directory of the distro.
In mod_perl programs where you will have to do something like the following:
# mod_perl 1
...
tie *XLSX, 'Apache';
binmode( XLSX );
my $workbook = Excel::Writer::XLSX->new( \*XLSX );
...

# mod_perl 2
...
tie *XLSX => $r;    # Tie to the Apache::RequestRec object
binmode( *XLSX );
my $workbook = Excel::Writer::XLSX->new( \*XLSX );
...
See also, the mod_perl1.pl and mod_perl2.pl programs in the examples directory of the distro.
Filehandles can also be useful if you want to stream an Excel file over a socket or if you want to store an Excel file in a scalar.
For example here is a way to write an Excel file to a scalar:
#!/usr/bin/perl -w

use strict;
use Excel::Writer::XLSX;

open my $fh, '>', \my $str or die "Failed to open filehandle: $!";

my $workbook  = Excel::Writer::XLSX->new( $fh );
my $worksheet = $workbook->add_worksheet();

$worksheet->write( 0, 0, 'Hi Excel!' );

$workbook->close();

# The Excel file in now in $str. Remember to binmode() the output
# filehandle before printing it.
binmode STDOUT;
print $str;
See also the write_to_scalar.pl and filehandle.pl programs in the examples directory of the distro.
Note about the requirement for binmode(). An Excel file is comprised of binary data. Therefore, if you are using a filehandle you should ensure that you binmode() it prior to passing it to new().You should do this regardless of whether you are on a Windows platform or not.
You don't have to worry about binmode() if you are using filenames instead of filehandles. Excel::Writer::XLSX performs the binmode() internally when it converts the filename to a filehandle. For more information about binmode() see perlfunc and perlopentut in the main Perl documentation.
add_worksheet( $sheetname )
At least one worksheet should be added to a new workbook. A worksheet is used to write data into cells:
$worksheet1 = $workbook->add_worksheet();               # Sheet1
$worksheet2 = $workbook->add_worksheet( 'Foglio2' );    # Foglio2
$worksheet3 = $workbook->add_worksheet( 'Data' );       # Data
$worksheet4 = $workbook->add_worksheet();               # Sheet4
If $sheetname is not specified the default Excel convention will be followed, i.e. Sheet1, Sheet2, etc.
The worksheet name must be a valid Excel worksheet name, i.e:
It must be less than 32 characters.
It cannot contain any of the following characters:
[ ] : * ? / \It cannot start or end with an apostrophe.
It cannot be the same as an existing worksheet name (or a case insensitive variant).
Note, the sheetname should not be "History" (case insensitive) which is reserved in English language versions of Excel. Non-English versions may have restrictions on the equivalent word.
See the Excel worksheet naming rules at https://support.office.com/en-ie/article/rename-a-worksheet-3f1f7148-ee83-404d-8ef0-9ff99fbad1f9.
add_format( %properties )
The add_format() method can be used to create new Format objects which are used to apply formatting to a cell. You can either define the properties at creation time via a hash of property values or later via method calls.
$format1 = $workbook->add_format( %props );    # Set properties at creation
$format2 = $workbook->add_format();            # Set properties later
See the "CELL FORMATTING" section for more details about Format properties and how to set them.
add_chart( %properties )
This method is use to create a new chart either as a standalone worksheet (the default) or as an embeddable object that can be inserted into a worksheet via the insert_chart() Worksheet method.
my $chart = $workbook->add_chart( type => 'column' );The properties that can be set are:
type     (required)
subtype  (optional)
name     (optional)
embedded (optional)typeThis is a required parameter. It defines the type of chart that will be created.
my $chart = $workbook->add_chart( type => 'line' );The available types are:
area bar column line pie doughnut scatter stocksubtypeUsed to define a chart subtype where available.
my $chart = $workbook->add_chart( type => 'bar', subtype => 'stacked' );See the Excel::Writer::XLSX::Chart documentation for a list of available chart subtypes.
nameSet the name for the chart sheet. The name property is optional and if it isn't supplied will default to
Chart1 .. n. The name must be a valid Excel worksheet name. Seeadd_worksheet()for more details on valid sheet names. Thenameproperty can be omitted for embedded charts.my $chart = $workbook->add_chart( type => 'line', name => 'Results Chart' );embeddedSpecifies that the Chart object will be inserted in a worksheet via the
insert_chart()Worksheet method. It is an error to try insert a Chart that doesn't have this flag set.my $chart = $workbook->add_chart( type => 'line', embedded => 1 ); # Configure the chart. ... # Insert the chart into the a worksheet. $worksheet->insert_chart( 'E2', $chart );
See Excel::Writer::XLSX::Chart for details on how to configure the chart object once it is created. See also the chart_*.pl programs in the examples directory of the distro.
add_shape( %properties )
The add_shape() method can be used to create new shapes that may be inserted into a worksheet.
You can either define the properties at creation time via a hash of property values or later via method calls.
# Set properties at creation.
$plus = $workbook->add_shape(
type => 'plus',
id => 3,
width => $pw,
height => $ph
);
# Default rectangle shape. Set properties later.
$rect = $workbook->add_shape();See Excel::Writer::XLSX::Shape for details on how to configure the shape object once it is created.
See also the shape*.pl programs in the examples directory of the distro.
add_vba_project( 'vbaProject.bin' )
The add_vba_project() method can be used to add macros or functions to an Excel::Writer::XLSX file using a binary VBA project file that has been extracted from an existing Excel xlsm file.
my $workbook = Excel::Writer::XLSX->new( 'file.xlsm' );
$workbook->add_vba_project( './vbaProject.bin' );The supplied extract_vba utility can be used to extract the required vbaProject.bin file from an existing Excel file:
$ extract_vba file.xlsm
Extracted 'vbaProject.bin' successfullyMacros can be tied to buttons using the worksheet insert_button() method (see the "WORKSHEET METHODS" section for details):
$worksheet->insert_button( 'C2', { macro => 'my_macro' } );Note, Excel uses the file extension xlsm instead of xlsx for files that contain macros. It is advisable to follow the same convention.
See also the macros.pl example file and the "WORKING WITH VBA MACROS".
set_vba_name()
The set_vba_name() method can be used to set the VBA codename for the workbook. This is sometimes required when a vbaProject macro included via add_vba_project() refers to the workbook. The default Excel VBA name of ThisWorkbook is used if a user defined name isn't specified. See also "WORKING WITH VBA MACROS".
close()
In general your Excel file will be closed automatically when your program ends or when the Workbook object goes out of scope. However it is recommended to explicitly call the close() method close the Excel file and avoid the potential issues outlined below. The close() method is called like this:
$workbook->close();The return value of close() is the same as that returned by perl when it closes the file created by new(). This allows you to handle error conditions in the usual way:
$workbook->close() or die "Error closing file: $!";An explicit close() is required if the file must be closed prior to performing some external action on it such as copying it, reading its size or attaching it to an email.
In addition, close() may be required to prevent perl's garbage collector from disposing of the Workbook, Worksheet and Format objects in the wrong order. Situations where this can occur are:
If
my()was not used to declare the scope of a workbook variable created usingnew().If the
new(),add_worksheet()oradd_format()methods are called in subroutines.
The reason for this is that Excel::Writer::XLSX relies on Perl's DESTROY mechanism to trigger destructor methods in a specific sequence. This may not happen in cases where the Workbook, Worksheet and Format variables are not lexically scoped or where they have different lexical scopes.
To avoid these issues it is recommended that you always close the Excel::Writer::XLSX filehandle using close().
set_size( $width, $height )
The set_size() method can be used to set the size of a workbook window.
$workbook->set_size(1200, 800);The Excel window size was used in Excel 2007 to define the width and height of a workbook window within the Multiple Document Interface (MDI). In later versions of Excel for Windows this interface was dropped. This method is currently only useful when setting the window size in Excel for Mac 2011. The units are pixels and the default size is 1073 x 644.
Note, this doesn't equate exactly to the Excel for Mac pixel size since it is based on the original Excel 2007 for Windows sizing.
set_tab_ratio( $tab_ratio )
The set_tab_ratio() method can be used to set the ratio between worksheet tabs and the horizontal slider at the bottom of a workbook. This can be increased to give more room to the tabs or reduced to increase the size of the horizontal slider:
$workbook->set_tab_ratio(75);The default value in Excel is 60.
set_properties()
The set_properties method can be used to set the document properties of the Excel file created by Excel::Writer::XLSX. These properties are visible when you use the Office Button -> Prepare -> Properties option in Excel and are also available to external applications that read or index Windows files.
The properties should be passed in hash format as follows:
$workbook->set_properties(
title => 'This is an example spreadsheet',
author => 'John McNamara',
comments => 'Created with Perl and Excel::Writer::XLSX',
);The properties that can be set are:
title
subject
author
manager
company
category
keywords
comments
status
hyperlink_base
created - File create date. Should be an aref of gmtime() values.See also the properties.pl program in the examples directory of the distro.
set_custom_property( $name, $value, $type)
The set_custom_property method can be used to set one of more custom document properties not covered by the set_properties() method above. These properties are visible when you use the Office Button -> Prepare -> Properties -> Advanced Properties -> Custom option in Excel and are also available to external applications that read or index Windows files.
The set_custom_property method takes 3 parameters:
$workbook-> set_custom_property( $name, $value, $type);Where the available types are:
text
date
number
boolFor example:
$workbook->set_custom_property( 'Checked by', 'Eve', 'text' );
$workbook->set_custom_property( 'Date completed', '2016-12-12T23:00:00Z', 'date' );
$workbook->set_custom_property( 'Document number', '12345' , 'number' );
$workbook->set_custom_property( 'Reference', '1.2345', 'number' );
$workbook->set_custom_property( 'Has review', 1, 'bool' );
$workbook->set_custom_property( 'Signed off', 0, 'bool' );
$workbook->set_custom_property( 'Department', $some_string, 'text' );
$workbook->set_custom_property( 'Scale', '1.2345678901234', 'number' );Dates should by in ISO8601 yyyy-mm-ddThh:mm:ss.sssZ date format in Zulu time, as shown above.
The text and number types are optional since they can usually be inferred from the data:
$workbook->set_custom_property( 'Checked by', 'Eve' );
$workbook->set_custom_property( 'Reference', '1.2345' );The $name and $value parameters are limited to 255 characters by Excel.
define_name()
This method is used to defined a name that can be used to represent a value, a single cell or a range of cells in a workbook.
For example to set a global/workbook name:
# Global/workbook names.
$workbook->define_name( 'Exchange_rate', '=0.96' );
$workbook->define_name( 'Sales', '=Sheet1!$G$1:$H$10' );It is also possible to define a local/worksheet name by prefixing the name with the sheet name using the syntax sheetname!definedname:
# Local/worksheet name.
$workbook->define_name( 'Sheet2!Sales', '=Sheet2!$G$1:$G$10' );If the sheet name contains spaces or special characters you must enclose it in single quotes like in Excel:
$workbook->define_name( "'New Data'!Sales", '=Sheet2!$G$1:$G$10' );See the defined_name.pl program in the examples dir of the distro.
Refer to the following to see Excel's syntax rules for defined names: http://office.microsoft.com/en-001/excel-help/define-and-use-names-in-formulas-HA010147120.aspx#BMsyntax_rules_for_names
set_tempdir()
Excel::Writer::XLSX stores worksheet data in temporary files prior to assembling the final workbook.
The File::Temp module is used to create these temporary files. File::Temp uses File::Spec to determine an appropriate location for these files such as /tmp or c:\windows\temp. You can find out which directory is used on your system as follows:
perl -MFile::Spec -le "print File::Spec->tmpdir()"If the default temporary file directory isn't accessible to your application, or doesn't contain enough space, you can specify an alternative location using the set_tempdir() method:
$workbook->set_tempdir( '/tmp/writeexcel' );
$workbook->set_tempdir( 'c:\windows\temp\writeexcel' );The directory for the temporary file must exist, set_tempdir() will not create a new directory.
set_custom_color( $index, $red, $green, $blue )
The method is maintained for backward compatibility with Spreadsheet::WriteExcel. Excel::Writer::XLSX programs don't require this method and colours can be specified using a Html style #RRGGBB value, see "WORKING WITH COLOURS".
sheets( 0, 1, ... )
The sheets() method returns a list, or a sliced list, of the worksheets in a workbook.
If no arguments are passed the method returns a list of all the worksheets in the workbook. This is useful if you want to repeat an operation on each worksheet:
for $worksheet ( $workbook->sheets() ) {
print $worksheet->get_name();
}You can also specify a slice list to return one or more worksheet objects:
$worksheet = $workbook->sheets( 0 );
$worksheet->write( 'A1', 'Hello' );Or since the return value from sheets() is a reference to a worksheet object you can write the above example as:
$workbook->sheets( 0 )->write( 'A1', 'Hello' );The following example returns the first and last worksheet in a workbook:
for $worksheet ( $workbook->sheets( 0, -1 ) ) {
# Do something
}Array slices are explained in the perldata manpage.
get_worksheet_by_name()
The get_worksheet_by_name() function return a worksheet or chartsheet object in the workbook using the sheetname:
$worksheet = $workbook->get_worksheet_by_name('Sheet1');set_1904()
Excel stores dates as real numbers where the integer part stores the number of days since the epoch and the fractional part stores the percentage of the day. The epoch can be either 1900 or 1904. Excel for Windows uses 1900 and Excel for Macintosh uses 1904. However, Excel on either platform will convert automatically between one system and the other.
Excel::Writer::XLSX stores dates in the 1900 format by default. If you wish to change this you can call the set_1904() workbook method. You can query the current value by calling the get_1904() workbook method. This returns 0 for 1900 and 1 for 1904.
See also "DATES AND TIME IN EXCEL" for more information about working with Excel's date system.
In general you probably won't need to use set_1904().
set_optimization()
The set_optimization() method is used to turn on optimizations in the Excel::Writer::XLSX module. Currently there is only one optimization available and that is to reduce memory usage.
$workbook->set_optimization();See "SPEED AND MEMORY USAGE" for more background information.
Note, that with this optimization turned on a row of data is written and then discarded when a cell in a new row is added via one of the Worksheet write_*() methods. As such data should be written in sequential row order once the optimization is turned on.
This method must be called before any calls to add_worksheet().
set_calc_mode( $mode )
Set the calculation mode for formulas in the workbook. This is mainly of use for workbooks with slow formulas where you want to allow the user to calculate them manually.
The mode parameter can be one of the following strings:
auto-
The default. Excel will re-calculate formulas when a formula or a value affecting the formula changes.
manual-
Only re-calculate formulas when the user requires it. Generally by pressing F9.
auto_except_tables-
Excel will automatically re-calculate formulas except for tables.
get_default_url_format()
The get_default_url_format() method gets a copy of the default url format used when a user defined format isn't specified with the worksheet write_url() method. The format is the hyperlink style defined by Excel for the default theme:
my $url_format = $workbook->get_default_url_format();read_only_recommended()
The read_only_recommended() method can be used to set the Excel "Read-only Recommended" option that is available when saving a file. This presents the user of the file with an option to open it in "read-only" mode. This means that any changes to the file can't be saved back to the same file and must be saved to a new file. It can be set as follows:
$workbook->read_only_recommended();WORKSHEET METHODS
A new worksheet is created by calling the add_worksheet() method from a workbook object:
$worksheet1 = $workbook->add_worksheet();
$worksheet2 = $workbook->add_worksheet();The following methods are available through a new worksheet:
write()
write_number()
write_string()
write_rich_string()
keep_leading_zeros()
write_blank()
write_row()
write_col()
write_date_time()
write_url()
write_url_range()
write_formula()
write_boolean()
write_comment()
show_comments()
set_comments_author()
add_write_handler()
insert_image()
embed_image()
insert_chart()
insert_shape()
insert_button()
data_validation()
conditional_formatting()
add_sparkline()
add_table()
get_name()
activate()
select()
hide()
very_hidden()
set_first_sheet()
protect()
unprotect_range()
set_selection()
set_top_left_cell()
set_row()
set_row_pixels()
set_default_row()
set_column()
set_column_pixels()
outline_settings()
freeze_panes()
split_panes()
merge_range()
merge_range_type()
set_zoom()
right_to_left()
hide_zero()
set_background()
set_tab_color()
autofilter()
filter_column()
filter_column_list()
set_vba_name()
ignore_errors()Cell notation
Excel::Writer::XLSX supports two forms of notation to designate the position of cells: Row-column notation and A1 notation.
Row-column notation uses a zero based index for both row and column while A1 notation uses the standard Excel alphanumeric sequence of column letter and 1-based row. For example:
(0, 0) # The top left cell in row-column notation.
('A1') # The top left cell in A1 notation.
(1999, 29) # Row-column notation.
('AD2000') # The same cell in A1 notation.Row-column notation is useful if you are referring to cells programmatically:
for my $i ( 0 .. 9 ) {
$worksheet->write( $i, 0, 'Hello' ); # Cells A1 to A10
}A1 notation is useful for setting up a worksheet manually and for working with formulas:
$worksheet->write( 'H1', 200 );
$worksheet->write( 'H2', '=H1+1' );In formulas and applicable methods you can also use the A:A column notation:
$worksheet->write( 'A1', '=SUM(B:B)' );The Excel::Writer::XLSX::Utility module that is included in the distro contains helper functions for dealing with A1 notation, for example:
use Excel::Writer::XLSX::Utility;
( $row, $col ) = xl_cell_to_rowcol( 'C2' ); # (1, 2)
$str = xl_rowcol_to_cell( 1, 2 ); # C2For simplicity, the parameter lists for the worksheet method calls in the following sections are given in terms of row-column notation. In all cases it is also possible to use A1 notation.
Note: in Excel it is also possible to use a R1C1 notation. This is not supported by Excel::Writer::XLSX.
write( $row, $column, $token, $format )
Excel makes a distinction between data types such as strings, numbers, blanks, formulas and hyperlinks. To simplify the process of writing data the write() method acts as a general alias for several more specific methods:
write_string()
write_number()
write_blank()
write_formula()
write_url()
write_row()
write_col()The general rule is that if the data looks like a something then a something is written. Here are some examples in both row-column and A1 notation:
# Same as:
$worksheet->write( 0, 0, 'Hello' ); # write_string()
$worksheet->write( 1, 0, 'One' ); # write_string()
$worksheet->write( 2, 0, 2 ); # write_number()
$worksheet->write( 3, 0, 3.00001 ); # write_number()
$worksheet->write( 4, 0, "" ); # write_blank()
$worksheet->write( 5, 0, '' ); # write_blank()
$worksheet->write( 6, 0, undef ); # write_blank()
$worksheet->write( 7, 0 ); # write_blank()
$worksheet->write( 8, 0, 'http://www.perl.com/' ); # write_url()
$worksheet->write( 'A9', 'ftp://ftp.cpan.org/' ); # write_url()
$worksheet->write( 'A10', 'internal:Sheet1!A1' ); # write_url()
$worksheet->write( 'A11', 'external:c:\foo.xlsx' ); # write_url()
$worksheet->write( 'A12', '=A3 + 3*A4' ); # write_formula()
$worksheet->write( 'A13', '=SIN(PI()/4)' ); # write_formula()
$worksheet->write( 'A14', \@array ); # write_row()
$worksheet->write( 'A15', [\@array] ); # write_col()
# And if the keep_leading_zeros property is set:
$worksheet->write( 'A16', '2' ); # write_number()
$worksheet->write( 'A17', '02' ); # write_string()
$worksheet->write( 'A18', '00002' ); # write_string()
# Write an array formula. Not available in Spreadsheet::WriteExcel.
$worksheet->write( 'A19', '{=SUM(A1:B1*A2:B2)}' ); # write_formula()The "looks like" rule is defined by regular expressions:
write_number() if $token is a number based on the following regex: $token =~ /^([+-]?)(?=\d|\.\d)\d*(\.\d*)?([Ee]([+-]?\d+))?$/.
write_string() if keep_leading_zeros() is set and $token is an integer with leading zeros based on the following regex: $token =~ /^0\d+$/.
write_blank() if $token is undef or a blank string: undef, "" or ''.
write_url() if $token is a http, https, ftp or mailto URL based on the following regexes: $token =~ m|^[fh]tt?ps?://| or $token =~ m|^mailto:|.
write_url() if $token is an internal or external sheet reference based on the following regex: $token =~ m[^(in|ex)ternal:].
write_formula() if the first character of $token is "=".
write_array_formula() if the $token matches /^{=.*}$/.
write_row() if $token is an array ref.
write_col() if $token is an array ref of array refs.
write_string() if none of the previous conditions apply.
The $format parameter is optional. It should be a valid Format object, see "CELL FORMATTING":
my $format = $workbook->add_format();
$format->set_bold();
$format->set_color( 'red' );
$format->set_align( 'center' );
$worksheet->write( 4, 0, 'Hello', $format ); # Formatted stringThe write() method will ignore empty strings or undef tokens unless a format is also supplied. As such you needn't worry about special handling for empty or undef values in your data. See also the write_blank() method.
One problem with the write() method is that occasionally data looks like a number but you don't want it treated as a number. For example, zip codes or ID numbers often start with a leading zero. If you write this data as a number then the leading zero(s) will be stripped. You can change this default behaviour by using the keep_leading_zeros() method. While this property is in place any integers with leading zeros will be treated as strings and the zeros will be preserved. See the keep_leading_zeros() section for a full discussion of this issue.
You can also add your own data handlers to the write() method using add_write_handler().
The write() method will also handle Unicode strings in UTF-8 format.
The write methods return:
0 for success.
-1 for insufficient number of arguments.
-2 for row or column out of bounds.
-3 for string too long.write_number( $row, $column, $number, $format )
Write an integer or a float to the cell specified by $row and $column:
$worksheet->write_number( 0, 0, 123456 );
$worksheet->write_number( 'A2', 2.3451 );See the note about "Cell notation". The $format parameter is optional.
In general it is sufficient to use the write() method.
Note: some versions of Excel 2007 do not display the calculated values of formulas written by Excel::Writer::XLSX. Applying all available Service Packs to Excel should fix this.
write_string( $row, $column, $string, $format )
Write a string to the cell specified by $row and $column:
$worksheet->write_string( 0, 0, 'Your text here' );
$worksheet->write_string( 'A2', 'or here' );The maximum string size is 32767 characters. However the maximum string segment that Excel can display in a cell is 1000. All 32767 characters can be displayed in the formula bar.
The $format parameter is optional.
The write() method will also handle strings in UTF-8 format. See also the unicode_*.pl programs in the examples directory of the distro.
In general it is sufficient to use the write() method. However, you may sometimes wish to use the write_string() method to write data that looks like a number but that you don't want treated as a number. For example, zip codes or phone numbers:
# Write as a plain string
$worksheet->write_string( 'A1', '01209' );However, if the user edits this string Excel may convert it back to a number. To get around this you can use the Excel text format @:
# Format as a string. Doesn't change to a number when edited
my $format1 = $workbook->add_format( num_format => '@' );
$worksheet->write_string( 'A2', '01209', $format1 );See also the note about "Cell notation".
write_rich_string( $row, $column, $format, $string, ..., $cell_format )
The write_rich_string() method is used to write strings with multiple formats. For example to write the string "This is bold and this is italic" you would use the following:
my $bold = $workbook->add_format( bold => 1 );
my $italic = $workbook->add_format( italic => 1 );
$worksheet->write_rich_string( 'A1',
'This is ', $bold, 'bold', ' and this is ', $italic, 'italic' );The basic rule is to break the string into fragments and put a $format object before the fragment that you want to format. For example:
# Unformatted string.
'This is an example string'
# Break it into fragments.
'This is an ', 'example', ' string'
# Add formatting before the fragments you want formatted.
'This is an ', $format, 'example', ' string'
# In Excel::Writer::XLSX.
$worksheet->write_rich_string( 'A1',
'This is an ', $format, 'example', ' string' );String fragments that don't have a format are given a default format. So for example when writing the string "Some bold text" you would use the first example below but it would be equivalent to the second:
# With default formatting:
my $bold = $workbook->add_format( bold => 1 );
$worksheet->write_rich_string( 'A1',
'Some ', $bold, 'bold', ' text' );
# Or more explicitly:
my $bold = $workbook->add_format( bold => 1 );
my $default = $workbook->add_format();
$worksheet->write_rich_string( 'A1',
$default, 'Some ', $bold, 'bold', $default, ' text' );As with Excel, only the font properties of the format such as font name, style, size, underline, color and effects are applied to the string fragments. Other features such as border, background, text wrap and alignment must be applied to the cell.
The write_rich_string() method allows you to do this by using the last argument as a cell format (if it is a format object). The following example centers a rich string in the cell:
my $bold = $workbook->add_format( bold => 1 );
my $center = $workbook->add_format( align => 'center' );
$worksheet->write_rich_string( 'A5',
'Some ', $bold, 'bold text', ' centered', $center );See the rich_strings.pl example in the distro for more examples.
my $bold = $workbook->add_format( bold => 1 );
my $italic = $workbook->add_format( italic => 1 );
my $red = $workbook->add_format( color => 'red' );
my $blue = $workbook->add_format( color => 'blue' );
my $center = $workbook->add_format( align => 'center' );
my $super = $workbook->add_format( font_script => 1 );
# Write some strings with multiple formats.
$worksheet->write_rich_string( 'A1',
'This is ', $bold, 'bold', ' and this is ', $italic, 'italic' );
$worksheet->write_rich_string( 'A3',
'This is ', $red, 'red', ' and this is ', $blue, 'blue' );
$worksheet->write_rich_string( 'A5',
'Some ', $bold, 'bold text', ' centered', $center );
$worksheet->write_rich_string( 'A7',
$italic, 'j = k', $super, '(n-1)', $center );
As with write_sting() the maximum string size is 32767 characters. See also the note about "Cell notation".
keep_leading_zeros()
This method changes the default handling of integers with leading zeros when using the write() method.
The write() method uses regular expressions to determine what type of data to write to an Excel worksheet. If the data looks like a number it writes a number using write_number(). One problem with this approach is that occasionally data looks like a number but you don't want it treated as a number.
Zip codes and ID numbers, for example, often start with a leading zero. If you write this data as a number then the leading zero(s) will be stripped. This is the also the default behaviour when you enter data manually in Excel.
To get around this you can use one of three options. Write a formatted number, write the number as a string or use the keep_leading_zeros() method to change the default behaviour of write():
# Implicitly write a number, the leading zero is removed: 1209
$worksheet->write( 'A1', '01209' );
# Write a zero padded number using a format: 01209
my $format1 = $workbook->add_format( num_format => '00000' );
$worksheet->write( 'A2', '01209', $format1 );
# Write explicitly as a string: 01209
$worksheet->write_string( 'A3', '01209' );
# Write implicitly as a string: 01209
$worksheet->keep_leading_zeros();
$worksheet->write( 'A4', '01209' );The above code would generate a worksheet that looked like the following:
-----------------------------------------------------------
| | A | B | C | D | ...
-----------------------------------------------------------
| 1 | 1209 | | | | ...
| 2 | 01209 | | | | ...
| 3 | 01209 | | | | ...
| 4 | 01209 | | | | ...The examples are on different sides of the cells due to the fact that Excel displays strings with a left justification and numbers with a right justification by default. You can change this by using a format to justify the data, see "CELL FORMATTING".
It should be noted that if the user edits the data in examples A3 and A4 the strings will revert back to numbers. Again this is Excel's default behaviour. To avoid this you can use the text format @:
# Format as a string (01209)
my $format2 = $workbook->add_format( num_format => '@' );
$worksheet->write_string( 'A5', '01209', $format2 );The keep_leading_zeros() property is off by default. The keep_leading_zeros() method takes 0 or 1 as an argument. It defaults to 1 if an argument isn't specified:
$worksheet->keep_leading_zeros(); # Set on
$worksheet->keep_leading_zeros( 1 ); # Set on
$worksheet->keep_leading_zeros( 0 ); # Set offSee also the add_write_handler() method.
write_blank( $row, $column, $format )
Write a blank cell specified by $row and $column:
$worksheet->write_blank( 0, 0, $format );This method is used to add formatting to a cell which doesn't contain a string or number value.
Excel differentiates between an "Empty" cell and a "Blank" cell. An "Empty" cell is a cell which doesn't contain data whilst a "Blank" cell is a cell which doesn't contain data but does contain formatting. Excel stores "Blank" cells but ignores "Empty" cells.
As such, if you write an empty cell without formatting it is ignored:
$worksheet->write( 'A1', undef, $format ); # write_blank()
$worksheet->write( 'A2', undef ); # IgnoredThis seemingly uninteresting fact means that you can write arrays of data without special treatment for undef or empty string values.
See the note about "Cell notation".
write_row( $row, $column, $array_ref, $format )
The write_row() method can be used to write a 1D or 2D array of data in one go. This is useful for converting the results of a database query into an Excel worksheet. You must pass a reference to the array of data rather than the array itself. The write() method is then called for each element of the data. For example:
@array = ( 'awk', 'gawk', 'mawk' );
$array_ref = \@array;
$worksheet->write_row( 0, 0, $array_ref );
# The above example is equivalent to:
$worksheet->write( 0, 0, $array[0] );
$worksheet->write( 0, 1, $array[1] );
$worksheet->write( 0, 2, $array[2] );Note: For convenience the write() method behaves in the same way as write_row() if it is passed an array reference. Therefore the following two method calls are equivalent:
$worksheet->write_row( 'A1', $array_ref ); # Write a row of data
$worksheet->write( 'A1', $array_ref ); # Same thingAs with all of the write methods the $format parameter is optional. If a format is specified it is applied to all the elements of the data array.
Array references within the data will be treated as columns. This allows you to write 2D arrays of data in one go. For example:
@eec = (
['maggie', 'milly', 'molly', 'may' ],
[13, 14, 15, 16 ],
['shell', 'star', 'crab', 'stone']
);
$worksheet->write_row( 'A1', \@eec );Would produce a worksheet as follows:
-----------------------------------------------------------
| | A | B | C | D | E | ...
-----------------------------------------------------------
| 1 | maggie | 13 | shell | ... | ... | ...
| 2 | milly | 14 | star | ... | ... | ...
| 3 | molly | 15 | crab | ... | ... | ...
| 4 | may | 16 | stone | ... | ... | ...
| 5 | ... | ... | ... | ... | ... | ...
| 6 | ... | ... | ... | ... | ... | ...To write the data in a row-column order refer to the write_col() method below.
Any undef values in the data will be ignored unless a format is applied to the data, in which case a formatted blank cell will be written. In either case the appropriate row or column value will still be incremented.
To find out more about array references refer to perlref and perlreftut in the main Perl documentation. To find out more about 2D arrays or "lists of lists" refer to perllol.
The write_row() method returns the first error encountered when writing the elements of the data or zero if no errors were encountered. See the return values described for the write() method above.
The write_row() method allows the following idiomatic conversion of a text file to an Excel file:
#!/usr/bin/perl -w
use strict;
use Excel::Writer::XLSX;
my $workbook = Excel::Writer::XLSX->new( 'file.xlsx' );
my $worksheet = $workbook->add_worksheet();
open INPUT, 'file.txt' or die "Couldn't open file: $!";
$worksheet->write( $. -1, 0, [split] ) while <INPUT>;
$workbook->close();write_col( $row, $column, $array_ref, $format )
The write_col() method can be used to write a 1D or 2D array of data in one go. This is useful for converting the results of a database query into an Excel worksheet. You must pass a reference to the array of data rather than the array itself. The write() method is then called for each element of the data. For example:
@array = ( 'awk', 'gawk', 'mawk' );
$array_ref = \@array;
$worksheet->write_col( 0, 0, $array_ref );
# The above example is equivalent to:
$worksheet->write( 0, 0, $array[0] );
$worksheet->write( 1, 0, $array[1] );
$worksheet->write( 2, 0, $array[2] );As with all of the write methods the $format parameter is optional. If a format is specified it is applied to all the elements of the data array.
Array references within the data will be treated as rows. This allows you to write 2D arrays of data in one go. For example:
@eec = (
['maggie', 'milly', 'molly', 'may' ],
[13, 14, 15, 16 ],
['shell', 'star', 'crab', 'stone']
);
$worksheet->write_col( 'A1', \@eec );Would produce a worksheet as follows:
-----------------------------------------------------------
| | A | B | C | D | E | ...
-----------------------------------------------------------
| 1 | maggie | milly | molly | may | ... | ...
| 2 | 13 | 14 | 15 | 16 | ... | ...
| 3 | shell | star | crab | stone | ... | ...
| 4 | ... | ... | ... | ... | ... | ...
| 5 | ... | ... | ... | ... | ... | ...
| 6 | ... | ... | ... | ... | ... | ...To write the data in a column-row order refer to the write_row() method above.
Any undef values in the data will be ignored unless a format is applied to the data, in which case a formatted blank cell will be written. In either case the appropriate row or column value will still be incremented.
As noted above the write() method can be used as a synonym for write_row() and write_row() handles nested array refs as columns. Therefore, the following two method calls are equivalent although the more explicit call to write_col() would be preferable for maintainability:
$worksheet->write_col( 'A1', $array_ref ); # Write a column of data
$worksheet->write( 'A1', [ $array_ref ] ); # Same thingTo find out more about array references refer to perlref and perlreftut in the main Perl documentation. To find out more about 2D arrays or "lists of lists" refer to perllol.
The write_col() method returns the first error encountered when writing the elements of the data or zero if no errors were encountered. See the return values described for the write() method above.
write_date_time( $row, $col, $date_string, $format )
The write_date_time() method can be used to write a date or time to the cell specified by $row and $column:
$worksheet->write_date_time( 'A1', '2004-05-13T23:20', $date_format );The $date_string should be in the following format:
yyyy-mm-ddThh:mm:ss.sssThis conforms to an ISO8601 date but it should be noted that the full range of ISO8601 formats are not supported.
The following variations on the $date_string parameter are permitted:
yyyy-mm-ddThh:mm:ss.sss # Standard format
yyyy-mm-ddT # No time
Thh:mm:ss.sss # No date
yyyy-mm-ddThh:mm:ss.sssZ # Additional Z (but not time zones)
yyyy-mm-ddThh:mm:ss # No fractional seconds
yyyy-mm-ddThh:mm # No secondsNote that the T is required in all cases.
A date should always have a $format, otherwise it will appear as a number, see "DATES AND TIME IN EXCEL" and "CELL FORMATTING". Here is a typical example:
my $date_format = $workbook->add_format( num_format => 'mm/dd/yy' );
$worksheet->write_date_time( 'A1', '2004-05-13T23:20', $date_format );Valid dates should be in the range 1900-01-01 to 9999-12-31, for the 1900 epoch and 1904-01-01 to 9999-12-31, for the 1904 epoch. As with Excel, dates outside these ranges will be written as a string.
See also the date_time.pl program in the examples directory of the distro.
write_url( $row, $col, $url, $format, $label )
Write a hyperlink to a URL in the cell specified by $row and $column. The hyperlink is comprised of two elements: the visible label and the invisible link. The visible label is the same as the link unless an alternative label is specified. The $label parameter is optional. The label is written using the write() method. Therefore it is possible to write strings, numbers or formulas as labels.
The $format parameter is also optional and the default Excel hyperlink style will be used if it isn't specified. If required you can access the default url format using the Workbook get_default_url_format method:
my $url_format = $workbook->get_default_url_format();There are four web style URI's supported: http://, https://, ftp:// and mailto::
$worksheet->write_url( 0, 0, 'ftp://www.perl.org/' );
$worksheet->write_url( 'A3', 'http://www.perl.com/' );
$worksheet->write_url( 'A4', 'mailto:jmcnamara@cpan.org' );You can display an alternative string using the $label parameter:
$worksheet->write_url( 1, 0, 'http://www.perl.com/', undef, 'Perl' );If you wish to have some other cell data such as a number or a formula you can overwrite the cell using another call to write_*():
$worksheet->write_url( 'A1', 'http://www.perl.com/' );
# Overwrite the URL string with a formula. The cell is still a link.
# Note the use of the default url format for consistency with other links.
my $url_format = $workbook->get_default_url_format();
$worksheet->write_formula( 'A1', '=1+1', $url_format );There are two local URIs supported: internal: and external:. These are used for hyperlinks to internal worksheet references or external workbook and worksheet references:
$worksheet->write_url( 'A6', 'internal:Sheet2!A1' );
$worksheet->write_url( 'A7', 'internal:Sheet2!A1' );
$worksheet->write_url( 'A8', 'internal:Sheet2!A1:B2' );
$worksheet->write_url( 'A9', q{internal:'Sales Data'!A1} );
$worksheet->write_url( 'A10', 'external:c:\temp\foo.xlsx' );
$worksheet->write_url( 'A11', 'external:c:\foo.xlsx#Sheet2!A1' );
$worksheet->write_url( 'A12', 'external:..\foo.xlsx' );
$worksheet->write_url( 'A13', 'external:..\foo.xlsx#Sheet2!A1' );
$worksheet->write_url( 'A13', 'external:\\\\NET\share\foo.xlsx' );All of the these URI types are recognised by the write() method, see above.
Worksheet references are typically of the form Sheet1!A1. You can also refer to a worksheet range using the standard Excel notation: Sheet1!A1:B2.
In external links the workbook and worksheet name must be separated by the # character: external:Workbook.xlsx#Sheet1!A1'.
You can also link to a named range in the target worksheet. For example say you have a named range called my_name in the workbook c:\temp\foo.xlsx you could link to it as follows:
$worksheet->write_url( 'A14', 'external:c:\temp\foo.xlsx#my_name' );Excel requires that worksheet names containing spaces or non alphanumeric characters are single quoted as follows 'Sales Data'!A1. If you need to do this in a single quoted string then you can either escape the single quotes \' or use the quote operator q{} as described in perlop in the main Perl documentation.
Links to network files are also supported. MS/Novell Network files normally begin with two back slashes as follows \\NETWORK\etc. In order to generate this in a single or double quoted string you will have to escape the backslashes, '\\\\NETWORK\etc'.
If you are using double quote strings then you should be careful to escape anything that looks like a metacharacter. For more information see perlfaq5: Why can't I use "C:\temp\foo" in DOS paths?.
Finally, you can avoid most of these quoting problems by using forward slashes. These are translated internally to backslashes:
$worksheet->write_url( 'A14', "external:c:/temp/foo.xlsx" );
$worksheet->write_url( 'A15', 'external://NETWORK/share/foo.xlsx' );Note: Excel::Writer::XLSX will escape the following characters in URLs as required by Excel: \s " < > \ [ ] ` ^ { } unless the URL already contains %xx style escapes. In which case it is assumed that the URL was escaped correctly by the user and will by passed directly to Excel.
Versions of Excel prior to Excel 2015 limited hyperlink links and anchor/locations to 255 characters each. Versions after that support urls up to 2079 characters. Excel::Writer::XLSX versions >= 1.0.2 support the new longer limit by default.
See also, the note about "Cell notation".
write_formula( $row, $column, $formula, $format, $value )
Write a formula or function to the cell specified by $row and $column:
$worksheet->write_formula( 0, 0, '=$B$3 + B4' );
$worksheet->write_formula( 1, 0, '=SIN(PI()/4)' );
$worksheet->write_formula( 2, 0, '=SUM(B1:B5)' );
$worksheet->write_formula( 'A4', '=IF(A3>1,"Yes", "No")' );
$worksheet->write_formula( 'A5', '=AVERAGE(1, 2, 3, 4)' );
$worksheet->write_formula( 'A6', '=DATEVALUE("1-Jan-2001")' );Array formulas are also supported:
$worksheet->write_formula( 'A7', '{=SUM(A1:B1*A2:B2)}' );See also the write_array_formula() method below.
See the note about "Cell notation". For more information about writing Excel formulas see "FORMULAS AND FUNCTIONS IN EXCEL"
If required, it is also possible to specify the calculated value of the formula. This is occasionally necessary when working with non-Excel applications that don't calculate the value of the formula. The calculated $value is added at the end of the argument list:
$worksheet->write( 'A1', '=2+2', $format, 4 );However, this probably isn't something that you will ever need to do. If you do use this feature then do so with care.
write_array_formula($first_row, $first_col, $last_row, $last_col, $formula, $format, $value)
Write an array formula to a cell range. In Excel an array formula is a formula that performs a calculation on a set of values. It can return a single value or a range of values.
An array formula is indicated by a pair of braces around the formula: {=SUM(A1:B1*A2:B2)}. If the array formula returns a single value then the $first_ and $last_ parameters should be the same:
$worksheet->write_array_formula('A1:A1', '{=SUM(B1:C1*B2:C2)}');It this case however it is easier to just use the write_formula() or write() methods:
# Same as above but more concise.
$worksheet->write( 'A1', '{=SUM(B1:C1*B2:C2)}' );
$worksheet->write_formula( 'A1', '{=SUM(B1:C1*B2:C2)}' );For array formulas that return a range of values you must specify the range that the return values will be written to:
$worksheet->write_array_formula( 'A1:A3', '{=TREND(C1:C3,B1:B3)}' );
$worksheet->write_array_formula( 0, 0, 2, 0, '{=TREND(C1:C3,B1:B3)}' );If required, it is also possible to specify the calculated value of the formula. This is occasionally necessary when working with non-Excel applications that don't calculate the value of the formula. However, using this parameter only writes a single value to the upper left cell in the result array. For a multi-cell array formula where the results are required, the other result values can be specified by using write_number() to write to the appropriate cell:
# Specify the result for a single cell range.
$worksheet->write_array_formula( 'A1:A3', '{=SUM(B1:C1*B2:C2)}, $format, 2005 );
# Specify the results for a multi cell range.
$worksheet->write_array_formula( 'A1:A3', '{=TREND(C1:C3,B1:B3)}', $format, 105 );
$worksheet->write_number( 'A2', 12, format );
$worksheet->write_number( 'A3', 14, format );In addition, some early versions of Excel 2007 don't calculate the values of array formulas when they aren't supplied. Installing the latest Office Service Pack should fix this issue.
See also the array_formula.pl program in the examples directory of the distro.
Note: Array formulas are not supported by Spreadsheet::WriteExcel.
write_boolean( $row, $column, $value, $format )
Write an Excel boolean value to the cell specified by $row and $column:
$worksheet->write_boolean( 'A1', 1 ); # TRUE
$worksheet->write_boolean( 'A2', 0 ); # FALSE
$worksheet->write_boolean( 'A3', undef ); # FALSE
$worksheet->write_boolean( 'A3', 0, $format ); # FALSE, with format.A $value that is true or false using Perl's rules will be written as an Excel boolean TRUE or FALSE value.
See the note about "Cell notation".
store_formula( $formula )
Deprecated. This is a Spreadsheet::WriteExcel method that is no longer required by Excel::Writer::XLSX. See below.
repeat_formula( $row, $col, $formula, $format )
Deprecated. This is a Spreadsheet::WriteExcel method that is no longer required by Excel::Writer::XLSX.
In Spreadsheet::WriteExcel it was computationally expensive to write formulas since they were parsed by a recursive descent parser. The store_formula() and repeat_formula() methods were used as a way of avoiding the overhead of repeated formulas by reusing a pre-parsed formula.
In Excel::Writer::XLSX this is no longer necessary since it is just as quick to write a formula as it is to write a string or a number.
The methods remain for backward compatibility but new Excel::Writer::XLSX programs shouldn't use them.
write_comment( $row, $column, $string, ... )
The write_comment() method is used to add a comment to a cell. A cell comment is indicated in Excel by a small red triangle in the upper right-hand corner of the cell. Moving the cursor over the red triangle will reveal the comment.
The following example shows how to add a comment to a cell:
$worksheet->write ( 2, 2, 'Hello' );
$worksheet->write_comment( 2, 2, 'This is a comment.' );As usual you can replace the $row and $column parameters with an A1 cell reference. See the note about "Cell notation".
$worksheet->write ( 'C3', 'Hello');
$worksheet->write_comment( 'C3', 'This is a comment.' );The write_comment() method will also handle strings in UTF-8 format.
$worksheet->write_comment( 'C3', "\x{263a}" ); # Smiley
$worksheet->write_comment( 'C4', 'Comment ca va?' );In addition to the basic 3 argument form of write_comment() you can pass in several optional key/value pairs to control the format of the comment. For example:
$worksheet->write_comment( 'C3', 'Hello', visible => 1, author => 'Perl' );Most of these options are quite specific and in general the default comment behaves will be all that you need. However, should you need greater control over the format of the cell comment the following options are available:
author
visible
x_scale
width
y_scale
height
color
start_cell
start_row
start_col
x_offset
y_offset
font
font_size-
This option is used to indicate who is the author of the cell comment. Excel displays the author of the comment in the status bar at the bottom of the worksheet. This is usually of interest in corporate environments where several people might review and provide comments to a workbook.
$worksheet->write_comment( 'C3', 'Atonement', author => 'Ian McEwan' );The default author for all cell comments can be set using the
set_comments_author()method (see below).$worksheet->set_comments_author( 'Perl' ); - Option: visible
-
This option is used to make a cell comment visible when the worksheet is opened. The default behaviour in Excel is that comments are initially hidden. However, it is also possible in Excel to make individual or all comments visible. In Excel::Writer::XLSX individual comments can be made visible as follows:
$worksheet->write_comment( 'C3', 'Hello', visible => 1 );It is possible to make all comments in a worksheet visible using the
show_comments()worksheet method (see below). Alternatively, if all of the cell comments have been made visible you can hide individual comments:$worksheet->write_comment( 'C3', 'Hello', visible => 0 ); - Option: x_scale
-
This option is used to set the width of the cell comment box as a factor of the default width.
$worksheet->write_comment( 'C3', 'Hello', x_scale => 2 ); $worksheet->write_comment( 'C4', 'Hello', x_scale => 4.2 ); - Option: width
-
This option is used to set the width of the cell comment box explicitly in pixels.
$worksheet->write_comment( 'C3', 'Hello', width => 200 ); - Option: y_scale
-
This option is used to set the height of the cell comment box as a factor of the default height.
$worksheet->write_comment( 'C3', 'Hello', y_scale => 2 ); $worksheet->write_comment( 'C4', 'Hello', y_scale => 4.2 ); - Option: height
-
This option is used to set the height of the cell comment box explicitly in pixels.
$worksheet->write_comment( 'C3', 'Hello', height => 200 ); - Option: color
-
This option is used to set the background colour of cell comment box. You can use one of the named colours recognised by Excel::Writer::XLSX or a Html style
#RRGGBBcolour. See "WORKING WITH COLOURS".$worksheet->write_comment( 'C3', 'Hello', color => 'green' ); $worksheet->write_comment( 'C4', 'Hello', color => '#FF6600' ); # Orange - Option: start_cell
-
This option is used to set the cell in which the comment will appear. By default Excel displays comments one cell to the right and one cell above the cell to which the comment relates. However, you can change this behaviour if you wish. In the following example the comment which would appear by default in cell
D2is moved toE2.$worksheet->write_comment( 'C3', 'Hello', start_cell => 'E2' ); - Option: start_row
-
This option is used to set the row in which the comment will appear. See the
start_celloption above. The row is zero indexed.$worksheet->write_comment( 'C3', 'Hello', start_row => 0 ); - Option: start_col
-
This option is used to set the column in which the comment will appear. See the
start_celloption above. The column is zero indexed.$worksheet->write_comment( 'C3', 'Hello', start_col => 4 ); - Option: x_offset
-
This option is used to change the x offset, in pixels, of a comment within a cell:
$worksheet->write_comment( 'C3', $comment, x_offset => 30 ); - Option: y_offset
-
This option is used to change the y offset, in pixels, of a comment within a cell:
$worksheet->write_comment('C3', $comment, y_offset => 30); - Option: font
-
This option is used to change the font used in the comment from 'Tahoma' which is the default.
$worksheet->write_comment('C3', $comment, font => 'Calibri'); - Option: font_size
-
This option is used to change the font size used in the comment from 8 which is the default.
$worksheet->write_comment('C3', $comment, font_size => 20);
You can apply as many of these options as you require.
Note about using options that adjust the position of the cell comment such as start_cell, start_row, start_col, x_offset and y_offset: Excel only displays offset cell comments when they are displayed as "visible". Excel does not display hidden cells as moved when you mouse over them.
Note about row height and comments. If you specify the height of a row that contains a comment then Excel::Writer::XLSX will adjust the height of the comment to maintain the default or user specified dimensions. However, the height of a row can also be adjusted automatically by Excel if the text wrap property is set or large fonts are used in the cell. This means that the height of the row is unknown to the module at run time and thus the comment box is stretched with the row. Use the set_row() method to specify the row height explicitly and avoid this problem.
show_comments()
This method is used to make all cell comments visible when a worksheet is opened.
$worksheet->show_comments();Individual comments can be made visible using the visible parameter of the write_comment method (see above):
$worksheet->write_comment( 'C3', 'Hello', visible => 1 );If all of the cell comments have been made visible you can hide individual comments as follows:
$worksheet->show_comments();
$worksheet->write_comment( 'C3', 'Hello', visible => 0 );set_comments_author()
This method is used to set the default author of all cell comments.
$worksheet->set_comments_author( 'Perl' );Individual comment authors can be set using the author parameter of the write_comment method (see above).
The default comment author is an empty string, '', if no author is specified.
add_write_handler( $re, $code_ref )
This method is used to extend the Excel::Writer::XLSX write() method to handle user defined data.
If you refer to the section on write() above you will see that it acts as an alias for several more specific write_* methods. However, it doesn't always act in exactly the way that you would like it to.
One solution is to filter the input data yourself and call the appropriate write_* method. Another approach is to use the add_write_handler() method to add your own automated behaviour to write().
The add_write_handler() method take two arguments, $re, a regular expression to match incoming data and $code_ref a callback function to handle the matched data:
$worksheet->add_write_handler( qr/^\d\d\d\d$/, \&my_write );(In the these examples the qr operator is used to quote the regular expression strings, see perlop for more details).
The method is used as follows. say you wished to write 7 digit ID numbers as a string so that any leading zeros were preserved*, you could do something like the following:
$worksheet->add_write_handler( qr/^\d{7}$/, \&write_my_id );
sub write_my_id {
my $worksheet = shift;
return $worksheet->write_string( @_ );
}* You could also use the keep_leading_zeros() method for this.
Then if you call write() with an appropriate string it will be handled automatically:
# Writes 0000000. It would normally be written as a number; 0.
$worksheet->write( 'A1', '0000000' );The callback function will receive a reference to the calling worksheet and all of the other arguments that were passed to write(). The callback will see an @_ argument list that looks like the following:
$_[0] A ref to the calling worksheet. *
$_[1] Zero based row number.
$_[2] Zero based column number.
$_[3] A number or string or token.
$_[4] A format ref if any.
$_[5] Any other arguments.
...
* It is good style to shift this off the list so the @_ is the same
as the argument list seen by write().Your callback should return() the return value of the write_* method that was called or undef to indicate that you rejected the match and want write() to continue as normal.
So for example if you wished to apply the previous filter only to ID values that occur in the first column you could modify your callback function as follows:
sub write_my_id {
my $worksheet = shift;
my $col = $_[1];
if ( $col == 0 ) {
return $worksheet->write_string( @_ );
}
else {
# Reject the match and return control to write()
return undef;
}
}Now, you will get different behaviour for the first column and other columns:
$worksheet->write( 'A1', '0000000' ); # Writes 0000000
$worksheet->write( 'B1', '0000000' ); # Writes 0You may add more than one handler in which case they will be called in the order that they were added.
Note, the add_write_handler() method is particularly suited for handling dates.
See the write_handler 1-4 programs in the examples directory for further examples.
insert_image( $row, $col, $filename, { %options } )
This method can be used to insert a image into a worksheet. The image can be in PNG, JPEG, GIF or BMP format.
$worksheet1->insert_image( 'A1', 'perl.bmp' );
$worksheet2->insert_image( 'A1', '../images/perl.bmp' );
$worksheet3->insert_image( 'A1', '.c:\images\perl.bmp' );This is the equivalent of Excel's menu option to insert an image using the option to "Place over Cells". See embed_image() below for the equivalent method to "Place in Cell".
The optional options hash/hashref parameter can be used to set various options for the image. The defaults are:
%options = (
x_offset => 0,
y_offset => 0,
x_scale => 1,
y_scale => 1,
object_position => 2,
url => undef,
tip => undef,
description => $filename,
decorative => 0,
);The parameters x_offset and y_offset can be used to specify an offset from the top left hand corner of the cell specified by $row and $col. The offset values are in pixels.
$worksheet1->insert_image('A1', 'perl.bmp', { x_offset =>32, y_offset => 10 });The offsets can be greater than the width or height of the underlying cell. This can be occasionally useful if you wish to align two or more images relative to the same cell.
The parameters x_scale and y_scale can be used to scale the inserted image horizontally and vertically:
# Scale the inserted image: width x 2.0, height x 0.8
$worksheet->insert_image( 'A1', 'perl.bmp', { y_scale => 2, y_scale => 0.8 } );The positioning of the image when cells are resized can be set with the object_position parameter:
$worksheet->insert_image( 'A1', 'perl.bmp', { object_position => 1 } );The object_position parameter can have one of the following allowable values:
1. Move and size with cells.
2. Move but don't size with cells.
3. Don't move or size with cells.
4. Same as Option 1, see below.Option 4 appears in Excel as Option 1. However, the worksheet object is sized to take hidden rows or columns into account. This allows the user to hide an image in a cell, possibly as part of an autofilter.
The url option can be use to used to add a hyperlink to an image:
$worksheet->insert_image( 'A1', 'logo.png',
{ url => 'https://github.com/jmcnamara' } );The supported url formats are the same as those supported by the write_url() method and the same rules/limits apply.
The tip option can be use to used to add a mouseover tip to the hyperlink:
$worksheet->insert_image( 'A1', 'logo.png',
{
url => 'https://github.com/jmcnamara',
tip => 'GitHub'
}
);The description parameter can be used to specify a description or "alt text" string for the image. In general this would be used to provide a text description of the image to help accessibility. It is an optional parameter and defaults to the filename of the image. It can be used as follows:
$worksheet->insert_image( 'E9', 'logo.png',
{description => "This is some alternative text"} );The optional decorative parameter is also used to help accessibility. It is used to mark the image as decorative, and thus uninformative, for automated screen readers. As in Excel, if this parameter is in use the description field isn't written. It is used as follows:
$worksheet->insert_image( 'E9', 'logo.png', {decorative => 1} );Note: you must call set_row() or set_column() before insert_image() if you wish to change the default dimensions of any of the rows or columns that the image occupies. The height of a row can also change if you use a font that is larger than the default. This in turn will affect the scaling of your image. To avoid this you should explicitly set the height of the row using set_row() if it contains a font size that will change the row height.
BMP images must be 24 bit, true colour, bitmaps. In general it is best to avoid BMP images since they aren't compressed.
embed_image( $row, $col, $filename, { %options } )
This method can be used to embed an image into a worksheet. The image can be in PNG, JPEG, GIF or BMP format.
$worksheet1->embed_image( 'A1', 'perl.bmp' );
$worksheet2->embed_image( 'A1', '../images/perl.bmp' );
$worksheet3->embed_image( 'A1', '.c:\images\perl.bmp' );This method can be used to embed a image into a worksheet cell and have the image automatically scale to the width and height of the cell. The X/Y scaling of the image is preserved but the size of the image is adjusted to fit the largest possible width or height depending on the cell dimensions.
This is the equivalent of Excel's menu option to insert an image using the option to "Place in Cell" which is only available in Excel 365 versions from 2023 onwards. For older versions of Excel a ``#VALUE!`` error is displayed.
See insert_image() for the equivalent method to "Place over Cells".
The optional options hash/hashref parameter can be used to set various options for the image. The defaults are:
%options = (
cell_format => format,
url => undef,
tip => undef,
description => $filename,
decorative => 0,
);The cell_format parameters can be an standard Format to set the formatting of the cell behind the image.
The url option can be use to used to add a hyperlink to an image:
$worksheet->insert_image( 'A1', 'logo.png',
{ url => 'https://github.com/jmcnamara' } );The supported url formats are the same as those supported by the write_url() method and the same rules/limits apply.
The tip option can be use to used to add a mouseover tip to the hyperlink:
$worksheet->insert_image( 'A1', 'logo.png',
{
url => 'https://github.com/jmcnamara',
tip => 'GitHub'
}
);The description parameter can be used to specify a description or "alt text" string for the image. In general this would be used to provide a text description of the image to help accessibility. It is an optional parameter and defaults to the filename of the image. It can be used as follows:
$worksheet->insert_image( 'E9', 'logo.png',
{description => "This is some alternative text"} );The optional decorative parameter is also used to help accessibility. It is used to mark the image as decorative, and thus uninformative, for automated screen readers. As in Excel, if this parameter is in use the description field isn't written. It is used as follows:
$worksheet->insert_image( 'E9', 'logo.png', {decorative => 1} );Note: you must call set_row() or set_column() before insert_image() if you wish to change the default dimensions of any of the rows or columns that the image occupies. The height of a row can also change if you use a font that is larger than the default. This in turn will affect the scaling of your image. To avoid this you should explicitly set the height of the row using set_row() if it contains a font size that will change the row height.
BMP images must be 24 bit, true colour, bitmaps. In general it is best to avoid BMP images since they aren't compressed.
insert_chart( $row, $col, $chart, { %options } )
This method can be used to insert a Chart object into a worksheet. The Chart must be created by the add_chart() Workbook method and it must have the embedded option set.
my $chart = $workbook->add_chart( type => 'line', embedded => 1 );

# Configure the chart.
...

# Insert the chart into the a worksheet.
$worksheet->insert_chart( 'E2', $chart );
See add_chart() for details on how to create the Chart object and Excel::Writer::XLSX::Chart for details on how to configure it. See also the chart_*.pl programs in the examples directory of the distro.
The optional options hash/hashref parameter can be used to set various options for the chart. The defaults are:
%options = (
x_offset => 0,
y_offset => 0,
x_scale => 1,
y_scale => 1,
object_position => 1,
description => undef,
decorative => 0,
);The parameters x_offset and y_offset can be used to specify an offset from the top left hand corner of the cell specified by $row and $col. The offset values are in pixels.
$worksheet1->insert_chart( 'E2', $chart, { x_offset =>10, y_offset => 20 });The parameters x_scale and y_scale can be used to scale the inserted chart horizontally and vertically:
# Scale the width by 120% and the height by 150%
$worksheet->insert_chart( 'E2', $chart, { y_scale => 1.2, y_scale => 1.5 } );The positioning of the chart when cells are resized can be set with the object_position parameter:
$worksheet->insert_chart( 'E2', $chart, { object_position => 2 } );The object_position parameter can have one of the following allowable values:
1. Move and size with cells.
2. Move but don't size with cells.
3. Don't move or size with cells.
4. Same as Option 1, see below.Option 4 appears in Excel as Option 1. However, the worksheet object is sized to take hidden rows or columns into account. This is generally only useful for images and not for charts.
The description parameter can be used to specify a description or "alt text" string for the chart. In general this would be used to provide a text description of the chart to help accessibility. It is an optional parameter and has no default. It can be used as follows:
$worksheet->insert_chart( 'E9', $chart, {description => 'Some alternative text'} );The optional decorative parameter is also used to help accessibility. It is used to mark the chart as decorative, and thus uninformative, for automated screen readers. As in Excel, if this parameter is in use the description field isn't written. It is used as follows:
$worksheet->insert_chart( 'E9', $chart, {decorative => 1} );insert_shape( $row, $col, $shape, $x, $y, $x_scale, $y_scale )
This method can be used to insert a Shape object into a worksheet. The Shape must be created by the add_shape() Workbook method.
my $shape = $workbook->add_shape( name => 'My Shape', type => 'plus' );
# Configure the shape.
$shape->set_text('foo');
...
# Insert the shape into the a worksheet.
$worksheet->insert_shape( 'E2', $shape );See add_shape() for details on how to create the Shape object and Excel::Writer::XLSX::Shape for details on how to configure it.
The $x, $y, $x_scale and $y_scale parameters are optional.
The parameters $x and $y can be used to specify an offset from the top left hand corner of the cell specified by $row and $col. The offset values are in pixels.
$worksheet1->insert_shape( 'E2', $chart, 3, 3 );The parameters $x_scale and $y_scale can be used to scale the inserted shape horizontally and vertically:
# Scale the width by 120% and the height by 150%
$worksheet->insert_shape( 'E2', $shape, 0, 0, 1.2, 1.5 );See also the shape*.pl programs in the examples directory of the distro.
insert_button( $row, $col, { %options })
The insert_button() method can be used to insert an Excel form button into a worksheet.
This method is generally only useful when used in conjunction with the Workbook add_vba_project() method to tie the button to a macro from an embedded VBA project:
my $workbook = Excel::Writer::XLSX->new( 'file.xlsm' );
...
$workbook->add_vba_project( './vbaProject.bin' );
$worksheet->insert_button( 'C2', { macro => 'my_macro' } );The properties of the button that can be set are:
macro
caption
width
height
x_scale
y_scale
x_offset
y_offset
description- Option: macro
-
This option is used to set the macro that the button will invoke when the user clicks on it. The macro should be included using the Workbook
add_vba_project()method shown above.$worksheet->insert_button( 'C2', { macro => 'my_macro' } );The default macro is
ButtonX_Clickwhere X is the button number. - Option: caption
-
This option is used to set the caption on the button. The default is
Button Xwhere X is the button number.$worksheet->insert_button( 'C2', { macro => 'my_macro', caption => 'Hello' } ); - Option: width
-
This option is used to set the width of the button in pixels.
$worksheet->insert_button( 'C2', { macro => 'my_macro', width => 128 } );The default button width is 64 pixels which is the width of a default cell.
- Option: height
-
This option is used to set the height of the button in pixels.
$worksheet->insert_button( 'C2', { macro => 'my_macro', height => 40 } );The default button height is 20 pixels which is the height of a default cell.
- Option: x_scale
-
This option is used to set the width of the button as a factor of the default width.
$worksheet->insert_button( 'C2', { macro => 'my_macro', x_scale => 2.0 ); - Option: y_scale
-
This option is used to set the height of the button as a factor of the default height.
$worksheet->insert_button( 'C2', { macro => 'my_macro', y_scale => 2.0 ); - Option: x_offset
-
This option is used to change the x offset, in pixels, of a button within a cell:
$worksheet->insert_button( 'C2', { macro => 'my_macro', x_offset => 2 ); - Option: y_offset
-
This option is used to change the y offset, in pixels, of a comment within a cell.
- Option: description
-
The option is used to specify a description or "alt text" string for the button.
Note: Button is the only Excel form element that is available in Excel::Writer::XLSX. Form elements represent a lot of work to implement and the underlying VML syntax isn't very much fun.
data_validation()
The data_validation() method is used to construct an Excel data validation or to limit the user input to a dropdown list of values.
$worksheet->data_validation('B3',
{
validate => 'integer',
criteria => '>',
value => 100,
});
$worksheet->data_validation('B5:B9',
{
validate => 'list',
value => ['open', 'high', 'close'],
});This method contains a lot of parameters and is described in detail in a separate section "DATA VALIDATION IN EXCEL".
See also the data_validate.pl program in the examples directory of the distro
conditional_formatting()
The conditional_formatting() method is used to add formatting to a cell or range of cells based on user defined criteria.
$worksheet->conditional_formatting( 'A1:J10',
{
type => 'cell',
criteria => '>=',
value => 50,
format => $format1,
}
);This method contains a lot of parameters and is described in detail in a separate section "CONDITIONAL FORMATTING IN EXCEL".
See also the conditional_format.pl program in the examples directory of the distro
add_sparkline()
The add_sparkline() worksheet method is used to add sparklines to a cell or a range of cells.
$worksheet->add_sparkline(
{
location => 'F2',
range => 'Sheet1!A2:E2',
type => 'column',
style => 12,
}
);This method contains a lot of parameters and is described in detail in a separate section "SPARKLINES IN EXCEL".
See also the sparklines1.pl and sparklines2.pl example programs in the examples directory of the distro.
Note: Sparklines are a feature of Excel 2010+ only. You can write them to an XLSX file that can be read by Excel 2007 but they won't be displayed.
add_table()
The add_table() method is used to group a range of cells into an Excel Table.
$worksheet->add_table( 'B3:F7', { ... } );This method contains a lot of parameters and is described in detail in a separate section "TABLES IN EXCEL".
See also the tables.pl program in the examples directory of the distro
get_name()
The get_name() method is used to retrieve the name of a worksheet. For example:
for my $sheet ( $workbook->sheets() ) {
print $sheet->get_name();
}For reasons related to the design of Excel::Writer::XLSX and to the internals of Excel there is no set_name() method. The only way to set the worksheet name is via the add_worksheet() method.
activate()
The activate() method is used to specify which worksheet is initially visible in a multi-sheet workbook:
$worksheet1 = $workbook->add_worksheet( 'To' );
$worksheet2 = $workbook->add_worksheet( 'the' );
$worksheet3 = $workbook->add_worksheet( 'wind' );
$worksheet3->activate();This is similar to the Excel VBA activate method. More than one worksheet can be selected via the select() method, see below, however only one worksheet can be active.
The default active worksheet is the first worksheet.
select()
The select() method is used to indicate that a worksheet is selected in a multi-sheet workbook:
$worksheet1->activate();
$worksheet2->select();
$worksheet3->select();A selected worksheet has its tab highlighted. Selecting worksheets is a way of grouping them together so that, for example, several worksheets could be printed in one go. A worksheet that has been activated via the activate() method will also appear as selected.
hide()
The hide() method is used to hide a worksheet:
$worksheet2->hide();You may wish to hide a worksheet in order to avoid confusing a user with intermediate data or calculations.
A hidden worksheet can not be activated or selected so this method is mutually exclusive with the activate() and select() methods. In addition, since the first worksheet will default to being the active worksheet, you cannot hide the first worksheet without activating another sheet:
$worksheet2->activate();
$worksheet1->hide();very_hidden()
The very_hidden() method can be used to hide a worksheet similar to the hide() method. The difference is that the worksheet cannot be unhidden in the the Excel user interface. The Excel worksheet "xlSheetVeryHidden" option can only be unset programmatically by VBA.
set_first_sheet()
The activate() method determines which worksheet is initially selected. However, if there are a large number of worksheets the selected worksheet may not appear on the screen. To avoid this you can select which is the leftmost visible worksheet using set_first_sheet():
for ( 1 .. 20 ) {
$workbook->add_worksheet;
}
$worksheet21 = $workbook->add_worksheet();
$worksheet22 = $workbook->add_worksheet();
$worksheet21->set_first_sheet();
$worksheet22->activate();This method is not required very often. The default value is the first worksheet.
protect( $password, \%options )
The protect() method is used to protect a worksheet from modification:
$worksheet->protect();The protect() method also has the effect of enabling a cell's locked and hidden properties if they have been set. A locked cell cannot be edited and this property is on by default for all cells. A hidden cell will display the results of a formula but not the formula itself.
See the protection.pl program in the examples directory of the distro for an illustrative example and the set_locked and set_hidden format methods in "CELL FORMATTING".
You can optionally add a password to the worksheet protection:
$worksheet->protect( 'drowssap' );The password should be an ASCII string. Passing the empty string '' is the same as turning on protection without a password.
Note, the worksheet level password in Excel provides very weak protection. It does not encrypt your data and is very easy to deactivate. Full workbook encryption is not supported by Excel::Writer::XLSX since it requires a completely different file format and would take several man months to implement.
You can specify which worksheet elements you wish to protect by passing a hash_ref with any or all of the following keys:
# Default shown.
%options = (
objects => 0,
scenarios => 0,
format_cells => 0,
format_columns => 0,
format_rows => 0,
insert_columns => 0,
insert_rows => 0,
insert_hyperlinks => 0,
delete_columns => 0,
delete_rows => 0,
select_locked_cells => 1,
sort => 0,
autofilter => 0,
pivot_tables => 0,
select_unlocked_cells => 1,
);The default boolean values are shown above. Individual elements can be protected as follows:
$worksheet->protect( 'drowssap', { insert_rows => 1 } );For chartsheets the allowable options and default values are:
%options = (
objects => 1,
content => 1,
);unprotect_range( $cell_range, $range_name )
The unprotect_range() method is used to unprotect ranges in a protected worksheet. It can be used to set a single range or multiple ranges:
$worksheet->unprotect_range( 'A1' );
$worksheet->unprotect_range( 'C1' );
$worksheet->unprotect_range( 'E1:E3' );
$worksheet->unprotect_range( 'G1:K100' );As in Excel the ranges are given sequential names like Range1 and Range2 but a user defined name can also be specified:
$worksheet->unprotect_range( 'G4:I6', 'MyRange' );set_selection( $first_row, $first_col, $last_row, $last_col )
This method can be used to specify which cell or cells are selected in a worksheet. The most common requirement is to select a single cell, in which case $last_row and $last_col can be omitted. The active cell within a selected range is determined by the order in which $first and $last are specified. It is also possible to specify a cell or a range using A1 notation. See the note about "Cell notation".
Examples:
$worksheet1->set_selection( 3, 3 ); # 1. Cell D4.
$worksheet2->set_selection( 3, 3, 6, 6 ); # 2. Cells D4 to G7.
$worksheet3->set_selection( 6, 6, 3, 3 ); # 3. Cells G7 to D4.
$worksheet4->set_selection( 'D4' ); # Same as 1.
$worksheet5->set_selection( 'D4:G7' ); # Same as 2.
$worksheet6->set_selection( 'G7:D4' ); # Same as 3.The default cell selections is (0, 0), 'A1'.
set_top_left_cell( $row, $col )
This method can be used to set the top leftmost visible cell in the worksheet:
$worksheet->set_top_left_cell( 31, 26 );
# Same as:
$worksheet->set_top_left_cell( 'AA32' );You can also use A1 notation, as shown above, see the note about "Cell notation".
set_row( $row, $height, $format, $hidden, $level, $collapsed )
This method can be used to change the default properties of a row. All parameters apart from $row are optional.
The most common use for this method is to change the height of a row.
$worksheet->set_row( 0, 20 ); # Row 1 height set to 20Note: the row height is in Excel character units. To set the height in pixels use the set_row_pixels() method, see below.
If you wish to set the format without changing the height you can pass undef as the height parameter:
$worksheet->set_row( 0, undef, $format );The $format parameter will be applied to any cells in the row that don't have a format. For example
$worksheet->set_row( 0, undef, $format1 ); # Set the format for row 1
$worksheet->write( 'A1', 'Hello' ); # Defaults to $format1
$worksheet->write( 'B1', 'Hello', $format2 ); # Keeps $format2If you wish to define a row format in this way you should call the method before any calls to write(). Calling it afterwards will overwrite any format that was previously specified.
The $hidden parameter should be set to 1 if you wish to hide a row. This can be used, for example, to hide intermediary steps in a complicated calculation:
$worksheet->set_row( 0, 20, $format, 1 );
$worksheet->set_row( 1, undef, undef, 1 );The $level parameter is used to set the outline level of the row. Outlines are described in "OUTLINES AND GROUPING IN EXCEL". Adjacent rows with the same outline level are grouped together into a single outline.
The following example sets an outline level of 1 for rows 2 and 3 (zero-indexed):
$worksheet->set_row( 1, undef, undef, 0, 1 );
$worksheet->set_row( 2, undef, undef, 0, 1 );The $hidden parameter can also be used to hide collapsed outlined rows when used in conjunction with the $level parameter.
$worksheet->set_row( 1, undef, undef, 1, 1 );
$worksheet->set_row( 2, undef, undef, 1, 1 );For collapsed outlines you should also indicate which row has the collapsed + symbol using the optional $collapsed parameter.
$worksheet->set_row( 3, undef, undef, 0, 0, 1 );For a more complete example see the outline.pl and outline_collapsed.pl programs in the examples directory of the distro.
Excel allows up to 7 outline levels. Therefore the $level parameter should be in the range 0 <= $level <= 7.
set_row_pixels( $row, $height, $format, $hidden, $level, $collapsed )
This method is the same as set_row() except that $height is in pixels.
$worksheet->set_row ( 0, 24 ); # Set row height in character units
$worksheet->set_row_pixels( 1, 18 ); # Set row to same height in pixelsset_column( $first_col, $last_col, $width, $format, $hidden, $level, $collapsed )
This method can be used to change the default properties of a single column or a range of columns. All parameters apart from $first_col and $last_col are optional.
If set_column() is applied to a single column the value of $first_col and $last_col should be the same. In the case where $last_col is zero it is set to the same value as $first_col.
It is also possible, and generally clearer, to specify a column range using the form of A1 notation used for columns. See the note about "Cell notation".
Examples:
$worksheet->set_column( 0, 0, 20 ); # Column A width set to 20
$worksheet->set_column( 1, 3, 30 ); # Columns B-D width set to 30
$worksheet->set_column( 'E:E', 20 ); # Column E width set to 20
$worksheet->set_column( 'F:H', 30 ); # Columns F-H width set to 30The width corresponds to the column width value that is specified in Excel. It is approximately equal to the length of a string in the default font of Calibri 11. To set the width in pixels use the set_column_pixels() method, see below.
See also the autofit() method to set the column widths based on the data in the column, approximately.
As usual the $format parameter is optional, for additional information, see "CELL FORMATTING". If you wish to set the format without changing the width you can pass undef as the width parameter:
$worksheet->set_column( 0, 0, undef, $format );The $format parameter will be applied to any cells in the column that don't have a format. For example
$worksheet->set_column( 'A:A', undef, $format1 ); # Set format for col 1
$worksheet->write( 'A1', 'Hello' ); # Defaults to $format1
$worksheet->write( 'A2', 'Hello', $format2 ); # Keeps $format2If you wish to define a column format in this way you should call the method before any calls to write(). If you call it afterwards it won't have any effect.
A default row format takes precedence over a default column format
$worksheet->set_row( 0, undef, $format1 ); # Set format for row 1
$worksheet->set_column( 'A:A', undef, $format2 ); # Set format for col 1
$worksheet->write( 'A1', 'Hello' ); # Defaults to $format1
$worksheet->write( 'A2', 'Hello' ); # Defaults to $format2The $hidden parameter should be set to 1 if you wish to hide a column. This can be used, for example, to hide intermediary steps in a complicated calculation:
$worksheet->set_column( 'D:D', 20, $format, 1 );
$worksheet->set_column( 'E:E', undef, undef, 1 );The $level parameter is used to set the outline level of the column. Outlines are described in "OUTLINES AND GROUPING IN EXCEL". Adjacent columns with the same outline level are grouped together into a single outline.
The following example sets an outline level of 1 for columns B to G:
$worksheet->set_column( 'B:G', undef, undef, 0, 1 );The $hidden parameter can also be used to hide collapsed outlined columns when used in conjunction with the $level parameter.
$worksheet->set_column( 'B:G', undef, undef, 1, 1 );For collapsed outlines you should also indicate which row has the collapsed + symbol using the optional $collapsed parameter.
$worksheet->set_column( 'H:H', undef, undef, 0, 0, 1 );For a more complete example see the outline.pl and outline_collapsed.pl programs in the examples directory of the distro.
Excel allows up to 7 outline levels. Therefore the $level parameter should be in the range 0 <= $level <= 7.
set_column_pixels( $first_col, $last_col, $width, $format, $hidden, $level, $collapsed )
This method is the same as set_column() except that $width is in pixels.
$worksheet->set_column ( 0, 0, 10 ); # Column A width set to 10 in character units
$worksheet->set_column_pixels( 1, 1, 75 ); # Column B set to the same width in pixelsset_default_row( $height, $hide_unused_rows )
The set_default_row() method is used to set the limited number of default row properties allowed by Excel. These are the default height and the option to hide unused rows.
$worksheet->set_default_row( 24 ); # Set the default row height to 24.The option to hide unused rows is used by Excel as an optimisation so that the user can hide a large number of rows without generating a very large file with an entry for each hidden row.
$worksheet->set_default_row( undef, 1 );See the hide_row_col.pl example program.
autofit($max_width)
Autofit the worksheet column widths to the widest data in the column, approximately.
$worksheet->autofit();Excel autofits columns at runtime when it has access to all of the required worksheet information as well as the Windows functions for calculating display areas based on fonts and formatting. Excel::Writer::XLSX doesn't have access to these Windows functions so it simulates autofit by calculating string widths based on metrics taken from Excel. This isn't perfect but for most cases it should be sufficient and indistinguishable from the output of Excel. However there are some limitations to be aware of when using this method:
It is based on the default Excel font type and size of Calibri 11. It will not give accurate results for other fonts or font sizes.
It doesn't take formatting of numbers or dates account, although this may be addressed in a later version.
Autofit is a relatively expensive operation since it performs a calculation for all the populated cells in a worksheet. See the note on performance below.
For cases that don't match your desired output you can set explicit column widths via set_column() or set_column_pixels() method ignores columns that have already been explicitly set if the width is greater than the calculated autofit width. Alternatively, setting the column width explicitly after calling autofit() will override the autofit value. You can also set an upper limit using the optional $max_width parameter as explained below.
Excel autofits very long strings up to limit of 1790 pixels/255 characters. This is often too wide to display on a single screen at normal zoom. As such the optional $max_width parameter is provided to enable a smaller upper pixel limit for autofitting long strings. A value of 300 pixels is recommended as a good compromise between column width and readability:
$worksheet->autofit(300);If you need more control over the autofit effect you can use the Excel::Writer::XLSX::Utility xl_cell_autofit_width() function to calculate the autofit width for a cell value. This is the same calculation used internally by autofit().
outline_settings( $visible, $symbols_below, $symbols_right, $auto_style )
The outline_settings() method is used to control the appearance of outlines in Excel. Outlines are described in "OUTLINES AND GROUPING IN EXCEL".
The $visible parameter is used to control whether or not outlines are visible. Setting this parameter to 0 will cause all outlines on the worksheet to be hidden. They can be unhidden in Excel by means of the "Show Outline Symbols" command button. The default setting is 1 for visible outlines.
$worksheet->outline_settings( 0 );The $symbols_below parameter is used to control whether the row outline symbol will appear above or below the outline level bar. The default setting is 1 for symbols to appear below the outline level bar.
The $symbols_right parameter is used to control whether the column outline symbol will appear to the left or the right of the outline level bar. The default setting is 1 for symbols to appear to the right of the outline level bar.
The $auto_style parameter is used to control whether the automatic outline generator in Excel uses automatic styles when creating an outline. This has no effect on a file generated by Excel::Writer::XLSX but it does have an effect on how the worksheet behaves after it is created. The default setting is 0 for "Automatic Styles" to be turned off.
The default settings for all of these parameters correspond to Excel's default parameters.
The worksheet parameters controlled by outline_settings() are rarely used.
freeze_panes( $row, $col, $top_row, $left_col )
This method can be used to divide a worksheet into horizontal or vertical regions known as panes and to also "freeze" these panes so that the splitter bars are not visible. This is the same as the Window->Freeze Panes menu command in Excel
The parameters $row and $col are used to specify the location of the split. It should be noted that the split is specified at the top or left of a cell and that the method uses zero based indexing. Therefore to freeze the first row of a worksheet it is necessary to specify the split at row 2 (which is 1 as the zero-based index). This might lead you to think that you are using a 1 based index but this is not the case.
You can set one of the $row and $col parameters as zero if you do not want either a vertical or horizontal split.
Examples:
$worksheet->freeze_panes( 1, 0 ); # Freeze the first row
$worksheet->freeze_panes( 'A2' ); # Same using A1 notation
$worksheet->freeze_panes( 0, 1 ); # Freeze the first column
$worksheet->freeze_panes( 'B1' ); # Same using A1 notation
$worksheet->freeze_panes( 1, 2 ); # Freeze first row and first 2 columns
$worksheet->freeze_panes( 'C2' ); # Same using A1 notationThe parameters $top_row and $left_col are optional. They are used to specify the top-most or left-most visible row or column in the scrolling region of the panes. For example to freeze the first row and to have the scrolling region begin at row twenty:
$worksheet->freeze_panes( 1, 0, 20, 0 );You cannot use A1 notation for the $top_row and $left_col parameters.
See also the panes.pl program in the examples directory of the distribution.
split_panes( $y, $x, $top_row, $left_col )
This method can be used to divide a worksheet into horizontal or vertical regions known as panes. This method is different from the freeze_panes() method in that the splits between the panes will be visible to the user and each pane will have its own scroll bars.
The parameters $y and $x are used to specify the vertical and horizontal position of the split. The units for $y and $x are the same as those used by Excel to specify row height and column width. However, the vertical and horizontal units are different from each other. Therefore you must specify the $y and $x parameters in terms of the row heights and column widths that you have set or the default values which are 15 for a row and 8.43 for a column.
You can set one of the $y and $x parameters as zero if you do not want either a vertical or horizontal split. The parameters $top_row and $left_col are optional. They are used to specify the top-most or left-most visible row or column in the bottom-right pane.
Example:
$worksheet->split_panes( 15, 0, ); # First row
$worksheet->split_panes( 0, 8.43 ); # First column
$worksheet->split_panes( 15, 8.43 ); # First row and columnYou cannot use A1 notation with this method.
See also the freeze_panes() method and the panes.pl program in the examples directory of the distribution.
merge_range( $first_row, $first_col, $last_row, $last_col, $token, $format )
The merge_range() method allows you to merge cells that contain other types of alignment in addition to the merging:
my $format = $workbook->add_format(
border => 6,
valign => 'vcenter',
align => 'center',
);
$worksheet->merge_range( 'B3:D4', 'Vertical and horizontal', $format );merge_range() writes its $token argument using the worksheet write() method. Therefore it will handle numbers, strings, formulas or urls as required. If you need to specify the required write_*() method use the merge_range_type() method, see below.
The full possibilities of this method are shown in the merge3.pl to merge6.pl programs in the examples directory of the distribution.
merge_range_type( $type, $first_row, $first_col, $last_row, $last_col, ... )
The merge_range() method, see above, uses write() to insert the required data into to a merged range. However, there may be times where this isn't what you require so as an alternative the merge_range_type () method allows you to specify the type of data you wish to write. For example:
$worksheet->merge_range_type( 'number', 'B2:C2', 123, $format1 );
$worksheet->merge_range_type( 'string', 'B4:C4', 'foo', $format2 );
$worksheet->merge_range_type( 'formula', 'B6:C6', '=1+2', $format3 );The $type must be one of the following, which corresponds to a write_*() method:
'number'
'string'
'formula'
'array_formula'
'blank'
'rich_string'
'date_time'
'url'Any arguments after the range should be whatever the appropriate method accepts:
$worksheet->merge_range_type( 'rich_string', 'B8:C8',
'This is ', $bold, 'bold', $format4 );Note, you must always pass a $format object as an argument, even if it is a default format.
set_zoom( $scale )
Set the worksheet zoom factor in the range 10 <= $scale <= 400:
$worksheet1->set_zoom( 50 );
$worksheet2->set_zoom( 75 );
$worksheet3->set_zoom( 300 );
$worksheet4->set_zoom( 400 );The default zoom factor is 100. You cannot zoom to "Selection" because it is calculated by Excel at run-time.
Note, set_zoom() does not affect the scale of the printed page. For that you should use set_print_scale().
right_to_left()
The right_to_left() method is used to change the default direction of the worksheet from left-to-right, with the A1 cell in the top left, to right-to-left, with the A1 cell in the top right.
$worksheet->right_to_left();This is useful when creating Arabic, Hebrew or other near or far eastern worksheets that use right-to-left as the default direction.
hide_zero()
The hide_zero() method is used to hide any zero values that appear in cells.
$worksheet->hide_zero();In Excel this option is found under Tools->Options->View.
set_background( $filename )
The set_background() method can be used to set the background image for the worksheet:
$worksheet->set_background( 'logo.png' )The set_background() method supports all the image formats supported by insert_image().
Some people use this method to add a watermark background to their document. However, Microsoft recommends using a header image to set a watermark. The choice of method depends on whether you want the watermark to be visible in normal viewing mode or just when the file is printed. In Excel::Writer::XLSX you can get the header watermark effect using set_header():
$worksheet->set_header( '&C&G', undef, { image_center => 'watermark.png' } )set_tab_color()
The set_tab_color() method is used to change the colour of the worksheet tab. You can use one of the standard colour names provided by the Format object or a Html style #RRGGBB colour. See "WORKING WITH COLOURS".
$worksheet1->set_tab_color( 'red' );
$worksheet2->set_tab_color( '#FF6600' );See the tab_colors.pl program in the examples directory of the distro.
autofilter( $first_row, $first_col, $last_row, $last_col )
This method allows an autofilter to be added to a worksheet. An autofilter is a way of adding drop down lists to the headers of a 2D range of worksheet data. This allows users to filter the data based on simple criteria so that some data is shown and some is hidden.
To add an autofilter to a worksheet:
$worksheet->autofilter( 0, 0, 10, 3 );
$worksheet->autofilter( 'A1:D11' ); # Same as above in A1 notation.Filter conditions can be applied using the filter_column() or filter_column_list() method.
See the autofilter.pl program in the examples directory of the distro for a more detailed example.
filter_column( $column, $expression )
The filter_column method can be used to filter columns in a autofilter range based on simple conditions.
NOTE: It isn't sufficient to just specify the filter condition. You must also hide any rows that don't match the filter condition. Rows are hidden using the set_row() visible parameter. Excel::Writer::XLSX cannot do this automatically since it isn't part of the file format. See the autofilter.pl program in the examples directory of the distro for an example.
The conditions for the filter are specified using simple expressions:
$worksheet->filter_column( 'A', 'x > 2000' );
$worksheet->filter_column( 'B', 'x > 2000 and x < 5000' );The $column parameter can either be a zero indexed column number or a string column name.
The following operators are available:
Operator Synonyms
== = eq =~
!= <> ne !=
>
<
>=
<=
and &&
or ||The operator synonyms are just syntactic sugar to make you more comfortable using the expressions. It is important to remember that the expressions will be interpreted by Excel and not by perl.
An expression can comprise a single statement or two statements separated by the and and or operators. For example:
'x < 2000'
'x > 2000'
'x == 2000'
'x > 2000 and x < 5000'
'x == 2000 or x == 5000'Filtering of blank or non-blank data can be achieved by using a value of Blanks or NonBlanks in the expression:
'x == Blanks'
'x == NonBlanks'Excel also allows some simple string matching operations:
'x =~ b*' # begins with b
'x !~ b*' # doesn't begin with b
'x =~ *b' # ends with b
'x !~ *b' # doesn't end with b
'x =~ *b*' # contains b
'x !~ *b*' # doesn't contains bYou can also use * to match any character or number and ? to match any single character or number. No other regular expression quantifier is supported by Excel's filters. Excel's regular expression characters can be escaped using ~.
The placeholder variable x in the above examples can be replaced by any simple string. The actual placeholder name is ignored internally so the following are all equivalent:
'x < 2000'
'col < 2000'
'Price < 2000'Also, note that a filter condition can only be applied to a column in a range specified by the autofilter() Worksheet method.
See the autofilter.pl program in the examples directory of the distro for a more detailed example.
Note Spreadsheet::WriteExcel supports Top 10 style filters. These aren't currently supported by Excel::Writer::XLSX but may be added later.
filter_column_list( $column, @matches )
Prior to Excel 2007 it was only possible to have either 1 or 2 filter conditions such as the ones shown above in the filter_column method.
Excel 2007 introduced a new list style filter where it is possible to specify 1 or more 'or' style criteria. For example if your column contained data for the first six months the initial data would be displayed as all selected as shown on the left. Then if you selected 'March', 'April' and 'May' they would be displayed as shown on the right.
No criteria selected Some criteria selected.
[/] (Select all) [X] (Select all)
[/] January [ ] January
[/] February [ ] February
[/] March [/] March
[/] April [/] April
[/] May [/] May
[/] June [ ] JuneThe filter_column_list() method can be used to represent these types of filters:
$worksheet->filter_column_list( 'A', 'March', 'April', 'May' );The $column parameter can either be a zero indexed column number or a string column name.
One or more criteria can be selected:
$worksheet->filter_column_list( 0, 'March' );
$worksheet->filter_column_list( 1, 100, 110, 120, 130 );NOTE: It isn't sufficient to just specify the filter condition. You must also hide any rows that don't match the filter condition. Rows are hidden using the set_row() visible parameter. Excel::Writer::XLSX cannot do this automatically since it isn't part of the file format. See the autofilter.pl program in the examples directory of the distro for an example.
convert_date_time( $date_string )
The convert_date_time() method is used internally by the write_date_time() method to convert date strings to a number that represents an Excel date and time.
It is exposed as a public method for utility purposes.
The $date_string format is detailed in the write_date_time() method.
set_vba_name()
The Worksheet set_vba_name() method can be used to set the VBA codename for the worksheet (there is a similar method for the workbook VBA name). This is sometimes required when a vbaProject macro included via add_vba_project() refers to the worksheet. The default Excel VBA name of Sheet1, etc., is used if a user defined name isn't specified.
See also "WORKING WITH VBA MACROS".
ignore_errors()
The ignore_errors() method can be used to ignore various worksheet cell errors/warnings. For example the following code writes a string that looks like a number:
$worksheet->write_string('D2', '123');This causes Excel to display a small green triangle in the top left hand corner of the cell to indicate an error/warning.
Sometimes these warnings are useful indicators that there is an issue in the spreadsheet but sometimes it is preferable to turn them off. Warnings can be turned off at the Excel level for all workbooks and worksheets by using the using "Excel options -> Formulas -> Error checking rules". Alternatively you can turn them off for individual cells in a worksheet, or ranges of cells, using the ignore_errors() method with a hashref of options and ranges like this:
$worksheet->ignore_errors({number_stored_as_text => 'A1:H50'});
# Or for more than one option:
$worksheet->ignore_errors({number_stored_as_text => 'A1:H50',
eval_error => 'A1:H50'});The range can be a single cell, a range of cells, or multiple cells and ranges separated by spaces:
# Single cell.
$worksheet->ignore_errors({eval_error => 'C6'});
# Or a single range:
$worksheet->ignore_errors({eval_error => 'C6:G8'});
# Or multiple cells and ranges:
$worksheet->ignore_errors({eval_error => 'C6 E6 G1:G20 J2:J6'});Note: calling ignore_errors multiple times will overwrite the previous settings.
You can turn off warnings for an entire column by specifying the range from the first cell in the column to the last cell in the column:
$worksheet->ignore_errors({number_stored_as_text => 'A1:A1048576'});Or for the entire worksheet by specifying the range from the first cell in the worksheet to the last cell in the worksheet:
$worksheet->ignore_errors({number_stored_as_text => 'A1:XFD1048576'});The worksheet errors/warnings that can be ignored are:
number_stored_as_text: Turn off errors/warnings for numbers stores as text.eval_error: Turn off errors/warnings for formula errors (such as divide by zero).formula_differs: Turn off errors/warnings for formulas that differ from surrounding formulas.formula_range: Turn off errors/warnings for formulas that omit cells in a range.formula_unlocked: Turn off errors/warnings for unlocked cells that contain formulas.empty_cell_reference: Turn off errors/warnings for formulas that refer to empty cells.list_data_validation: Turn off errors/warnings for cells in a table that do not comply with applicable data validation rules.calculated_column: Turn off errors/warnings for cell formulas that differ from the column formula.two_digit_text_year: Turn off errors/warnings for formulas that contain a two digit text representation of a year.
PAGE SET-UP METHODS
Page set-up methods affect the way that a worksheet looks when it is printed. They control features such as page headers and footers and margins. These methods are really just standard worksheet methods. They are documented here in a separate section for the sake of clarity.
The following methods are available for page set-up:
set_landscape()
set_portrait()
set_page_view()
set_pagebreak_view()
set_paper()
center_horizontally()
center_vertically()
set_margins()
set_header()
set_footer()
repeat_rows()
repeat_columns()
hide_gridlines()
print_row_col_headers()
print_area()
print_across()
fit_to_pages()
set_start_page()
set_print_scale()
print_black_and_white()
set_h_pagebreaks()
set_v_pagebreaks()A common requirement when working with Excel::Writer::XLSX is to apply the same page set-up features to all of the worksheets in a workbook. To do this you can use the sheets() method of the workbook class to access the array of worksheets in a workbook:
for $worksheet ( $workbook->sheets() ) {
$worksheet->set_landscape();
}set_landscape()
This method is used to set the orientation of a worksheet's printed page to landscape:
$worksheet->set_landscape(); # Landscape modeset_portrait()
This method is used to set the orientation of a worksheet's printed page to portrait. The default worksheet orientation is portrait, so you won't generally need to call this method.
$worksheet->set_portrait(); # Portrait modeset_page_view()
This method is used to display the worksheet in "Page View/Layout" mode.
$worksheet->set_page_view();set_pagebreak_view()
This method is used to display the worksheet in "Page Break Preview" mode.
$worksheet->set_pagebreak_view();set_paper( $index )
This method is used to set the paper format for the printed output of a worksheet. The following paper styles are available:
Index Paper format Paper size
===== ============ ==========
0 Printer default -
1 Letter 8 1/2 x 11 in
2 Letter Small 8 1/2 x 11 in
3 Tabloid 11 x 17 in
4 Ledger 17 x 11 in
5 Legal 8 1/2 x 14 in
6 Statement 5 1/2 x 8 1/2 in
7 Executive 7 1/4 x 10 1/2 in
8 A3 297 x 420 mm
9 A4 210 x 297 mm
10 A4 Small 210 x 297 mm
11 A5 148 x 210 mm
12 B4 250 x 354 mm
13 B5 182 x 257 mm
14 Folio 8 1/2 x 13 in
15 Quarto 215 x 275 mm
16 - 10x14 in
17 - 11x17 in
18 Note 8 1/2 x 11 in
19 Envelope 9 3 7/8 x 8 7/8
20 Envelope 10 4 1/8 x 9 1/2
21 Envelope 11 4 1/2 x 10 3/8
22 Envelope 12 4 3/4 x 11
23 Envelope 14 5 x 11 1/2
24 C size sheet -
25 D size sheet -
26 E size sheet -
27 Envelope DL 110 x 220 mm
28 Envelope C3 324 x 458 mm
29 Envelope C4 229 x 324 mm
30 Envelope C5 162 x 229 mm
31 Envelope C6 114 x 162 mm
32 Envelope C65 114 x 229 mm
33 Envelope B4 250 x 353 mm
34 Envelope B5 176 x 250 mm
35 Envelope B6 176 x 125 mm
36 Envelope 110 x 230 mm
37 Monarch 3.875 x 7.5 in
38 Envelope 3 5/8 x 6 1/2 in
39 Fanfold 14 7/8 x 11 in
40 German Std Fanfold 8 1/2 x 12 in
41 German Legal Fanfold 8 1/2 x 13 inNote, it is likely that not all of these paper types will be available to the end user since it will depend on the paper formats that the user's printer supports. Therefore, it is best to stick to standard paper types.
$worksheet->set_paper( 1 ); # US Letter
$worksheet->set_paper( 9 ); # A4If you do not specify a paper type the worksheet will print using the printer's default paper.
center_horizontally()
Center the worksheet data horizontally between the margins on the printed page:
$worksheet->center_horizontally();center_vertically()
Center the worksheet data vertically between the margins on the printed page:
$worksheet->center_vertically();set_margins( $inches )
There are several methods available for setting the worksheet margins on the printed page:
set_margins() # Set all margins to the same value
set_margins_LR() # Set left and right margins to the same value
set_margins_TB() # Set top and bottom margins to the same value
set_margin_left(); # Set left margin
set_margin_right(); # Set right margin
set_margin_top(); # Set top margin
set_margin_bottom(); # Set bottom marginAll of these methods take a distance in inches as a parameter. Note: 1 inch = 25.4mm. ;-) The default left and right margin is 0.7 inch. The default top and bottom margin is 0.75 inch. Note, these defaults are different from the defaults used in the binary file format by Spreadsheet::WriteExcel.
set_header( $string, $margin )
Headers and footers are generated using a $string which is a combination of plain text and control characters. The $margin parameter is optional.
The available control character are:
Control Category Description
======= ======== ===========
&L Justification Left
&C Center
&R Right
&P Information Page number
&N Total number of pages
&D Date
&T Time
&F File name
&A Worksheet name
&Z Workbook path
&fontsize Font Font size
&"font,style" Font name and style
&U Single underline
&E Double underline
&S Strikethrough
&X Superscript
&Y Subscript
&[Picture] Images Image placeholder
&G Same as &[Picture]
&& Miscellaneous Literal ampersand &Text in headers and footers can be justified (aligned) to the left, center and right by prefixing the text with the control characters &L, &C and &R.
For example (with ASCII art representation of the results):
$worksheet->set_header('&LHello');
---------------------------------------------------------------
| |
| Hello |
| |
$worksheet->set_header('&CHello');
---------------------------------------------------------------
| |
| Hello |
| |
$worksheet->set_header('&RHello');
---------------------------------------------------------------
| |
| Hello |
| |For simple text, if you do not specify any justification the text will be centred. However, you must prefix the text with &C if you specify a font name or any other formatting:
$worksheet->set_header('Hello');
---------------------------------------------------------------
| |
| Hello |
| |You can have text in each of the justification regions:
$worksheet->set_header('&LCiao&CBello&RCielo');
---------------------------------------------------------------
| |
| Ciao Bello Cielo |
| |The information control characters act as variables that Excel will update as the workbook or worksheet changes. Times and dates are in the users default format:
$worksheet->set_header('&CPage &P of &N');
---------------------------------------------------------------
| |
| Page 1 of 6 |
| |
$worksheet->set_header('&CUpdated at &T');
---------------------------------------------------------------
| |
| Updated at 12:30 PM |
| |Images can be inserted using the options shown below. Each image must have a placeholder in header string using the &[Picture] or &G control characters:
$worksheet->set_header( '&L&G', 0.3, { image_left => 'logo.jpg' });You can specify the font size of a section of the text by prefixing it with the control character &n where n is the font size:
$worksheet1->set_header( '&C&30Hello Big' );
$worksheet2->set_header( '&C&10Hello Small' );You can specify the font of a section of the text by prefixing it with the control sequence &"font,style" where fontname is a font name such as "Courier New" or "Times New Roman" and style is one of the standard Windows font descriptions: "Regular", "Italic", "Bold" or "Bold Italic":
$worksheet1->set_header( '&C&"Courier New,Italic"Hello' );
$worksheet2->set_header( '&C&"Courier New,Bold Italic"Hello' );
$worksheet3->set_header( '&C&"Times New Roman,Regular"Hello' );It is possible to combine all of these features together to create sophisticated headers and footers. As an aid to setting up complicated headers and footers you can record a page set-up as a macro in Excel and look at the format strings that VBA produces. Remember however that VBA uses two double quotes "" to indicate a single double quote. For the last example above the equivalent VBA code looks like this:
.LeftHeader = ""
.CenterHeader = "&""Times New Roman,Regular""Hello"
.RightHeader = ""To include a single literal ampersand & in a header or footer you should use a double ampersand &&:
$worksheet1->set_header('&CCuriouser && Curiouser - Attorneys at Law');As stated above the margin parameter is optional. As with the other margins the value should be in inches. The default header and footer margin is 0.3 inch. Note, the default margin is different from the default used in the binary file format by Spreadsheet::WriteExcel. The header and footer margin size can be set as follows:
$worksheet->set_header( '&CHello', 0.75 );The header and footer margins are independent of the top and bottom margins.
The available options are:
image_leftThe path to the image. Requires a&Gor&[Picture]placeholder.image_centerSame as above.image_rightSame as above.scale_with_docScale header with document. Defaults to true.align_with_marginsAlign header to margins. Defaults to true.
The image options must have an accompanying &[Picture] or &G control character in the header string:
$worksheet->set_header(
'&L&[Picture]&C&[Picture]&R&[Picture]',
undef, # If you don't want to change the margin.
{
image_left => 'red.jpg',
image_center => 'blue.jpg',
image_right => 'yellow.jpg'
}
);Note, the header or footer string must be less than 255 characters. Strings longer than this will not be written and a warning will be generated.
The set_header() method can also handle Unicode strings in UTF-8 format.
$worksheet->set_header( "&C\x{263a}" )See, also the headers.pl program in the examples directory of the distribution.
set_footer( $string, $margin )
The syntax of the set_footer() method is the same as set_header(), see above.
repeat_rows( $first_row, $last_row )
Set the number of rows to repeat at the top of each printed page.
For large Excel documents it is often desirable to have the first row or rows of the worksheet print out at the top of each page. This can be achieved by using the repeat_rows() method. The parameters $first_row and $last_row are zero based. The $last_row parameter is optional if you only wish to specify one row:
$worksheet1->repeat_rows( 0 ); # Repeat the first row
$worksheet2->repeat_rows( 0, 1 ); # Repeat the first two rowsrepeat_columns( $first_col, $last_col )
Set the columns to repeat at the left hand side of each printed page.
For large Excel documents it is often desirable to have the first column or columns of the worksheet print out at the left hand side of each page. This can be achieved by using the repeat_columns() method. The parameters $first_column and $last_column are zero based. The $last_column parameter is optional if you only wish to specify one column. You can also specify the columns using A1 column notation, see the note about "Cell notation".
$worksheet1->repeat_columns( 0 ); # Repeat the first column
$worksheet2->repeat_columns( 0, 1 ); # Repeat the first two columns
$worksheet3->repeat_columns( 'A:A' ); # Repeat the first column
$worksheet4->repeat_columns( 'A:B' ); # Repeat the first two columnshide_gridlines( $option )
This method is used to hide the gridlines on the screen and printed page. Gridlines are the lines that divide the cells on a worksheet. Screen and printed gridlines are turned on by default in an Excel worksheet. If you have defined your own cell borders you may wish to hide the default gridlines.
$worksheet->hide_gridlines();The following values of $option are valid:
0 : Don't hide gridlines
1 : Hide printed gridlines only
2 : Hide screen and printed gridlinesIf you don't supply an argument or use undef the default option is 1, i.e. only the printed gridlines are hidden.
print_row_col_headers()
Set the option to print the row and column headers on the printed page.
An Excel worksheet looks something like the following;
------------------------------------------
| | A | B | C | D | ...
------------------------------------------
| 1 | | | | | ...
| 2 | | | | | ...
| 3 | | | | | ...
| 4 | | | | | ...
|...| ... | ... | ... | ... | ...The headers are the letters and numbers at the top and the left of the worksheet. Since these headers serve mainly as a indication of position on the worksheet they generally do not appear on the printed page. If you wish to have them printed you can use the print_row_col_headers() method:
$worksheet->print_row_col_headers();Do not confuse these headers with page headers as described in the set_header() section above.
hide_row_col_headers()
Similar to print_row_col_headers() above but set the option to hide the row and column headers within Excel so that they aren't visible to the user:
$worksheet->hide_row_col_headers();print_area( $first_row, $first_col, $last_row, $last_col )
This method is used to specify the area of the worksheet that will be printed. All four parameters must be specified. You can also use A1 notation, see the note about "Cell notation".
$worksheet1->print_area( 'A1:H20' ); # Cells A1 to H20
$worksheet2->print_area( 0, 0, 19, 7 ); # The same
$worksheet2->print_area( 'A:H' ); # Columns A to H if rows have dataprint_across()
The print_across method is used to change the default print direction. This is referred to by Excel as the sheet "page order".
$worksheet->print_across();The default page order is shown below for a worksheet that extends over 4 pages. The order is called "down then across":
[1] [3]
[2] [4]However, by using the print_across method the print order will be changed to "across then down":
[1] [2]
[3] [4]fit_to_pages( $width, $height )
The fit_to_pages() method is used to fit the printed area to a specific number of pages both vertically and horizontally. If the printed area exceeds the specified number of pages it will be scaled down to fit. This guarantees that the printed area will always appear on the specified number of pages even if the page size or margins change.
$worksheet1->fit_to_pages( 1, 1 ); # Fit to 1x1 pages
$worksheet2->fit_to_pages( 2, 1 ); # Fit to 2x1 pages
$worksheet3->fit_to_pages( 1, 2 ); # Fit to 1x2 pagesThe print area can be defined using the print_area() method as described above.
A common requirement is to fit the printed output to n pages wide but have the height be as long as necessary. To achieve this set the $height to zero:
$worksheet1->fit_to_pages( 1, 0 ); # 1 page wide and as long as necessaryNote that although it is valid to use both fit_to_pages() and set_print_scale() on the same worksheet only one of these options can be active at a time. The last method call made will set the active option.
Note that fit_to_pages() will override any manual page breaks that are defined in the worksheet.
Note: When using fit_to_pages() it may also be required to set the printer paper size using set_paper() or else Excel will default to "US Letter".
set_start_page( $start_page )
The set_start_page() method is used to set the number of the starting page when the worksheet is printed out. The default value is 1.
$worksheet->set_start_page( 2 );set_print_scale( $scale )
Set the scale factor of the printed page. Scale factors in the range 10 <= $scale <= 400 are valid:
$worksheet1->set_print_scale( 50 );
$worksheet2->set_print_scale( 75 );
$worksheet3->set_print_scale( 300 );
$worksheet4->set_print_scale( 400 );The default scale factor is 100. Note, set_print_scale() does not affect the scale of the visible page in Excel. For that you should use set_zoom().
Note also that although it is valid to use both fit_to_pages() and set_print_scale() on the same worksheet only one of these options can be active at a time. The last method call made will set the active option.
print_black_and_white()
Set the option to print the worksheet in black and white:
$worksheet->print_black_and_white();set_h_pagebreaks( @breaks )
Add horizontal page breaks to a worksheet. A page break causes all the data that follows it to be printed on the next page. Horizontal page breaks act between rows. To create a page break between rows 20 and 21 you must specify the break at row 21. However in zero index notation this is actually row 20. So you can pretend for a small while that you are using 1 index notation:
$worksheet1->set_h_pagebreaks( 20 ); # Break between row 20 and 21The set_h_pagebreaks() method will accept a list of page breaks and you can call it more than once:
$worksheet2->set_h_pagebreaks( 20, 40, 60, 80, 100 ); # Add breaks
$worksheet2->set_h_pagebreaks( 120, 140, 160, 180, 200 ); # Add some moreNote: If you specify the "fit to page" option via the fit_to_pages() method it will override all manual page breaks.
There is a silent limitation of about 1000 horizontal page breaks per worksheet in line with an Excel internal limitation.
set_v_pagebreaks( @breaks )
Add vertical page breaks to a worksheet. A page break causes all the data that follows it to be printed on the next page. Vertical page breaks act between columns. To create a page break between columns 20 and 21 you must specify the break at column 21. However in zero index notation this is actually column 20. So you can pretend for a small while that you are using 1 index notation:
$worksheet1->set_v_pagebreaks(20); # Break between column 20 and 21The set_v_pagebreaks() method will accept a list of page breaks and you can call it more than once:
$worksheet2->set_v_pagebreaks( 20, 40, 60, 80, 100 ); # Add breaks
$worksheet2->set_v_pagebreaks( 120, 140, 160, 180, 200 ); # Add some moreNote: If you specify the "fit to page" option via the fit_to_pages() method it will override all manual page breaks.
CELL FORMATTING
This section describes the methods and properties that are available for formatting cells in Excel. The properties of a cell that can be formatted include: fonts, colours, patterns, borders, alignment and number formatting.
Creating and using a Format object
Cell formatting is defined through a Format object. Format objects are created by calling the workbook add_format() method as follows:
my $format1 = $workbook->add_format(); # Set properties later
my $format2 = $workbook->add_format( %props ); # Set at creationThe format object holds all the formatting properties that can be applied to a cell, a row or a column. The process of setting these properties is discussed in the next section.
Once a Format object has been constructed and its properties have been set it can be passed as an argument to the worksheet write methods as follows:
$worksheet->write( 0, 0, 'One', $format );
$worksheet->write_string( 1, 0, 'Two', $format );
$worksheet->write_number( 2, 0, 3, $format );
$worksheet->write_blank( 3, 0, $format );Formats can also be passed to the worksheet set_row() and set_column() methods to define the default property for a row or column.
$worksheet->set_row( 0, 15, $format );
$worksheet->set_column( 0, 0, 15, $format );Format methods and Format properties
The following table shows the Excel format categories, the formatting properties that can be applied and the equivalent object method:
Category Description Property Method Name
-------- ----------- -------- -----------
Font Font type font set_font()
Font size size set_size()
Font color color set_color()
Bold bold set_bold()
Italic italic set_italic()
Underline underline set_underline()
Strikeout font_strikeout set_font_strikeout()
Super/Subscript font_script set_font_script()
Outline font_outline set_font_outline()
Shadow font_shadow set_font_shadow()
Number Numeric format num_format set_num_format()
Protection Lock cells locked set_locked()
Hide formulas hidden set_hidden()
Alignment Horizontal align align set_align()
Vertical align valign set_align()
Rotation rotation set_rotation()
Text wrap text_wrap set_text_wrap()
Justify last text_justlast set_text_justlast()
Center across center_across set_center_across()
Indentation indent set_indent()
Shrink to fit shrink set_shrink()
Pattern Cell pattern pattern set_pattern()
Background color bg_color set_bg_color()
Foreground color fg_color set_fg_color()
Border Cell border border set_border()
Bottom border bottom set_bottom()
Top border top set_top()
Left border left set_left()
Right border right set_right()
Border color border_color set_border_color()
Bottom color bottom_color set_bottom_color()
Top color top_color set_top_color()
Left color left_color set_left_color()
Right color right_color set_right_color()
Diagonal type diag_type set_diag_type()
Diagonal border diag_border set_diag_border()
Diagonal color diag_color set_diag_color()There are two ways of setting Format properties: by using the object method interface or by setting the property directly. For example, a typical use of the method interface would be as follows:
my $format = $workbook->add_format();
$format->set_bold();
$format->set_color( 'red' );By comparison the properties can be set directly by passing a hash of properties to the Format constructor:
my $format = $workbook->add_format( bold => 1, color => 'red' );or after the Format has been constructed by means of the set_format_properties() method as follows:
my $format = $workbook->add_format();
$format->set_format_properties( bold => 1, color => 'red' );You can also store the properties in one or more named hashes and pass them to the required method:
my %font = (
font => 'Calibri',
size => 12,
color => 'blue',
bold => 1,
);
my %shading = (
bg_color => 'green',
pattern => 1,
);
my $format1 = $workbook->add_format( %font ); # Font only
my $format2 = $workbook->add_format( %font, %shading ); # Font and shadingThe provision of two ways of setting properties might lead you to wonder which is the best way. The method mechanism may be better if you prefer setting properties via method calls (which the author did when the code was first written) otherwise passing properties to the constructor has proved to be a little more flexible and self documenting in practice. An additional advantage of working with property hashes is that it allows you to share formatting between workbook objects as shown in the example above.
The Perl/Tk style of adding properties is also supported:
my %font = (
-font => 'Calibri',
-size => 12,
-color => 'blue',
-bold => 1,
);Working with formats
The default format is Calibri 11 with all other properties off.
Each unique format in Excel::Writer::XLSX must have a corresponding Format object. It isn't possible to use a Format with a write() method and then redefine the Format for use at a later stage. This is because a Format is applied to a cell not in its current state but in its final state. Consider the following example:
my $format = $workbook->add_format();
$format->set_bold();
$format->set_color( 'red' );
$worksheet->write( 'A1', 'Cell A1', $format );
$format->set_color( 'green' );
$worksheet->write( 'B1', 'Cell B1', $format );Cell A1 is assigned the Format $format which is initially set to the colour red. However, the colour is subsequently set to green. When Excel displays Cell A1 it will display the final state of the Format which in this case will be the colour green.
In general a method call without an argument will turn a property on, for example:
my $format1 = $workbook->add_format();
$format1->set_bold(); # Turns bold on
$format1->set_bold( 1 ); # Also turns bold on
$format1->set_bold( 0 ); # Turns bold offFORMAT METHODS
The Format object methods are described in more detail in the following sections. In addition, there is a Perl program called formats.pl in the examples directory of the WriteExcel distribution. This program creates an Excel workbook called formats.xlsx which contains examples of almost all the format types.
The following Format methods are available:
set_font()
set_size()
set_color()
set_bold()
set_italic()
set_underline()
set_font_strikeout()
set_font_script()
set_font_outline()
set_font_shadow()
set_num_format()
set_locked()
set_hidden()
set_align()
set_rotation()
set_text_wrap()
set_text_justlast()
set_center_across()
set_indent()
set_shrink()
set_pattern()
set_bg_color()
set_fg_color()
set_border()
set_bottom()
set_top()
set_left()
set_right()
set_border_color()
set_bottom_color()
set_top_color()
set_left_color()
set_right_color()
set_diag_type()
set_diag_border()
set_diag_color()The above methods can also be applied directly as properties. For example $format->set_bold() is equivalent to $workbook->add_format(bold => 1).
set_format_properties( %properties )
The properties of an existing Format object can be also be set by means of set_format_properties():
my $format = $workbook->add_format();
$format->set_format_properties( bold => 1, color => 'red' );However, this method is here mainly for legacy reasons. It is preferable to set the properties in the format constructor:
my $format = $workbook->add_format( bold => 1, color => 'red' );set_font( $fontname )
Default state: Font is Calibri
Default action: None
Valid args: Any valid font nameSpecify the font used:
$format->set_font('Times New Roman');Excel can only display fonts that are installed on the system that it is running on. Therefore it is best to use the fonts that come as standard such as 'Calibri', 'Times New Roman' and 'Courier New'. See also the Fonts worksheet created by formats.pl
set_size()
Default state: Font size is 10
Default action: Set font size to 1
Valid args: Integer values from 1 to as big as your screen.Set the font size. Excel adjusts the height of a row to accommodate the largest font size in the row. You can also explicitly specify the height of a row using the set_row() worksheet method.
my $format = $workbook->add_format();
$format->set_size( 30 );set_color()
Default state: Excels default color, usually black
Default action: Set the default color
Valid args: Html RGB strings like "#FF0000" or the following shortcut strings:
'black'
'blue'
'brown'
'cyan'
'gray'
'green'
'lime'
'magenta'
'navy'
'orange'
'pink'
'purple'
'red'
'silver'
'white'
'yellow'Set the font colour. The set_color() method is used as follows:
my $format = $workbook->add_format();
$format->set_color( 'red' );
$worksheet->write( 0, 0, 'wheelbarrow', $format );Note: The set_color() method is used to set the colour of the font in a cell. To set the colour of a cell use the set_bg_color() and set_pattern() methods.
For additional examples see the 'Named colors' and 'Standard colors' worksheets created by formats.pl in the examples directory.
See also "WORKING WITH COLOURS".
set_bold()
Default state: bold is off
Default action: Turn bold on
Valid args: 0, 1Set the bold property of the font:
$format->set_bold(); # Turn bold onset_italic()
Default state: Italic is off
Default action: Turn italic on
Valid args: 0, 1Set the italic property of the font:
$format->set_italic(); # Turn italic onset_underline()
Default state: Underline is off
Default action: Turn on single underline
Valid args: 0 = No underline
1 = Single underline
2 = Double underline
33 = Single accounting underline
34 = Double accounting underlineSet the underline property of the font.
$format->set_underline(); # Single underlineset_font_strikeout()
Default state: Strikeout is off
Default action: Turn strikeout on
Valid args: 0, 1Set the strikeout property of the font.
set_font_script()
Default state: Super/Subscript is off
Default action: Turn Superscript on
Valid args: 0 = Normal
1 = Superscript
2 = SubscriptSet the superscript/subscript property of the font.
set_font_outline()
Default state: Outline is off
Default action: Turn outline on
Valid args: 0, 1Macintosh only.
set_font_shadow()
Default state: Shadow is off
Default action: Turn shadow on
Valid args: 0, 1Macintosh only.
set_num_format()
Default state: General format
Default action: Format index 1
Valid args: See the following tableThis method is used to define the numerical format of a number in Excel. It controls whether a number is displayed as an integer, a floating point number, a date, a currency value or some other user defined format.
The numerical format of a cell can be specified by using a format string or an index to one of Excel's built-in formats:
my $format1 = $workbook->add_format();
my $format2 = $workbook->add_format();
$format1->set_num_format( 'd mmm yyyy' ); # Format string
$format2->set_num_format( 0x0f ); # Format index
$worksheet->write( 0, 0, 36892.521, $format1 ); # 1 Jan 2001
$worksheet->write( 0, 0, 36892.521, $format2 ); # 1-Jan-01Using format strings you can define very sophisticated formatting of numbers.
$format01->set_num_format( '0.000' );
$worksheet->write( 0, 0, 3.1415926, $format01 ); # 3.142
$format02->set_num_format( '#,##0' );
$worksheet->write( 1, 0, 1234.56, $format02 ); # 1,235
$format03->set_num_format( '#,##0.00' );
$worksheet->write( 2, 0, 1234.56, $format03 ); # 1,234.56
$format04->set_num_format( '$0.00' );
$worksheet->write( 3, 0, 49.99, $format04 ); # $49.99
# Note you can use other currency symbols such as the pound or yen as well.
# Other currencies may require the use of Unicode.
$format07->set_num_format( 'mm/dd/yy' );
$worksheet->write( 6, 0, 36892.521, $format07 ); # 01/01/01
$format08->set_num_format( 'mmm d yyyy' );
$worksheet->write( 7, 0, 36892.521, $format08 ); # Jan 1 2001
$format09->set_num_format( 'd mmmm yyyy' );
$worksheet->write( 8, 0, 36892.521, $format09 ); # 1 January 2001
$format10->set_num_format( 'dd/mm/yyyy hh:mm AM/PM' );
$worksheet->write( 9, 0, 36892.521, $format10 ); # 01/01/2001 12:30 PM
$format11->set_num_format( '0 "dollar and" .00 "cents"' );
$worksheet->write( 10, 0, 1.87, $format11 ); # 1 dollar and .87 cents
# Conditional numerical formatting.
$format12->set_num_format( '[Green]General;[Red]-General;General' );
$worksheet->write( 11, 0, 123, $format12 ); # > 0 Green
$worksheet->write( 12, 0, -45, $format12 ); # < 0 Red
$worksheet->write( 13, 0, 0, $format12 ); # = 0 Default colour
# Zip code
$format13->set_num_format( '00000' );
$worksheet->write( 14, 0, '01209', $format13 );The number system used for dates is described in "DATES AND TIME IN EXCEL".
The colour format should have one of the following values:
[Black] [Blue] [Cyan] [Green] [Magenta] [Red] [White] [Yellow]Alternatively you can specify the colour based on a colour index as follows: [Color n], where n is a standard Excel colour index - 7. See the 'Standard colors' worksheet created by formats.pl.
For more information refer to the documentation on formatting in the docs directory of the Excel::Writer::XLSX distro, the Excel on-line help or http://office.microsoft.com/en-gb/assistance/HP051995001033.aspx.
You should ensure that the format string is valid in Excel prior to using it in WriteExcel.
Excel's built-in formats are shown in the following table:
Index Index Format String
0 0x00 General
1 0x01 0
2 0x02 0.00
3 0x03 #,##0
4 0x04 #,##0.00
5 0x05 ($#,##0_);($#,##0)
6 0x06 ($#,##0_);[Red]($#,##0)
7 0x07 ($#,##0.00_);($#,##0.00)
8 0x08 ($#,##0.00_);[Red]($#,##0.00)
9 0x09 0%
10 0x0a 0.00%
11 0x0b 0.00E+00
12 0x0c # ?/?
13 0x0d # ??/??
14 0x0e m/d/yy
15 0x0f d-mmm-yy
16 0x10 d-mmm
17 0x11 mmm-yy
18 0x12 h:mm AM/PM
19 0x13 h:mm:ss AM/PM
20 0x14 h:mm
21 0x15 h:mm:ss
22 0x16 m/d/yy h:mm
.. .... ...........
37 0x25 (#,##0_);(#,##0)
38 0x26 (#,##0_);[Red](#,##0)
39 0x27 (#,##0.00_);(#,##0.00)
40 0x28 (#,##0.00_);[Red](#,##0.00)
41 0x29 _(* #,##0_);_(* (#,##0);_(* "-"_);_(@_)
42 0x2a _($* #,##0_);_($* (#,##0);_($* "-"_);_(@_)
43 0x2b _(* #,##0.00_);_(* (#,##0.00);_(* "-"??_);_(@_)
44 0x2c _($* #,##0.00_);_($* (#,##0.00);_($* "-"??_);_(@_)
45 0x2d mm:ss
46 0x2e [h]:mm:ss
47 0x2f mm:ss.0
48 0x30 ##0.0E+0
49 0x31 @For examples of these formatting codes see the 'Numerical formats' worksheet created by formats.pl. See also the number_formats1.html and the number_formats2.html documents in the docs directory of the distro.
Note 1. Numeric formats 23 to 36 are not documented by Microsoft and may differ in international versions.
Note 2. The built-in formats are localised according to the locale settings (regional settings on Windows) of the user when opening the file in Excel:
The dot appears as the defined local decimal separator.
The comma appears as the defined local digit groups separator.
The dollar sign appears as the defined local currency symbol.
The date, time and duration formats appear as the local equivalent date or time format.
set_locked()
Default state: Cell locking is on
Default action: Turn locking on
Valid args: 0, 1This property can be used to prevent modification of a cells contents. Following Excel's convention, cell locking is turned on by default. However, it only has an effect if the worksheet has been protected, see the worksheet protect() method.
my $locked = $workbook->add_format();
$locked->set_locked( 1 ); # A non-op
my $unlocked = $workbook->add_format();
$unlocked->set_locked( 0 );
# Enable worksheet protection
$worksheet->protect();
# This cell cannot be edited.
$worksheet->write( 'A1', '=1+2', $locked );
# This cell can be edited.
$worksheet->write( 'A2', '=1+2', $unlocked );Note: This offers weak protection even with a password, see the note in relation to the protect() method.
set_hidden()
Default state: Formula hiding is off
Default action: Turn hiding on
Valid args: 0, 1This property is used to hide a formula while still displaying its result. This is generally used to hide complex calculations from end users who are only interested in the result. It only has an effect if the worksheet has been protected, see the worksheet protect() method.
my $hidden = $workbook->add_format();
$hidden->set_hidden();
# Enable worksheet protection
$worksheet->protect();
# The formula in this cell isn't visible
$worksheet->write( 'A1', '=1+2', $hidden );Note: This offers weak protection even with a password, see the note in relation to the protect() method.
set_align()
Default state: Alignment is off
Default action: Left alignment
Valid args: 'left' Horizontal
'center'
'right'
'fill'
'justify'
'center_across'
'top' Vertical
'vcenter'
'bottom'
'vjustify'This method is used to set the horizontal and vertical text alignment within a cell. Vertical and horizontal alignments can be combined. The method is used as follows:
my $format = $workbook->add_format();
$format->set_align( 'center' );
$format->set_align( 'vcenter' );
$worksheet->set_row( 0, 30 );
$worksheet->write( 0, 0, 'X', $format );Text can be aligned across two or more adjacent cells using the center_across property. However, for genuine merged cells it is better to use the merge_range() worksheet method.
The vjustify (vertical justify) option can be used to provide automatic text wrapping in a cell. The height of the cell will be adjusted to accommodate the wrapped text. To specify where the text wraps use the set_text_wrap() method.
For further examples see the 'Alignment' worksheet created by formats.pl.
set_center_across()
Default state: Center across selection is off
Default action: Turn center across on
Valid args: 1Text can be aligned across two or more adjacent cells using the set_center_across() method. This is an alias for the set_align('center_across') method call.
Only one cell should contain the text, the other cells should be blank:
my $format = $workbook->add_format();
$format->set_center_across();
$worksheet->write( 1, 1, 'Center across selection', $format );
$worksheet->write_blank( 1, 2, $format );See also the merge1.pl to merge6.pl programs in the examples directory and the merge_range() method.
set_text_wrap()
Default state: Text wrap is off
Default action: Turn text wrap on
Valid args: 0, 1Here is an example using the text wrap property, the escape character \n is used to indicate the end of line:
my $format = $workbook->add_format();
$format->set_text_wrap();
$worksheet->write( 0, 0, "It's\na bum\nwrap", $format );Excel will adjust the height of the row to accommodate the wrapped text. A similar effect can be obtained without newlines using the set_align('vjustify') method. See the textwrap.pl program in the examples directory.
set_rotation()
Default state: Text rotation is off
Default action: None
Valid args: Integers in the range -90 to 90 and 270Set the rotation of the text in a cell. The rotation can be any angle in the range -90 to 90 degrees.
my $format = $workbook->add_format();
$format->set_rotation( 30 );
$worksheet->write( 0, 0, 'This text is rotated', $format );The angle 270 is also supported. This indicates text where the letters run from top to bottom.
set_indent()
Default state: Text indentation is off
Default action: Indent text 1 level
Valid args: Positive integersThis method can be used to indent text. The argument, which should be an integer, is taken as the level of indentation:
my $format = $workbook->add_format();
$format->set_indent( 2 );
$worksheet->write( 0, 0, 'This text is indented', $format );Indentation is a horizontal alignment property. It will override any other horizontal properties but it can be used in conjunction with vertical properties.
set_shrink()
Default state: Text shrinking is off
Default action: Turn "shrink to fit" on
Valid args: 1This method can be used to shrink text so that it fits in a cell.
my $format = $workbook->add_format();
$format->set_shrink();
$worksheet->write( 0, 0, 'Honey, I shrunk the text!', $format );set_text_justlast()
Default state: Justify last is off
Default action: Turn justify last on
Valid args: 0, 1Only applies to Far Eastern versions of Excel.
set_pattern()
Default state: Pattern is off
Default action: Solid fill is on
Valid args: 0 .. 18Set the background pattern of a cell.
Examples of the available patterns are shown in the 'Patterns' worksheet created by formats.pl. However, it is unlikely that you will ever need anything other than Pattern 1 which is a solid fill of the background color.
set_bg_color()
Default state: Color is off
Default action: Solid fill.
Valid args: See set_color()The set_bg_color() method can be used to set the background colour of a pattern. Patterns are defined via the set_pattern() method. If a pattern hasn't been defined then a solid fill pattern is used as the default.
Here is an example of how to set up a solid fill in a cell:
my $format = $workbook->add_format();
$format->set_pattern(); # This is optional when using a solid fill
$format->set_bg_color( 'green' );
$worksheet->write( 'A1', 'Ray', $format );For further examples see the 'Patterns' worksheet created by formats.pl.
set_fg_color()
Default state: Color is off
Default action: Solid fill.
Valid args: See set_color()The set_fg_color() method can be used to set the foreground colour of a pattern.
For further examples see the 'Patterns' worksheet created by formats.pl.
set_border()
Also applies to: set_bottom()
set_top()
set_left()
set_right()
Default state: Border is off
Default action: Set border type 1
Valid args: 0-13, See below.A cell border is comprised of a border on the bottom, top, left and right. These can be set to the same value using set_border() or individually using the relevant method calls shown above.
The following shows the border styles sorted by Excel::Writer::XLSX index number:
Index Name Weight Style
===== ============= ====== ===========
0 None 0
1 Continuous 1 -----------
2 Continuous 2 -----------
3 Dash 1 - - - - - -
4 Dot 1 . . . . . .
5 Continuous 3 -----------
6 Double 3 ===========
7 Continuous 0 -----------
8 Dash 2 - - - - - -
9 Dash Dot 1 - . - . - .
10 Dash Dot 2 - . - . - .
11 Dash Dot Dot 1 - . . - . .
12 Dash Dot Dot 2 - . . - . .
13 SlantDash Dot 2 / - . / - .The following shows the borders sorted by style:
Name Weight Style Index
============= ====== =========== =====
Continuous 0 ----------- 7
Continuous 1 ----------- 1
Continuous 2 ----------- 2
Continuous 3 ----------- 5
Dash 1 - - - - - - 3
Dash 2 - - - - - - 8
Dash Dot 1 - . - . - . 9
Dash Dot 2 - . - . - . 10
Dash Dot Dot 1 - . . - . . 11
Dash Dot Dot 2 - . . - . . 12
Dot 1 . . . . . . 4
Double 3 =========== 6
None 0 0
SlantDash Dot 2 / - . / - . 13The following shows the borders in the order shown in the Excel Dialog.
Index Style Index Style
===== ===== ===== =====
0 None 12 - . . - . .
7 ----------- 13 / - . / - .
4 . . . . . . 10 - . - . - .
11 - . . - . . 8 - - - - - -
9 - . - . - . 2 -----------
3 - - - - - - 5 -----------
1 ----------- 6 ===========Examples of the available border styles are shown in the 'Borders' worksheet created by formats.pl.
set_border_color()
Also applies to: set_bottom_color()
set_top_color()
set_left_color()
set_right_color()
Default state: Color is off
Default action: Undefined
Valid args: See set_color()Set the colour of the cell borders. A cell border is comprised of a border on the bottom, top, left and right. These can be set to the same colour using set_border_color() or individually using the relevant method calls shown above. Examples of the border styles and colours are shown in the 'Borders' worksheet created by formats.pl.
set_diag_type()
Default state: Diagonal border is off.
Default action: None.
Valid args: 1-3, See below.Set the diagonal border type for the cell. Three types of diagonal borders are available in Excel:
1: From bottom left to top right.
2: From top left to bottom right.
3: Same as 1 and 2 combined.For example:
$format->set_diag_type( 3 );set_diag_border()
Default state: Border is off
Default action: Set border type 1
Valid args: 0-13, See below.Set the diagonal border style. Same as the parameter to set_border() above.
set_diag_color()
Default state: Color is off
Default action: Undefined
Valid args: See set_color()Set the colour of the diagonal cell border:
$format->set_diag_type( 3 );
$format->set_diag_border( 7 );
$format->set_diag_color( 'red' );set_quote_prefix()
Default state: quote prefix is off
Default action: Turn quote prefix on
Valid args: 0, 1Set the quote prefix property of a format to ensure a string is treated as a string after editing. This is the same as prefixing the string with a single quote in Excel. You don't need to add the quote to the string but you do need to add the format.
Set the quote prefix property of the format:
$format->set_quote_prefix(); # Turn quote prefix oncopy( $format )
This method is used to copy all of the properties from one Format object to another:
my $lorry1 = $workbook->add_format();
$lorry1->set_bold();
$lorry1->set_italic();
$lorry1->set_color( 'red' ); # lorry1 is bold, italic and red
my $lorry2 = $workbook->add_format();
$lorry2->copy( $lorry1 );
$lorry2->set_color( 'yellow' ); # lorry2 is bold, italic and yellowThe copy() method is only useful if you are using the method interface to Format properties. It generally isn't required if you are setting Format properties directly using hashes.
Note: this is not a copy constructor, both objects must exist prior to copying.
UNICODE IN EXCEL
The following is a brief introduction to handling Unicode in Excel::Writer::XLSX.
For a more general introduction to Unicode handling in Perl see perlunitut and perluniintro.
Excel::Writer::XLSX writer differs from Spreadsheet::WriteExcel in that it only handles Unicode data in UTF-8 format and doesn't try to handle legacy UTF-16 Excel formats.
If the data is in UTF-8 format then Excel::Writer::XLSX will handle it automatically.
If you are dealing with non-ASCII characters that aren't in UTF-8 then perl provides useful tools in the guise of the Encode module to help you to convert to the required format. For example:
use Encode 'decode';
my $string = 'some string with koi8-r characters';
$string = decode('koi8-r', $string); # koi8-r to utf8Alternatively you can read data from an encoded file and convert it to UTF-8 as you read it in:
my $file = 'unicode_koi8r.txt';
open FH, '<:encoding(koi8-r)', $file or die "Couldn't open $file: $!\n";
my $row = 0;
while ( <FH> ) {
# Data read in is now in utf8 format.
chomp;
$worksheet->write( $row++, 0, $_ );
}These methodologies are explained in more detail in perlunitut, perluniintro and perlunicode.
If the program contains UTF-8 text then you will also need to add use utf8 to the includes:
use utf8;
...
$worksheet->write( 'A1', 'Some UTF-8 string' );See also the unicode_*.pl programs in the examples directory of the distro.
WORKING WITH COLOURS
Throughout Excel::Writer::XLSX colours can be specified using a Html style #RRGGBB value. For example with a Format object:
$format->set_color( '#FF0000' );For backward compatibility a limited number of color names are supported:
$format->set_color( 'red' );The color names supported are:
black
blue
brown
cyan
gray
green
lime
magenta
navy
orange
pink
purple
red
silver
white
yellowSee also colors.pl in the examples directory.
DATES AND TIME IN EXCEL
There are two important things to understand about dates and times in Excel:
- 1 A date/time in Excel is a real number plus an Excel number format.
- 2 Excel::Writer::XLSX doesn't automatically convert date/time strings in
write()to an Excel date/time.
These two points are explained in more detail below along with some suggestions on how to convert times and dates to the required format.
An Excel date/time is a number plus a format
If you write a date string with write() then all you will get is a string:
$worksheet->write( 'A1', '02/03/04' ); # !! Writes a string not a date. !!Dates and times in Excel are represented by real numbers, for example "Jan 1 2001 12:30 PM" is represented by the number 36892.521.
The integer part of the number stores the number of days since the epoch and the fractional part stores the percentage of the day.
A date or time in Excel is just like any other number. To have the number display as a date you must apply an Excel number format to it. Here are some examples.
#!/usr/bin/perl -w
use strict;
use Excel::Writer::XLSX;
my $workbook = Excel::Writer::XLSX->new( 'date_examples.xlsx' );
my $worksheet = $workbook->add_worksheet();
$worksheet->set_column( 'A:A', 30 ); # For extra visibility.
my $number = 39506.5;
$worksheet->write( 'A1', $number ); # 39506.5
my $format2 = $workbook->add_format( num_format => 'dd/mm/yy' );
$worksheet->write( 'A2', $number, $format2 ); # 28/02/08
my $format3 = $workbook->add_format( num_format => 'mm/dd/yy' );
$worksheet->write( 'A3', $number, $format3 ); # 02/28/08
my $format4 = $workbook->add_format( num_format => 'd-m-yyyy' );
$worksheet->write( 'A4', $number, $format4 ); # 28-2-2008
my $format5 = $workbook->add_format( num_format => 'dd/mm/yy hh:mm' );
$worksheet->write( 'A5', $number, $format5 ); # 28/02/08 12:00
my $format6 = $workbook->add_format( num_format => 'd mmm yyyy' );
$worksheet->write( 'A6', $number, $format6 ); # 28 Feb 2008
my $format7 = $workbook->add_format( num_format => 'mmm d yyyy hh:mm AM/PM' );
$worksheet->write('A7', $number , $format7); # Feb 28 2008 12:00 PM
$workbook->close();Excel::Writer::XLSX doesn't automatically convert date/time strings
Excel::Writer::XLSX doesn't automatically convert input date strings into Excel's formatted date numbers due to the large number of possible date formats and also due to the possibility of misinterpretation.
For example, does 02/03/04 mean March 2 2004, February 3 2004 or even March 4 2002.
Therefore, in order to handle dates you will have to convert them to numbers and apply an Excel format. Some methods for converting dates are listed in the next section.
The most direct way is to convert your dates to the ISO8601 yyyy-mm-ddThh:mm:ss.sss date format and use the write_date_time() worksheet method:
$worksheet->write_date_time( 'A2', '2001-01-01T12:20', $format );See the write_date_time() section of the documentation for more details.
A general methodology for handling date strings with write_date_time() is:
1. Identify incoming date/time strings with a regex.
2. Extract the component parts of the date/time using the same regex.
3. Convert the date/time to the ISO8601 format.
4. Write the date/time using write_date_time() and a number format.Here is an example:
#!/usr/bin/perl -w
use strict;
use Excel::Writer::XLSX;
my $workbook = Excel::Writer::XLSX->new( 'example.xlsx' );
my $worksheet = $workbook->add_worksheet();
# Set the default format for dates.
my $date_format = $workbook->add_format( num_format => 'mmm d yyyy' );
# Increase column width to improve visibility of data.
$worksheet->set_column( 'A:C', 20 );
# Simulate reading from a data source.
my $row = 0;
while ( <DATA> ) {
chomp;
my $col = 0;
my @data = split ' ';
for my $item ( @data ) {
# Match dates in the following formats: d/m/yy, d/m/yyyy
if ( $item =~ qr[^(\d{1,2})/(\d{1,2})/(\d{4})$] ) {
# Change to the date format required by write_date_time().
my $date = sprintf "%4d-%02d-%02dT", $3, $2, $1;
$worksheet->write_date_time( $row, $col++, $date,
$date_format );
}
else {
# Just plain data
$worksheet->write( $row, $col++, $item );
}
}
$row++;
}
$workbook->close();
__DATA__
Item Cost Date
Book 10 1/9/2007
Beer 4 12/9/2007
Bed 500 5/10/2007For a slightly more advanced solution you can modify the write() method to handle date formats of your choice via the add_write_handler() method. See the add_write_handler() section of the docs and the write_handler3.pl and write_handler4.pl programs in the examples directory of the distro.
Converting dates and times to an Excel date or time
The write_date_time() method above is just one way of handling dates and times.
You can also use the convert_date_time() worksheet method to convert from an ISO8601 style date string to an Excel date and time number.
The Excel::Writer::XLSX::Utility module which is included in the distro has date/time handling functions:
use Excel::Writer::XLSX::Utility;
$date = xl_date_list(2002, 1, 1); # 37257
$date = xl_parse_date("11 July 1997"); # 35622
$time = xl_parse_time('3:21:36 PM'); # 0.64
$date = xl_decode_date_EU("13 May 2002"); # 37389Note: some of these functions require additional CPAN modules.
For date conversions using the CPAN DateTime framework see DateTime::Format::Excel http://search.cpan.org/search?dist=DateTime-Format-Excel.
OUTLINES AND GROUPING IN EXCEL
Excel allows you to group rows or columns so that they can be hidden or displayed with a single mouse click. This feature is referred to as outlines.
Outlines can reduce complex data down to a few salient sub-totals or summaries.
This feature is best viewed in Excel but the following is an ASCII representation of what a worksheet with three outlines might look like. Rows 3-4 and rows 7-8 are grouped at level 2. Rows 2-9 are grouped at level 1. The lines at the left hand side are called outline level bars.
------------------------------------------
1 2 3 | | A | B | C | D | ...
------------------------------------------
_ | 1 | A | | | | ...
| _ | 2 | B | | | | ...
| | | 3 | (C) | | | | ...
| | | 4 | (D) | | | | ...
| - | 5 | E | | | | ...
| _ | 6 | F | | | | ...
| | | 7 | (G) | | | | ...
| | | 8 | (H) | | | | ...
| - | 9 | I | | | | ...
- | . | ... | ... | ... | ... | ...Clicking the minus sign on each of the level 2 outlines will collapse and hide the data as shown in the next figure. The minus sign changes to a plus sign to indicate that the data in the outline is hidden.
------------------------------------------
1 2 3 | | A | B | C | D | ...
------------------------------------------
_ | 1 | A | | | | ...
| | 2 | B | | | | ...
| + | 5 | E | | | | ...
| | 6 | F | | | | ...
| + | 9 | I | | | | ...
- | . | ... | ... | ... | ... | ...Clicking on the minus sign on the level 1 outline will collapse the remaining rows as follows:
------------------------------------------
1 2 3 | | A | B | C | D | ...
------------------------------------------
| 1 | A | | | | ...
+ | . | ... | ... | ... | ... | ...Grouping in Excel::Writer::XLSX is achieved by setting the outline level via the set_row() and set_column() worksheet methods:
set_row( $row, $height, $format, $hidden, $level, $collapsed )
set_column( $first_col, $last_col, $width, $format, $hidden, $level, $collapsed )The following example sets an outline level of 1 for rows 2 and 3 (zero-indexed) and columns B to G. The parameters $height and $XF are assigned default values since they are undefined:
$worksheet->set_row( 1, undef, undef, 0, 1 );
$worksheet->set_row( 2, undef, undef, 0, 1 );
$worksheet->set_column( 'B:G', undef, undef, 0, 1 );Excel allows up to 7 outline levels. Therefore the $level parameter should be in the range 0 <= $level <= 7.
Rows and columns can be collapsed by setting the $hidden flag for the hidden rows/columns and setting the $collapsed flag for the row/column that has the collapsed + symbol:
$worksheet->set_row( 1, undef, undef, 1, 1 );
$worksheet->set_row( 2, undef, undef, 1, 1 );
$worksheet->set_row( 3, undef, undef, 0, 0, 1 ); # Collapsed flag.
$worksheet->set_column( 'B:G', undef, undef, 1, 1 );
$worksheet->set_column( 'H:H', undef, undef, 0, 0, 1 ); # Collapsed flag.Note: Setting the $collapsed flag is particularly important for compatibility with OpenOffice.org and Gnumeric.
For a more complete example see the outline.pl and outline_collapsed.pl programs in the examples directory of the distro.
Some additional outline properties can be set via the outline_settings() worksheet method, see above.
DATA VALIDATION IN EXCEL
Data validation is a feature of Excel which allows you to restrict the data that a users enters in a cell and to display help and warning messages. It also allows you to restrict input to values in a drop down list.
A typical use case might be to restrict data in a cell to integer values in a certain range, to provide a help message to indicate the required value and to issue a warning if the input data doesn't meet the stated criteria. In Excel::Writer::XLSX we could do that as follows:
$worksheet->data_validation('B3',
{
validate => 'integer',
criteria => 'between',
minimum => 1,
maximum => 100,
input_title => 'Input an integer:',
input_message => 'Between 1 and 100',
error_message => 'Sorry, try again.',
});
For more information on data validation see the following Microsoft support article "Description and examples of data validation in Excel": http://support.microsoft.com/kb/211485.
The following sections describe how to use the data_validation() method and its various options.
data_validation( $row, $col, { parameter => 'value', ... } )
The data_validation() method is used to construct an Excel data validation.
It can be applied to a single cell or a range of cells. You can pass 3 parameters such as ($row, $col, {...}) or 5 parameters such as ($first_row, $first_col, $last_row, $last_col, {...}). You can also use A1 style notation. For example:
$worksheet->data_validation( 0, 0, {...} );
$worksheet->data_validation( 0, 0, 4, 1, {...} );
# Which are the same as:
$worksheet->data_validation( 'A1', {...} );
$worksheet->data_validation( 'A1:B5', {...} );See also the note about "Cell notation" for more information.
The last parameter in data_validation() must be a hash ref containing the parameters that describe the type and style of the data validation. The allowable parameters are:
validate
criteria
value | minimum | source
maximum
ignore_blank
dropdown
input_title
input_message
show_input
error_title
error_message
error_type
show_errorThese parameters are explained in the following sections. Most of the parameters are optional, however, you will generally require the three main options validate, criteria and value.
$worksheet->data_validation('B3',
{
validate => 'integer',
criteria => '>',
value => 100,
});The data_validation method returns:
0 for success.
-1 for insufficient number of arguments.
-2 for row or column out of bounds.
-3 for incorrect parameter or value.validate
This parameter is passed in a hash ref to data_validation().
The validate parameter is used to set the type of data that you wish to validate. It is always required and it has no default value. Allowable values are:
any
integer
decimal
list
date
time
length
customany is used to specify that the type of data is unrestricted. This is useful to display an input message without restricting the data that can be entered.
integer restricts the cell to integer values. Excel refers to this as 'whole number'.
validate => 'integer', criteria => '>', value => 100,decimal restricts the cell to decimal values.
validate => 'decimal', criteria => '>', value => 38.6,list restricts the cell to a set of user specified values. These can be passed in an array ref or as a cell range (named ranges aren't currently supported):
validate => 'list', value => ['open', 'high', 'close'], # Or like this: value => 'B1:B3',Excel requires that range references are only to cells on the same worksheet.
date restricts the cell to date values. Dates in Excel are expressed as integer values but you can also pass an ISO8601 style string as used in
write_date_time(). See also "DATES AND TIME IN EXCEL" for more information about working with Excel's dates.validate => 'date', criteria => '>', value => 39653, # 24 July 2008 # Or like this: value => '2008-07-24T',time restricts the cell to time values. Times in Excel are expressed as decimal values but you can also pass an ISO8601 style string as used in
write_date_time(). See also "DATES AND TIME IN EXCEL" for more information about working with Excel's times.validate => 'time', criteria => '>', value => 0.5, # Noon # Or like this: value => 'T12:00:00',length restricts the cell data based on an integer string length. Excel refers to this as 'Text length'.
validate => 'length', criteria => '>', value => 10,custom restricts the cell based on an external Excel formula that returns a
TRUE/FALSEvalue.validate => 'custom', value => '=IF(A10>B10,TRUE,FALSE)',
criteria
This parameter is passed in a hash ref to data_validation().
The criteria parameter is used to set the criteria by which the data in the cell is validated. It is almost always required except for the list and custom validate options. It has no default value. Allowable values are:
'between'
'not between'
'equal to' | '==' | '='
'not equal to' | '!=' | '<>'
'greater than' | '>'
'less than' | '<'
'greater than or equal to' | '>='
'less than or equal to' | '<='You can either use Excel's textual description strings, in the first column above, or the more common symbolic alternatives. The following are equivalent:
validate => 'integer',
criteria => 'greater than',
value => 100,
validate => 'integer',
criteria => '>',
value => 100,The list and custom validate options don't require a criteria. If you specify one it will be ignored.
validate => 'list',
value => ['open', 'high', 'close'],
validate => 'custom',
value => '=IF(A10>B10,TRUE,FALSE)',value | minimum | source
This parameter is passed in a hash ref to data_validation().
The value parameter is used to set the limiting value to which the criteria is applied. It is always required and it has no default value. You can also use the synonyms minimum or source to make the validation a little clearer and closer to Excel's description of the parameter:
# Use 'value'
validate => 'integer',
criteria => '>',
value => 100,
# Use 'minimum'
validate => 'integer',
criteria => 'between',
minimum => 1,
maximum => 100,
# Use 'source'
validate => 'list',
source => '$B$1:$B$3',maximum
This parameter is passed in a hash ref to data_validation().
The maximum parameter is used to set the upper limiting value when the criteria is either 'between' or 'not between':
validate => 'integer',
criteria => 'between',
minimum => 1,
maximum => 100,ignore_blank
This parameter is passed in a hash ref to data_validation().
The ignore_blank parameter is used to toggle on and off the 'Ignore blank' option in the Excel data validation dialog. When the option is on the data validation is not applied to blank data in the cell. It is on by default.
ignore_blank => 0, # Turn the option offdropdown
This parameter is passed in a hash ref to data_validation().
The dropdown parameter is used to toggle on and off the 'In-cell dropdown' option in the Excel data validation dialog. When the option is on a dropdown list will be shown for list validations. It is on by default.
dropdown => 0, # Turn the option offinput_title
This parameter is passed in a hash ref to data_validation().
The input_title parameter is used to set the title of the input message that is displayed when a cell is entered. It has no default value and is only displayed if the input message is displayed. See the input_message parameter below.
input_title => 'This is the input title',The maximum title length is 32 characters.
input_message
This parameter is passed in a hash ref to data_validation().
The input_message parameter is used to set the input message that is displayed when a cell is entered. It has no default value.
validate => 'integer',
criteria => 'between',
minimum => 1,
maximum => 100,
input_title => 'Enter the applied discount:',
input_message => 'between 1 and 100',The message can be split over several lines using newlines, "\n" in double quoted strings.
input_message => "This is\na test.",The maximum message length is 255 characters.
show_input
This parameter is passed in a hash ref to data_validation().
The show_input parameter is used to toggle on and off the 'Show input message when cell is selected' option in the Excel data validation dialog. When the option is off an input message is not displayed even if it has been set using input_message. It is on by default.
show_input => 0, # Turn the option offerror_title
This parameter is passed in a hash ref to data_validation().
The error_title parameter is used to set the title of the error message that is displayed when the data validation criteria is not met. The default error title is 'Microsoft Excel'.
error_title => 'Input value is not valid',The maximum title length is 32 characters.
error_message
This parameter is passed in a hash ref to data_validation().
The error_message parameter is used to set the error message that is displayed when a cell is entered. The default error message is "The value you entered is not valid.\nA user has restricted values that can be entered into the cell.".
validate => 'integer',
criteria => 'between',
minimum => 1,
maximum => 100,
error_title => 'Input value is not valid',
error_message => 'It should be an integer between 1 and 100',The message can be split over several lines using newlines, "\n" in double quoted strings.
input_message => "This is\na test.",The maximum message length is 255 characters.
error_type
This parameter is passed in a hash ref to data_validation().
The error_type parameter is used to specify the type of error dialog that is displayed. There are 3 options:
'stop'
'warning'
'information'The default is 'stop'.
show_error
This parameter is passed in a hash ref to data_validation().
The show_error parameter is used to toggle on and off the 'Show error alert after invalid data is entered' option in the Excel data validation dialog. When the option is off an error message is not displayed even if it has been set using error_message. It is on by default.
show_error => 0, # Turn the option offData Validation Examples
Example 1. Limiting input to an integer greater than a fixed value.
$worksheet->data_validation('A1',
{
validate => 'integer',
criteria => '>',
value => 0,
});Example 2. Limiting input to an integer greater than a fixed value where the value is referenced from a cell.
$worksheet->data_validation('A2',
{
validate => 'integer',
criteria => '>',
value => '=E3',
});Example 3. Limiting input to a decimal in a fixed range.
$worksheet->data_validation('A3',
{
validate => 'decimal',
criteria => 'between',
minimum => 0.1,
maximum => 0.5,
});Example 4. Limiting input to a value in a dropdown list.
$worksheet->data_validation('A4',
{
validate => 'list',
source => ['open', 'high', 'close'],
});Example 5. Limiting input to a value in a dropdown list where the list is specified as a cell range.
$worksheet->data_validation('A5',
{
validate => 'list',
source => '=$E$4:$G$4',
});Example 6. Limiting input to a date in a fixed range.
$worksheet->data_validation('A6',
{
validate => 'date',
criteria => 'between',
minimum => '2008-01-01T',
maximum => '2008-12-12T',
});Example 7. Displaying a message when the cell is selected.
$worksheet->data_validation('A7',
{
validate => 'integer',
criteria => 'between',
minimum => 1,
maximum => 100,
input_title => 'Enter an integer:',
input_message => 'between 1 and 100',
});See also the data_validate.pl program in the examples directory of the distro.
CONDITIONAL FORMATTING IN EXCEL
Conditional formatting is a feature of Excel which allows you to apply a format to a cell or a range of cells based on a certain criteria.
For example the following criteria is used to highlight cells >= 50 in red in the conditional_format.pl example from the distro:
# Write a conditional format over a range.
$worksheet->conditional_formatting( 'B3:K12',
{
type => 'cell',
criteria => '>=',
value => 50,
format => $format1,
}
);
conditional_formatting( $row, $col, { parameter => 'value', ... } )
The conditional_formatting() method is used to apply formatting based on user defined criteria to an Excel::Writer::XLSX file.
It can be applied to a single cell or a range of cells. You can pass 3 parameters such as ($row, $col, {...}) or 5 parameters such as ($first_row, $first_col, $last_row, $last_col, {...}). You can also use A1 style notation. For example:
$worksheet->conditional_formatting( 0, 0, {...} );
$worksheet->conditional_formatting( 0, 0, 4, 1, {...} );
# Which are the same as:
$worksheet->conditional_formatting( 'A1', {...} );
$worksheet->conditional_formatting( 'A1:B5', {...} );See also the note about "Cell notation" for more information.
Using A1 style notation is also possible to specify non-contiguous ranges, separated by a comma. For example:
$worksheet->conditional_formatting( 'A1:D5,A8:D12', {...} );The last parameter in conditional_formatting() must be a hash ref containing the parameters that describe the type and style of the data validation. The main parameters are:
type
format
criteria
value
minimum
maximumOther, less commonly used parameters are:
min_type
mid_type
max_type
min_value
mid_value
max_value
min_color
mid_color
max_color
bar_color
bar_only
bar_solid
bar_negative_color
bar_border_color
bar_negative_border_color
bar_negative_color_same
bar_negative_border_color_same
bar_no_border
bar_direction
bar_axis_position
bar_axis_color
data_bar_2010
icon_style
icons
reverse_icons
icons_only
stop_if_true
multi_rangeAdditional parameters which are used for specific conditional format types are shown in the relevant sections below.
type
This parameter is passed in a hash ref to conditional_formatting().
The type parameter is used to set the type of conditional formatting that you wish to apply. It is always required and it has no default value. Allowable type values and their associated parameters are:
Type Parameters
==== ==========
cell criteria
value
minimum
maximum
format
date criteria
value
minimum
maximum
format
time_period criteria
format
text criteria
value
format
average criteria
format
duplicate format
unique format
top criteria
value
format
bottom criteria
value
format
blanks format
no_blanks format
errors format
no_errors format
formula criteria
format
2_color_scale min_type
max_type
min_value
max_value
min_color
max_color
3_color_scale min_type
mid_type
max_type
min_value
mid_value
max_value
min_color
mid_color
max_color
data_bar min_type
max_type
min_value
max_value
bar_only
bar_color
bar_solid*
bar_negative_color*
bar_border_color*
bar_negative_border_color*
bar_negative_color_same*
bar_negative_border_color_same*
bar_no_border*
bar_direction*
bar_axis_position*
bar_axis_color*
data_bar_2010*
icon_set icon_style
reverse_icons
icons
icons_onlyData bar parameters marked with (*) are only available in Excel 2010 and later. Files that use these properties can still be opened in Excel 2007 but the data bars will be displayed without them.
type => 'cell'
This is the most common conditional formatting type. It is used when a format is applied to a cell based on a simple criterion. For example:
$worksheet->conditional_formatting( 'A1',
{
type => 'cell',
criteria => 'greater than',
value => 5,
format => $red_format,
}
);Or, using the between criteria:
$worksheet->conditional_formatting( 'C1:C4',
{
type => 'cell',
criteria => 'between',
minimum => 20,
maximum => 30,
format => $green_format,
}
);criteria
The criteria parameter is used to set the criteria by which the cell data will be evaluated. It has no default value. The most common criteria as applied to { type => 'cell' } are:
'between'
'not between'
'equal to' | '==' | '='
'not equal to' | '!=' | '<>'
'greater than' | '>'
'less than' | '<'
'greater than or equal to' | '>='
'less than or equal to' | '<='You can either use Excel's textual description strings, in the first column above, or the more common symbolic alternatives.
Additional criteria which are specific to other conditional format types are shown in the relevant sections below.
value
The value is generally used along with the criteria parameter to set the rule by which the cell data will be evaluated.
type => 'cell',
criteria => '>',
value => 5
format => $format,The value property can also be an cell reference.
type => 'cell',
criteria => '>',
value => '$C$1',
format => $format,format
The format parameter is used to specify the format that will be applied to the cell when the conditional formatting criterion is met. The format is created using the add_format() method in the same way as cell formats:
$format = $workbook->add_format( bold => 1, italic => 1 );
$worksheet->conditional_formatting( 'A1',
{
type => 'cell',
criteria => '>',
value => 5
format => $format,
}
);The conditional format follows the same rules as in Excel: it is superimposed over the existing cell format and not all font and border properties can be modified. Font properties that can't be modified are font name, font size, superscript and subscript. The border property that cannot be modified is diagonal borders.
Excel specifies some default formats to be used with conditional formatting. You can replicate them using the following Excel::Writer::XLSX formats:
# Light red fill with dark red text.
my $format1 = $workbook->add_format(
bg_color => '#FFC7CE',
color => '#9C0006',
);
# Light yellow fill with dark yellow text.
my $format2 = $workbook->add_format(
bg_color => '#FFEB9C',
color => '#9C6500',
);
# Green fill with dark green text.
my $format3 = $workbook->add_format(
bg_color => '#C6EFCE',
color => '#006100',
);minimum
The minimum parameter is used to set the lower limiting value when the criteria is either 'between' or 'not between':
validate => 'integer',
criteria => 'between',
minimum => 1,
maximum => 100,maximum
The maximum parameter is used to set the upper limiting value when the criteria is either 'between' or 'not between'. See the previous example.
type => 'date'
The date type is the same as the cell type and uses the same criteria and values. However it allows the value, minimum and maximum properties to be specified in the ISO8601 yyyy-mm-ddThh:mm:ss.sss date format which is detailed in the write_date_time() method.
$worksheet->conditional_formatting( 'A1:A4',
{
type => 'date',
criteria => 'greater than',
value => '2011-01-01T',
format => $format,
}
);type => 'time_period'
The time_period type is used to specify Excel's "Dates Occurring" style conditional format.
$worksheet->conditional_formatting( 'A1:A4',
{
type => 'time_period',
criteria => 'yesterday',
format => $format,
}
);The period is set in the criteria and can have one of the following values:
criteria => 'yesterday',
criteria => 'today',
criteria => 'last 7 days',
criteria => 'last week',
criteria => 'this week',
criteria => 'next week',
criteria => 'last month',
criteria => 'this month',
criteria => 'next month'type => 'text'
The text type is used to specify Excel's "Specific Text" style conditional format. It is used to do simple string matching using the criteria and value parameters:
$worksheet->conditional_formatting( 'A1:A4',
{
type => 'text',
criteria => 'containing',
value => 'foo',
format => $format,
}
);The criteria can have one of the following values:
criteria => 'containing',
criteria => 'not containing',
criteria => 'begins with',
criteria => 'ends with',The value parameter should be a string or single character.
type => 'average'
The average type is used to specify Excel's "Average" style conditional format.
$worksheet->conditional_formatting( 'A1:A4',
{
type => 'average',
criteria => 'above',
format => $format,
}
);The type of average for the conditional format range is specified by the criteria:
criteria => 'above',
criteria => 'below',
criteria => 'equal or above',
criteria => 'equal or below',
criteria => '1 std dev above',
criteria => '1 std dev below',
criteria => '2 std dev above',
criteria => '2 std dev below',
criteria => '3 std dev above',
criteria => '3 std dev below',type => 'duplicate'
The duplicate type is used to highlight duplicate cells in a range:
$worksheet->conditional_formatting( 'A1:A4',
{
type => 'duplicate',
format => $format,
}
);type => 'unique'
The unique type is used to highlight unique cells in a range:
$worksheet->conditional_formatting( 'A1:A4',
{
type => 'unique',
format => $format,
}
);type => 'top'
The top type is used to specify the top n values by number or percentage in a range:
$worksheet->conditional_formatting( 'A1:A4',
{
type => 'top',
value => 10,
format => $format,
}
);The criteria can be used to indicate that a percentage condition is required:
$worksheet->conditional_formatting( 'A1:A4',
{
type => 'top',
value => 10,
criteria => '%',
format => $format,
}
);type => 'bottom'
The bottom type is used to specify the bottom n values by number or percentage in a range.
It takes the same parameters as top, see above.
type => 'blanks'
The blanks type is used to highlight blank cells in a range:
$worksheet->conditional_formatting( 'A1:A4',
{
type => 'blanks',
format => $format,
}
);type => 'no_blanks'
The no_blanks type is used to highlight non blank cells in a range:
$worksheet->conditional_formatting( 'A1:A4',
{
type => 'no_blanks',
format => $format,
}
);type => 'errors'
The errors type is used to highlight error cells in a range:
$worksheet->conditional_formatting( 'A1:A4',
{
type => 'errors',
format => $format,
}
);type => 'no_errors'
The no_errors type is used to highlight non error cells in a range:
$worksheet->conditional_formatting( 'A1:A4',
{
type => 'no_errors',
format => $format,
}
);type => 'formula'
The formula type is used to specify a conditional format based on a user defined formula:
$worksheet->conditional_formatting( 'A1:A4',
{
type => 'formula',
criteria => '=$A$1 > 5',
format => $format,
}
);The formula is specified in the criteria.
type => '2_color_scale'
The 2_color_scale type is used to specify Excel's "2 Color Scale" style conditional format.
$worksheet->conditional_formatting( 'A1:A12',
{
type => '2_color_scale',
}
);This conditional type can be modified with min_type, max_type, min_value, max_value, min_color and max_color, see below.
type => '3_color_scale'
The 3_color_scale type is used to specify Excel's "3 Color Scale" style conditional format.
$worksheet->conditional_formatting( 'A1:A12',
{
type => '3_color_scale',
}
);This conditional type can be modified with min_type, mid_type, max_type, min_value, mid_value, max_value, min_color, mid_color and max_color, see below.
type => 'data_bar'
The data_bar type is used to specify Excel's "Data Bar" style conditional format.
$worksheet->conditional_formatting( 'A1:A12',
{
type => 'data_bar',
}
);This data bar conditional type can be modified with the following parameters, which are explained in the sections below. These properties were available in the original xlsx file specification used in Excel 2007::
min_type
max_type
min_value
max_value
bar_color
bar_onlyIn Excel 2010 additional data bar properties were added such as solid (non-gradient) bars and control over how negative values are displayed. These properties can be set using the following parameters:
bar_solid
bar_negative_color
bar_border_color
bar_negative_border_color
bar_negative_color_same
bar_negative_border_color_same
bar_no_border
bar_direction
bar_axis_position
bar_axis_color
data_bar_2010Files that use these Excel 2010 properties can still be opened in Excel 2007 but the data bars will be displayed without them.
type => 'icon_set'
The icon_set type is used to specify a conditional format with a set of icons such as traffic lights or arrows:
$worksheet->conditional_formatting( 'A1:C1',
{
type => 'icon_set',
icon_style => '3_traffic_lights',
}
);The icon set style is specified by the icon_style parameter. Valid options are:
3_arrows
3_arrows_gray
3_flags
3_signs
3_symbols
3_symbols_circled
3_traffic_lights
3_traffic_lights_rimmed
4_arrows
4_arrows_gray
4_ratings
4_red_to_black
4_traffic_lights
5_arrows
5_arrows_gray
5_quarters
5_ratingsThe criteria, type and value of each icon can be specified using the icon array of hash refs with optional criteria, type and value parameters:
$worksheet->conditional_formatting( 'A1:D1',
{
type => 'icon_set',
icon_style => '4_red_to_black',
icons => [ {criteria => '>', type => 'number', value => 90},
{criteria => '>=', type => 'percentile', value => 50},
{criteria => '>', type => 'percent', value => 25},
],
}
);The icons criteria parameter should be either >= or >. The default criteria is >=.
The icons type parameter should be one of the following values:
number
percentile
percent
formulaThe default type is percent.
The icons value parameter can be a value or formula:
$worksheet->conditional_formatting( 'A1:D1',
{
type => 'icon_set',
icon_style => '4_red_to_black',
icons => [ {value => 90},
{value => 50},
{value => 25},
],
}
);Note: The icons parameters should start with the highest value and with each subsequent one being lower. The default value is (n * 100) / number_of_icons. The lowest number icon in an icon set has properties defined by Excel. Therefore in a n icon set, there is no n-1 hash of parameters.
The order of the icons can be reversed using the reverse_icons parameter:
$worksheet->conditional_formatting( 'A1:C1',
{
type => 'icon_set',
icon_style => '3_arrows',
reverse_icons => 1,
}
);The icons can be displayed without the cell value using the icons_only parameter:
$worksheet->conditional_formatting( 'A1:C1',
{
type => 'icon_set',
icon_style => '3_flags',
icons_only => 1,
}
);min_type, mid_type, max_type
The min_type and max_type properties are available when the conditional formatting type is 2_color_scale, 3_color_scale or data_bar. The mid_type is available for 3_color_scale. The properties are used as follows:
$worksheet->conditional_formatting( 'A1:A12',
{
type => '2_color_scale',
min_type => 'percent',
max_type => 'percent',
}
);The available min/mid/max types are:
min (for min_type only)
num
percent
percentile
formula
max (for max_type only)min_value, mid_value, max_value
The min_value and max_value properties are available when the conditional formatting type is 2_color_scale, 3_color_scale or data_bar. The mid_value is available for 3_color_scale. The properties are used as follows:
$worksheet->conditional_formatting( 'A1:A12',
{
type => '2_color_scale',
min_value => 10,
max_value => 90,
}
);min_color, mid_color, max_color, bar_color
The min_color and max_color properties are available when the conditional formatting type is 2_color_scale, 3_color_scale or data_bar. The mid_color is available for 3_color_scale. The properties are used as follows:
$worksheet->conditional_formatting( 'A1:A12',
{
type => '2_color_scale',
min_color => "#C5D9F1",
max_color => "#538ED5",
}
);The color can be specified as an Excel::Writer::XLSX color index or, more usefully, as a HTML style RGB hex number, as shown above.
bar_only
The bar_only parameter property displays a bar data but not the data in the cells:
$worksheet->conditional_formatting( 'D3:D14',
{
type => 'data_bar',
bar_only => 1
}
);bar_solid
The bar_solid parameter turns on a solid (non-gradient) fill for data bars:
$worksheet->conditional_formatting( 'H3:H14',
{
type => 'data_bar',
bar_solid => 1
}
);Note, this property is only visible in Excel 2010 and later.
bar_negative_color
The bar_negative_color parameter is used to set the color fill for the negative portion of a data bar.
The color can be specified as an Excel::Writer::XLSX color index or as a HTML style RGB hex number, as shown in the other examples.
Note, this property is only visible in Excel 2010 and later.
bar_border_color
The bar_border_color parameter is used to set the border color of a data bar.
The color can be specified as an Excel::Writer::XLSX color index or as a HTML style RGB hex number, as shown in the other examples.
Note, this property is only visible in Excel 2010 and later.
bar_negative_border_color
The bar_negative_border_color parameter is used to set the border color of the negative portion of a data bar.
The color can be specified as an Excel::Writer::XLSX color index or as a HTML style RGB hex number, as shown in the other examples.
Note, this property is only visible in Excel 2010 and later.
bar_negative_color_same
The bar_negative_color_same parameter sets the fill color for the negative portion of a data bar to be the same as the fill color for the positive portion of the data bar:
$worksheet->conditional_formatting( 'N3:N14',
{
type => 'data_bar',
bar_negative_color_same => 1,
bar_negative_border_color_same => 1
}
);Note, this property is only visible in Excel 2010 and later.
bar_negative_border_color_same
The bar_negative_border_color_same parameter sets the border color for the negative portion of a data bar to be the same as the border color for the positive portion of the data bar.
Note, this property is only visible in Excel 2010 and later.
bar_no_border
The bar_no_border parameter turns off the border of a data bar.
Note, this property is only visible in Excel 2010 and later, however the default in Excel 2007 is not to have a border.
bar_direction
The bar_direction parameter sets the direction for data bars. This property can be either left for left-to-right or right for right-to-left. If the property isn't set then Excel will adjust the position automatically based on the context:
$worksheet->conditional_formatting( 'J3:J14',
{
type => 'data_bar',
bar_direction => 'right'
}
);Note, this property is only visible in Excel 2010 and later.
bar_axis_position
The bar_axis_position parameter sets the position within the cells for the axis that is shown in data bars when there are negative values to display. The property can be either middle or none. If the property isn't set then Excel will position the axis based on the range of positive and negative values.
Note, this property is only visible in Excel 2010 and later.
bar_axis_color
The bar_axis_color parameter sets the color for the axis that is shown in data bars when there are negative values to display.
The color can be specified as an Excel::Writer::XLSX color index or as a HTML style RGB hex number, as shown in the other examples.
Note, this property is only visible in Excel 2010 and later.
data_bar_2010
The data_bar_2010 parameter sets Excel 2010 style data bars even when Excel 2010 specific properties aren't used. This can be used to create consistency across all the data bar formatting in a worksheet:
$worksheet->conditional_formatting( 'L3:L14',
{
type => 'data_bar',
data_bar_2010 => 1
}
);Note, this property is only visible in Excel 2010 and later.
stop_if_true
The stop_if_true parameter, if set to a true value, will enable the "stop if true" feature on the conditional formatting rule, so that subsequent rules are not examined for any cell on which the conditions for this rule are met.
Conditional Formatting Examples
Example 1. Highlight cells greater than an integer value.
$worksheet->conditional_formatting( 'A1:F10',
{
type => 'cell',
criteria => 'greater than',
value => 5,
format => $format,
}
);Example 2. Highlight cells greater than a value in a reference cell.
$worksheet->conditional_formatting( 'A1:F10',
{
type => 'cell',
criteria => 'greater than',
value => '$H$1',
format => $format,
}
);Example 3. Highlight cells greater than a certain date:
$worksheet->conditional_formatting( 'A1:F10',
{
type => 'date',
criteria => 'greater than',
value => '2011-01-01T',
format => $format,
}
);Example 4. Highlight cells with a date in the last seven days:
$worksheet->conditional_formatting( 'A1:F10',
{
type => 'time_period',
criteria => 'last 7 days',
format => $format,
}
);Example 5. Highlight cells with strings starting with the letter b:
$worksheet->conditional_formatting( 'A1:F10',
{
type => 'text',
criteria => 'begins with',
value => 'b',
format => $format,
}
);Example 6. Highlight cells that are 1 std deviation above the average for the range:
$worksheet->conditional_formatting( 'A1:F10',
{
type => 'average',
format => $format,
}
);Example 7. Highlight duplicate cells in a range:
$worksheet->conditional_formatting( 'A1:F10',
{
type => 'duplicate',
format => $format,
}
);Example 8. Highlight unique cells in a range.
$worksheet->conditional_formatting( 'A1:F10',
{
type => 'unique',
format => $format,
}
);Example 9. Highlight the top 10 cells.
$worksheet->conditional_formatting( 'A1:F10',
{
type => 'top',
value => 10,
format => $format,
}
);Example 10. Highlight blank cells.
$worksheet->conditional_formatting( 'A1:F10',
{
type => 'blanks',
format => $format,
}
);Example 11. Set traffic light icons in 3 cells:
$worksheet->conditional_formatting( 'A1:C1',
{
type => 'icon_set',
icon_style => '3_traffic_lights',
}
);See also the conditional_format.pl example program in EXAMPLES.
SPARKLINES IN EXCEL
Sparklines are a feature of Excel 2010+ which allows you to add small charts to worksheet cells. These are useful for showing visual trends in data in a compact format.
In Excel::Writer::XLSX Sparklines can be added to cells using the add_sparkline() worksheet method:
$worksheet->add_sparkline(
{
location => 'F2',
range => 'Sheet1!A2:E2',
type => 'column',
style => 12,
}
);
Note: Sparklines are a feature of Excel 2010+ only. You can write them to an XLSX file that can be read by Excel 2007 but they won't be displayed.
add_sparkline( { parameter => 'value', ... } )
The add_sparkline() worksheet method is used to add sparklines to a cell or a range of cells.
The parameters to add_sparkline() must be passed in a hash ref. The main sparkline parameters are:
location (required)
range (required)
type
style
markers
negative_points
axis
reverseOther, less commonly used parameters are:
high_point
low_point
first_point
last_point
max
min
empty_cells
show_hidden
date_axis
weight
series_color
negative_color
markers_color
first_color
last_color
high_color
low_colorThese parameters are explained in the sections below:
location
This is the cell where the sparkline will be displayed:
location => 'F1'The location should be a single cell. (For multiple cells see "Grouped Sparklines" below).
To specify the location in row-column notation use the xl_rowcol_to_cell() function from the Excel::Writer::XLSX::Utility module.
use Excel::Writer::XLSX::Utility ':rowcol';
...
location => xl_rowcol_to_cell( 0, 5 ), # F1range
This specifies the cell data range that the sparkline will plot:
$worksheet->add_sparkline(
{
location => 'F1',
range => 'A1:E1',
}
);The range should be a 2D array. (For 3D arrays of cells see "Grouped Sparklines" below).
If range is not on the same worksheet you can specify its location using the usual Excel notation:
range => 'Sheet1!A1:E1',If the worksheet contains spaces or special characters you should quote the worksheet name in the same way that Excel does:
range => q('Monthly Data'!A1:E1),To specify the location in row-column notation use the xl_range() or xl_range_formula() functions from the Excel::Writer::XLSX::Utility module.
use Excel::Writer::XLSX::Utility ':rowcol';
...
range => xl_range( 1, 1, 0, 4 ), # 'A1:E1'
range => xl_range_formula( 'Sheet1', 0, 0, 0, 4 ), # 'Sheet1!A2:E2'type
Specifies the type of sparkline. There are 3 available sparkline types:
line (default)
column
win_lossFor example:
{
location => 'F1',
range => 'A1:E1',
type => 'column',
}style
Excel provides 36 built-in Sparkline styles in 6 groups of 6. The style parameter can be used to replicate these and should be a corresponding number from 1 .. 36.
{
location => 'A14',
range => 'Sheet2!A2:J2',
style => 3,
}The style number starts in the top left of the style grid and runs left to right. The default style is 1. It is possible to override colour elements of the sparklines using the *_color parameters below.
markers
Turn on the markers for line style sparklines.
{
location => 'A6',
range => 'Sheet2!A1:J1',
markers => 1,
}Markers aren't shown in Excel for column and win_loss sparklines.
negative_points
Highlight negative values in a sparkline range. This is usually required with win_loss sparklines.
{
location => 'A21',
range => 'Sheet2!A3:J3',
type => 'win_loss',
negative_points => 1,
}axis
Display a horizontal axis in the sparkline:
{
location => 'A10',
range => 'Sheet2!A1:J1',
axis => 1,
}reverse
Plot the data from right-to-left instead of the default left-to-right:
{
location => 'A24',
range => 'Sheet2!A4:J4',
type => 'column',
reverse => 1,
}weight
Adjust the default line weight (thickness) for line style sparklines.
weight => 0.25,The weight value should be one of the following values allowed by Excel:
0.25 0.5 0.75
1 1.25
2.25
3
4.25
6high_point, low_point, first_point, last_point
Highlight points in a sparkline range.
high_point => 1,
low_point => 1,
first_point => 1,
last_point => 1,max, min
Specify the maximum and minimum vertical axis values:
max => 0.5,
min => -0.5,As a special case you can set the maximum and minimum to be for a group of sparklines rather than one:
max => 'group',See "Grouped Sparklines" below.
empty_cells
Define how empty cells are handled in a sparkline.
empty_cells => 'zero',The available options are:
gaps : show empty cells as gaps (the default).
zero : plot empty cells as 0.
connect: Connect points with a line ("line" type sparklines only).show_hidden
Plot data in hidden rows and columns:
show_hidden => 1,Note, this option is off by default.
date_axis
Specify an alternative date axis for the sparkline. This is useful if the data being plotted isn't at fixed width intervals:
{
location => 'F3',
range => 'A3:E3',
date_axis => 'A4:E4',
}The number of cells in the date range should correspond to the number of cells in the data range.
series_color
It is possible to override the colour of a sparkline style using the following parameters:
series_color
negative_color
markers_color
first_color
last_color
high_color
low_colorThe color should be specified as a HTML style #rrggbb hex value:
{
location => 'A18',
range => 'Sheet2!A2:J2',
type => 'column',
series_color => '#E965E0',
}Grouped Sparklines
The add_sparkline() worksheet method can be used multiple times to write as many sparklines as are required in a worksheet.
However, it is sometimes necessary to group contiguous sparklines so that changes that are applied to one are applied to all. In Excel this is achieved by selecting a 3D range of cells for the data range and a 2D range of cells for the location.
In Excel::Writer::XLSX, you can simulate this by passing an array refs of values to location and range:
{
location => [ 'A27', 'A28', 'A29' ],
range => [ 'Sheet2!A5:J5', 'Sheet2!A6:J6', 'Sheet2!A7:J7' ],
markers => 1,
}Sparkline examples
See the sparklines1.pl and sparklines2.pl example programs in the examples directory of the distro.
TABLES IN EXCEL
Tables in Excel are a way of grouping a range of cells into a single entity that has common formatting or that can be referenced from formulas. Tables can have column headers, autofilters, total rows, column formulas and default formatting.
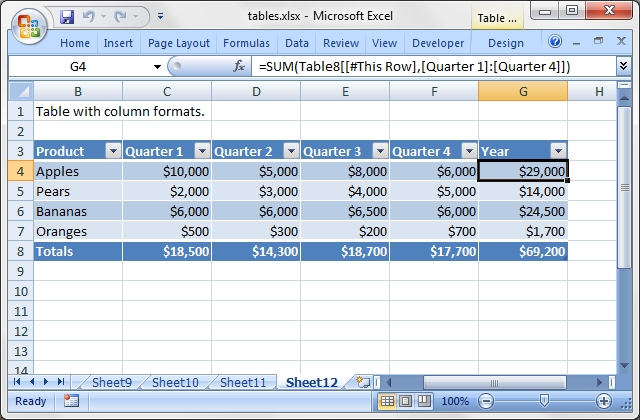
For more information see "An Overview of Excel Tables" http://office.microsoft.com/en-us/excel-help/overview-of-excel-tables-HA010048546.aspx.
Note, tables don't work in Excel::Writer::XLSX when set_optimization() mode in on.
add_table( $row1, $col1, $row2, $col2, { parameter => 'value', ... })
Tables are added to a worksheet using the add_table() method:
$worksheet->add_table( 'B3:F7', { %parameters } );The data range can be specified in 'A1' or 'row/col' notation (see also the note about "Cell notation" for more information):
$worksheet->add_table( 'B3:F7' );
# Same as:
$worksheet->add_table( 2, 1, 6, 5 );The last parameter in add_table() should be a hash ref containing the parameters that describe the table options and data. The available parameters are:
data
autofilter
header_row
banded_columns
banded_rows
first_column
last_column
style
total_row
columns
nameThe table parameters are detailed below. There are no required parameters and the hash ref isn't required if no options are specified.
data
The data parameter can be used to specify the data in the cells of the table.
my $data = [
[ 'Apples', 10000, 5000, 8000, 6000 ],
[ 'Pears', 2000, 3000, 4000, 5000 ],
[ 'Bananas', 6000, 6000, 6500, 6000 ],
[ 'Oranges', 500, 300, 200, 700 ],
];
$worksheet->add_table( 'B3:F7', { data => $data } );Table data can also be written separately, as an array or individual cells.
# These two statements are the same as the single statement above.
$worksheet->add_table( 'B3:F7' );
$worksheet->write_col( 'B4', $data );Writing the cell data separately is occasionally required when you need to control the write_*() method used to populate the cells or if you wish to tweak the cell formatting.
The data structure should be an array ref of array refs holding row data as shown above.
header_row
The header_row parameter can be used to turn on or off the header row in the table. It is on by default.
$worksheet->add_table( 'B4:F7', { header_row => 0 } ); # Turn header off.The header row will contain default captions such as Column 1, Column 2, etc. These captions can be overridden using the columns parameter below.
autofilter
The autofilter parameter can be used to turn on or off the autofilter in the header row. It is on by default.
$worksheet->add_table( 'B3:F7', { autofilter => 0 } ); # Turn autofilter off.The autofilter is only shown if the header_row is on. Filters within the table are not supported.
banded_rows
The banded_rows parameter can be used to used to create rows of alternating colour in the table. It is on by default.
$worksheet->add_table( 'B3:F7', { banded_rows => 0 } );banded_columns
The banded_columns parameter can be used to used to create columns of alternating colour in the table. It is off by default.
$worksheet->add_table( 'B3:F7', { banded_columns => 1 } );first_column
The first_column parameter can be used to highlight the first column of the table. The type of highlighting will depend on the style of the table. It may be bold text or a different colour. It is off by default.
$worksheet->add_table( 'B3:F7', { first_column => 1 } );last_column
The last_column parameter can be used to highlight the last column of the table. The type of highlighting will depend on the style of the table. It may be bold text or a different colour. It is off by default.
$worksheet->add_table( 'B3:F7', { last_column => 1 } );style
The style parameter can be used to set the style of the table. Standard Excel table format names should be used (with matching capitalisation):
$worksheet11->add_table(
'B3:F7',
{
data => $data,
style => 'Table Style Light 11',
}
);The default table style is 'Table Style Medium 9'.
You can also turn the table style off by setting it to 'None':
$worksheet11->add_table( 'B3:F7', { style => 'None' } );name
By default tables are named Table1, Table2, etc. The name parameter can be used to set the name of the table:
$worksheet->add_table( 'B3:F7', { name => 'SalesData' } );If you override the table name you must ensure that it doesn't clash with an existing table name and that it follows Excel's requirements for table names http://office.microsoft.com/en-001/excel-help/define-and-use-names-in-formulas-HA010147120.aspx#BMsyntax_rules_for_names.
If you need to know the name of the table, for example to use it in a formula, you can get it as follows:
my $table = $worksheet2->add_table( 'B3:F7' );
my $table_name = $table->{_name};total_row
The total_row parameter can be used to turn on the total row in the last row of a table. It is distinguished from the other rows by a different formatting and also with dropdown SUBTOTAL functions.
$worksheet->add_table( 'B3:F7', { total_row => 1 } );The default total row doesn't have any captions or functions. These must by specified via the columns parameter below.
columns
The columns parameter can be used to set properties for columns within the table.
The sub-properties that can be set are:
header
formula
total_string
total_function
total_value
format
header_formatThe column data must be specified as an array ref of hash refs. For example to override the default 'Column n' style table headers:
$worksheet->add_table(
'B3:F7',
{
data => $data,
columns => [
{ header => 'Product' },
{ header => 'Quarter 1' },
{ header => 'Quarter 2' },
{ header => 'Quarter 3' },
{ header => 'Quarter 4' },
]
}
);If you don't wish to specify properties for a specific column you pass an empty hash ref and the defaults will be applied:
...
columns => [
{ header => 'Product' },
{ header => 'Quarter 1' },
{ }, # Defaults to 'Column 3'.
{ header => 'Quarter 3' },
{ header => 'Quarter 4' },
]
...Column formulas can by applied using the formula column property:
$worksheet8->add_table(
'B3:G7',
{
data => $data,
columns => [
{ header => 'Product' },
{ header => 'Quarter 1' },
{ header => 'Quarter 2' },
{ header => 'Quarter 3' },
{ header => 'Quarter 4' },
{
header => 'Year',
formula => '=SUM(Table8[@[Quarter 1]:[Quarter 4]])'
},
]
}
);The Excel 2007 [#This Row] and Excel 2010 @ structural references are supported within the formula.
As stated above the total_row table parameter turns on the "Total" row in the table but it doesn't populate it with any defaults. Total captions and functions must be specified via the columns property and the total_string, total_function and total_value sub properties:
$worksheet10->add_table(
'B3:F8',
{
data => $data,
total_row => 1,
columns => [
{ header => 'Product', total_string => 'Totals' },
{ header => 'Quarter 1', total_function => 'sum' },
{ header => 'Quarter 2', total_function => 'sum' },
{ header => 'Quarter 3', total_function => 'sum' },
{ header => 'Quarter 4', total_function => 'sum' },
]
}
);The supported totals row SUBTOTAL functions are:
average
count_nums
count
max
min
std_dev
sum
varUser defined functions or formulas aren't supported.
It is also possible to set a calculated value for the total_function using the total_value sub property. This is only necessary when creating workbooks for applications that cannot calculate the value of formulas automatically. This is similar to setting the value optional property in write_formula():
$worksheet10->add_table(
'B3:F8',
{
data => $data,
total_row => 1,
columns => [
{ total_string => 'Totals' },
{ total_function => 'sum', total_value => 100 },
{ total_function => 'sum', total_value => 200 },
{ total_function => 'sum', total_value => 100 },
{ total_function => 'sum', total_value => 400 },
]
}
);Formatting can also be applied to columns, to the column data using format and to the header using header_format:
my $currency_format = $workbook->add_format( num_format => '$#,##0' );
$worksheet->add_table(
'B3:D8',
{
data => $data,
total_row => 1,
columns => [
{ header => 'Product', total_string => 'Totals' },
{
header => 'Quarter 1',
total_function => 'sum',
format => $currency_format,
},
{
header => 'Quarter 2',
header_format => $bold,
total_function => 'sum',
format => $currency_format,
},
]
}
);Standard Excel::Writer::XLSX format objects can be used. However, they should be limited to numerical formats for the columns and simple formatting like text wrap for the headers. Overriding other table formatting may produce inconsistent results.
FORMULAS AND FUNCTIONS IN EXCEL
Introduction
The following is a brief introduction to formulas and functions in Excel and Excel::Writer::XLSX.
A formula is a string that begins with an equals sign:
'=A1+B1'
'=AVERAGE(1, 2, 3)'The formula can contain numbers, strings, boolean values, cell references, cell ranges and functions. Named ranges are not supported. Formulas should be written as they appear in Excel, that is cells and functions must be in uppercase.
Cells in Excel are referenced using the A1 notation system where the column is designated by a letter and the row by a number. Columns range from A to XFD i.e. 0 to 16384, rows range from 1 to 1048576. The Excel::Writer::XLSX::Utility module that is included in the distro contains helper functions for dealing with A1 notation, for example:
use Excel::Writer::XLSX::Utility;

( $row, $col ) = xl_cell_to_rowcol( 'C2' );    # (1, 2)
$str = xl_rowcol_to_cell( 1, 2 ); # C2The Excel $ notation in cell references is also supported. This allows you to specify whether a row or column is relative or absolute. This only has an effect if the cell is copied. The following examples show relative and absolute values.
'=A1' # Column and row are relative
'=$A1' # Column is absolute and row is relative
'=A$1' # Column is relative and row is absolute
'=$A$1' # Column and row are absoluteFormulas can also refer to cells in other worksheets of the current workbook. For example:
'=Sheet2!A1'
'=Sheet2!A1:A5'
'=Sheet2:Sheet3!A1'
'=Sheet2:Sheet3!A1:A5'
q{='Test Data'!A1}
q{='Test Data1:Test Data2'!A1}The sheet reference and the cell reference are separated by ! the exclamation mark symbol. If worksheet names contain spaces, commas or parentheses then Excel requires that the name is enclosed in single quotes as shown in the last two examples above. In order to avoid using a lot of escape characters you can use the quote operator q{} to protect the quotes. See perlop in the main Perl documentation. Only valid sheet names that have been added using the add_worksheet() method can be used in formulas. You cannot reference external workbooks.
The following table lists the operators that are available in Excel's formulas. The majority of the operators are the same as Perl's, differences are indicated:
Arithmetic operators:
=====================
Operator Meaning Example
+ Addition 1+2
- Subtraction 2-1
* Multiplication 2*3
/ Division 1/4
^ Exponentiation 2^3 # Equivalent to **
- Unary minus -(1+2)
% Percent (Not modulus) 13%
Comparison operators:
=====================
Operator Meaning Example
= Equal to A1 = B1 # Equivalent to ==
<> Not equal to A1 <> B1 # Equivalent to !=
> Greater than A1 > B1
< Less than A1 < B1
>= Greater than or equal to A1 >= B1
<= Less than or equal to A1 <= B1
String operator:
================
Operator Meaning Example
& Concatenation "Hello " & "World!" # [1]
Reference operators:
====================
Operator Meaning Example
: Range operator A1:A4 # [2]
, Union operator SUM(1, 2+2, B3) # [3]
Notes:
[1]: Equivalent to "Hello " . "World!" in Perl.
[2]: This range is equivalent to cells A1, A2, A3 and A4.
[3]: The comma behaves like the list separator in Perl.The range and comma operators can have different symbols in non-English versions of Excel, see below.
For a general introduction to Excel's formulas and an explanation of the syntax of the function refer to the Excel help files or the following: http://office.microsoft.com/en-us/assistance/CH062528031033.aspx.
In most cases a formula in Excel can be used directly in the write_formula method. However, there are a few potential issues and differences that the user should be aware of. These are explained in the following sections.
Non US Excel functions and syntax
Excel stores formulas in the format of the US English version, regardless of the language or locale of the end-user's version of Excel. Therefore all formula function names written using Excel::Writer::XLSX must be in English:
worksheet->write_formula('A1', '=SUM(1, 2, 3)'); # OK
worksheet->write_formula('A2', '=SOMME(1, 2, 3)'); # French. Error on load.Also, formulas must be written with the US style separator/range operator which is a comma (not semi-colon). Therefore a formula with multiple values should be written as follows:
worksheet->write_formula('A1', '=SUM(1, 2, 3)'); # OK
worksheet->write_formula('A2', '=SUM(1; 2; 3)'); # Semi-colon. Error on load.If you have a non-English version of Excel you can use the following multi-lingual Formula Translator (http://en.excel-translator.de/language/) to help you convert the formula. It can also replace semi-colons with commas.
Formulas added in Excel 2010 and later
Excel 2010 and later added functions which weren't defined in the original file specification. These functions are referred to by Microsoft as future functions. Examples of these functions are ACOT, CHISQ.DIST.RT , CONFIDENCE.NORM, STDEV.P, STDEV.S and WORKDAY.INTL.
When written using write_formula() these functions need to be fully qualified with a _xlfn. (or other) prefix as they are shown the list below. For example:
worksheet->write_formula('A1', '=_xlfn.STDEV.S(B1:B10)')They will appear without the prefix in Excel.
The following list is taken from the MS XLSX extensions documentation on future functions: http://msdn.microsoft.com/en-us/library/dd907480%28v=office.12%29.aspx:
_xlfn.ACOT
_xlfn.ACOTH
_xlfn.AGGREGATE
_xlfn.ARABIC
_xlfn.ARRAYTOTEXT
_xlfn.BASE
_xlfn.BETA.DIST
_xlfn.BETA.INV
_xlfn.BINOM.DIST
_xlfn.BINOM.DIST.RANGE
_xlfn.BINOM.INV
_xlfn.BITAND
_xlfn.BITLSHIFT
_xlfn.BITOR
_xlfn.BITRSHIFT
_xlfn.BITXOR
_xlfn.CEILING.MATH
_xlfn.CEILING.PRECISE
_xlfn.CHISQ.DIST
_xlfn.CHISQ.DIST.RT
_xlfn.CHISQ.INV
_xlfn.CHISQ.INV.RT
_xlfn.CHISQ.TEST
_xlfn.COMBINA
_xlfn.CONCAT
_xlfn.CONFIDENCE.NORM
_xlfn.CONFIDENCE.T
_xlfn.COT
_xlfn.COTH
_xlfn.COVARIANCE.P
_xlfn.COVARIANCE.S
_xlfn.CSC
_xlfn.CSCH
_xlfn.DAYS
_xlfn.DECIMAL
ECMA.CEILING
_xlfn.ERF.PRECISE
_xlfn.ERFC.PRECISE
_xlfn.EXPON.DIST
_xlfn.F.DIST
_xlfn.F.DIST.RT
_xlfn.F.INV
_xlfn.F.INV.RT
_xlfn.F.TEST
_xlfn.FILTERXML
_xlfn.FLOOR.MATH
_xlfn.FLOOR.PRECISE
_xlfn.FORECAST.ETS
_xlfn.FORECAST.ETS.CONFINT
_xlfn.FORECAST.ETS.SEASONALITY
_xlfn.FORECAST.ETS.STAT
_xlfn.FORECAST.LINEAR
_xlfn.FORMULATEXT
_xlfn.GAMMA
_xlfn.GAMMA.DIST
_xlfn.GAMMA.INV
_xlfn.GAMMALN.PRECISE
_xlfn.GAUSS
_xlfn.HYPGEOM.DIST
_xlfn.IFNA
_xlfn.IFS
_xlfn.IMAGE
_xlfn.IMCOSH
_xlfn.IMCOT
_xlfn.IMCSC
_xlfn.IMCSCH
_xlfn.IMSEC
_xlfn.IMSECH
_xlfn.IMSINH
_xlfn.IMTAN
_xlfn.ISFORMULA
ISO.CEILING
_xlfn.ISOMITTED
_xlfn.ISOWEEKNUM
_xlfn.LET
_xlfn.LOGNORM.DIST
_xlfn.LOGNORM.INV
_xlfn.MAXIFS
_xlfn.MINIFS
_xlfn.MODE.MULT
_xlfn.MODE.SNGL
_xlfn.MUNIT
_xlfn.NEGBINOM.DIST
NETWORKDAYS.INTL
_xlfn.NORM.DIST
_xlfn.NORM.INV
_xlfn.NORM.S.DIST
_xlfn.NORM.S.INV
_xlfn.NUMBERVALUE
_xlfn.PDURATION
_xlfn.PERCENTILE.EXC
_xlfn.PERCENTILE.INC
_xlfn.PERCENTRANK.EXC
_xlfn.PERCENTRANK.INC
_xlfn.PERMUTATIONA
_xlfn.PHI
_xlfn.POISSON.DIST
_xlfn.QUARTILE.EXC
_xlfn.QUARTILE.INC
_xlfn.QUERYSTRING
_xlfn.RANK.AVG
_xlfn.RANK.EQ
_xlfn.RRI
_xlfn.SEC
_xlfn.SECH
_xlfn.SHEET
_xlfn.SHEETS
_xlfn.SKEW.P
_xlfn.STDEV.P
_xlfn.STDEV.S
_xlfn.T.DIST
_xlfn.T.DIST.2T
_xlfn.T.DIST.RT
_xlfn.T.INV
_xlfn.T.INV.2T
_xlfn.T.TEST
_xlfn.TEXTAFTER
_xlfn.TEXTBEFORE
_xlfn.TEXTJOIN
_xlfn.UNICHAR
_xlfn.UNICODE
_xlfn.VALUETOTEXT
_xlfn.VAR.P
_xlfn.VAR.S
_xlfn.WEBSERVICE
_xlfn.WEIBULL.DIST
WORKDAY.INTL
_xlfn.XMATCH
_xlfn.XOR
_xlfn.Z.TESTUsing Tables in Formulas
Worksheet tables can be added with Excel::Writer::XLSX using the add_table() method:
worksheet->add_table('B3:F7', {options});By default tables are named Table1, Table2, etc., in the order that they are added. However it can also be set by the user using the name parameter:
worksheet->add_table('B3:F7', {'name': 'SalesData'});If you need to know the name of the table, for example to use it in a formula, you can get it as follows:
table = worksheet->add_table('B3:F7');
table_name = table->{_name};When used in a formula a table name such as TableX should be referred to as TableX[] (like a Perl array):
worksheet->write_formula('A5', '=VLOOKUP("Sales", Table1[], 2, FALSE');Dealing with #NAME? errors
If there is an error in the syntax of a formula it is usually displayed in Excel as #NAME?. If you encounter an error like this you can debug it as follows:
- 1. Ensure the formula is valid in Excel by copying and pasting it into a cell. Note, this should be done in Excel and not other applications such as OpenOffice or LibreOffice since they may have slightly different syntax.
- 2. Ensure the formula is using comma separators instead of semi-colons, see "Non US Excel functions and syntax" above.
- 3. Ensure the formula is in English, see "Non US Excel functions and syntax" above.
- 4. Ensure that the formula doesn't contain an Excel 2010+ future function as listed in "Formulas added in Excel 2010 and later" above. If it does then ensure that the correct prefix is used.
Finally if you have completed all the previous steps and still get a #NAME? error you can examine a valid Excel file to see what the correct syntax should be. To do this you should create a valid formula in Excel and save the file. You can then examine the XML in the unzipped file.
The following shows how to do that using Linux unzip and libxml's xmllint http://xmlsoft.org/xmllint.html to format the XML for clarity:
$ unzip myfile.xlsx -d myfile
$ xmllint --format myfile/xl/worksheets/sheet1.xml | grep '<f>'
<f>SUM(1, 2, 3)</f>Formula Results
Excel::Writer::XLSX doesn't calculate the result of a formula and instead stores the value 0 as the formula result. It then sets a global flag in the XLSX file to say that all formulas and functions should be recalculated when the file is opened.
This is the method recommended in the Excel documentation and in general it works fine with spreadsheet applications. However, applications that don't have a facility to calculate formulas will only display the 0 results. Examples of such applications are Excel Viewer, PDF Converters, and some mobile device applications.
If required, it is also possible to specify the calculated result of the formula using the optional last value parameter in write_formula:
worksheet->write_formula('A1', '=2+2', num_format, 4);The value parameter can be a number, a string, a boolean sting ('TRUE' or 'FALSE') or one of the following Excel error codes:
#DIV/0!
#N/A
#NAME?
#NULL!
#NUM!
#REF!
#VALUE!It is also possible to specify the calculated result of an array formula created with write_array_formula:
# Specify the result for a single cell range.
worksheet->write_array_formula('A1:A1', '{=SUM(B1:C1*B2:C2)}', format, 2005);However, using this parameter only writes a single value to the upper left cell in the result array. For a multi-cell array formula where the results are required, the other result values can be specified by using write_number() to write to the appropriate cell:
# Specify the results for a multi cell range.
worksheet->write_array_formula('A1:A3', '{=TREND(C1:C3,B1:B3)}', format, 15);
worksheet->write_number('A2', 12, format);
worksheet->write_number('A3', 14, format);WORKING WITH VBA MACROS
An Excel xlsm file is exactly the same as a xlsx file except that is includes an additional vbaProject.bin file which contains functions and/or macros. Excel uses a different extension to differentiate between the two file formats since files containing macros are usually subject to additional security checks.
The vbaProject.bin file is a binary OLE COM container. This was the format used in older xls versions of Excel prior to Excel 2007. Unlike all of the other components of an xlsx/xlsm file the data isn't stored in XML format. Instead the functions and macros as stored as pre-parsed binary format. As such it wouldn't be feasible to define macros and create a vbaProject.bin file from scratch (at least not in the remaining lifespan and interest levels of the author).
Instead a workaround is used to extract vbaProject.bin files from existing xlsm files and then add these to Excel::Writer::XLSX files.
The extract_vba utility
The extract_vba utility is used to extract the vbaProject.bin binary from an Excel 2007+ xlsm file. The utility is included in the Excel::Writer::XLSX bin directory and is also installed as a standalone executable file:
$ extract_vba macro_file.xlsm
Extracted: vbaProject.binAdding the VBA macros to a Excel::Writer::XLSX file
Once the vbaProject.bin file has been extracted it can be added to the Excel::Writer::XLSX workbook using the add_vba_project() method:
$workbook->add_vba_project( './vbaProject.bin' );If the VBA file contains functions you can then refer to them in calculations using write_formula:
$worksheet->write_formula( 'A1', '=MyMortgageCalc(200000, 25)' );Excel files that contain functions and macros should use an xlsm extension or else Excel will complain and possibly not open the file:
my $workbook = Excel::Writer::XLSX->new( 'file.xlsm' );It is also possible to assign a macro to a button that is inserted into a worksheet using the insert_button() method:
my $workbook  = Excel::Writer::XLSX->new( 'file.xlsm' );
...
$workbook->add_vba_project( './vbaProject.bin' );

$worksheet->insert_button( 'C2', { macro => 'my_macro' } );It may be necessary to specify a more explicit macro name prefixed by the workbook VBA name as follows:
$worksheet->insert_button( 'C2', { macro => 'ThisWorkbook.my_macro' } );See the macros.pl from the examples directory for a working example.
Note: Button is the only VBA Control supported by Excel::Writer::XLSX. Due to the large effort in implementation (1+ man months) it is unlikely that any other form elements will be added in the future.
Setting the VBA codenames
VBA macros generally refer to workbook and worksheet objects. If the VBA codenames aren't specified then Excel::Writer::XLSX will use the Excel defaults of ThisWorkbook and Sheet1, Sheet2 etc.
If the macro uses other codenames you can set them using the workbook and worksheet set_vba_name() methods as follows:
$workbook->set_vba_name( 'MyWorkbook' );
$worksheet->set_vba_name( 'MySheet' );You can find the names that are used in the VBA editor or by unzipping the xlsm file and grepping the files. The following shows how to do that using libxml's xmllint http://xmlsoft.org/xmllint.html to format the XML for clarity:
$ unzip myfile.xlsm -d myfile
$ xmllint --format `find myfile -name "*.xml" | xargs` | grep "Pr.*codeName"
<workbookPr codeName="MyWorkbook" defaultThemeVersion="124226"/>
<sheetPr codeName="MySheet"/>Note: This step is particularly important for macros created with non-English versions of Excel.
What to do if it doesn't work
This feature should be considered experimental and there is no guarantee that it will work in all cases. Some effort may be required and some knowledge of VBA will certainly help. If things don't work out here are some things to try:
Start with a simple macro file, ensure that it works and then add complexity.
Try to extract the macros from an Excel 2007 file. The method should work with macros from later versions (it was also tested with Excel 2010 macros). However there may be features in the macro files of more recent version of Excel that aren't backward compatible.
Check the code names that macros use to refer to the workbook and worksheets (see the previous section above). In general VBA uses a code name of
ThisWorkbookto refer to the current workbook and the sheet name (such asSheet1) to refer to the worksheets. These are the defaults used by Excel::Writer::XLSX. If the macro uses other names then you can specify these using the workbook and worksheetset_vba_name()methods:$workbook>set_vba_name( 'MyWorkbook' ); $worksheet->set_vba_name( 'MySheet' );
EXAMPLES
See Excel::Writer::XLSX::Examples for a full list of examples.
Example 1
The following example shows some of the basic features of Excel::Writer::XLSX.
#!/usr/bin/perl -w
use strict;
use Excel::Writer::XLSX;
# Create a new workbook called simple.xlsx and add a worksheet
my $workbook = Excel::Writer::XLSX->new( 'simple.xlsx' );
my $worksheet = $workbook->add_worksheet();
# The general syntax is write($row, $column, $token). Note that row and
# column are zero indexed
# Write some text
$worksheet->write( 0, 0, 'Hi Excel!' );
# Write some numbers
$worksheet->write( 2, 0, 3 );
$worksheet->write( 3, 0, 3.00000 );
$worksheet->write( 4, 0, 3.00001 );
$worksheet->write( 5, 0, 3.14159 );
# Write some formulas
$worksheet->write( 7, 0, '=A3 + A6' );
$worksheet->write( 8, 0, '=IF(A5>3,"Yes", "No")' );
# Write a hyperlink
my $hyperlink_format = $workbook->add_format(
color => 'blue',
underline => 1,
);
$worksheet->write( 10, 0, 'http://www.perl.com/', $hyperlink_format );
$workbook->close();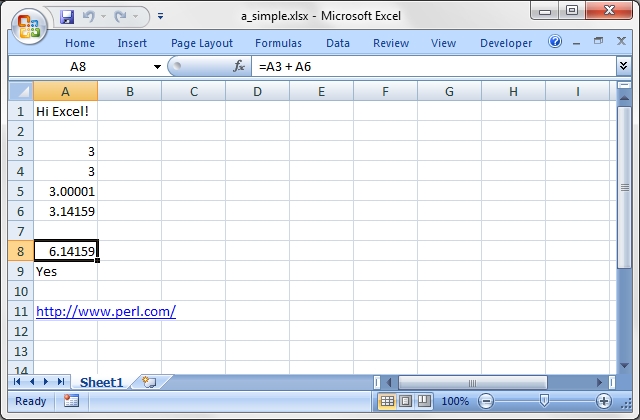
Example 2
The following is a general example which demonstrates some features of working with multiple worksheets.
#!/usr/bin/perl -w
use strict;
use Excel::Writer::XLSX;
# Create a new Excel workbook
my $workbook = Excel::Writer::XLSX->new( 'regions.xlsx' );
# Add some worksheets
my $north = $workbook->add_worksheet( 'North' );
my $south = $workbook->add_worksheet( 'South' );
my $east = $workbook->add_worksheet( 'East' );
my $west = $workbook->add_worksheet( 'West' );
# Add a Format
my $format = $workbook->add_format();
$format->set_bold();
$format->set_color( 'blue' );
# Add a caption to each worksheet
for my $worksheet ( $workbook->sheets() ) {
$worksheet->write( 0, 0, 'Sales', $format );
}
# Write some data
$north->write( 0, 1, 200000 );
$south->write( 0, 1, 100000 );
$east->write( 0, 1, 150000 );
$west->write( 0, 1, 100000 );
# Set the active worksheet
$south->activate();
# Set the width of the first column
$south->set_column( 0, 0, 20 );
# Set the active cell
$south->set_selection( 0, 1 );
$workbook->close();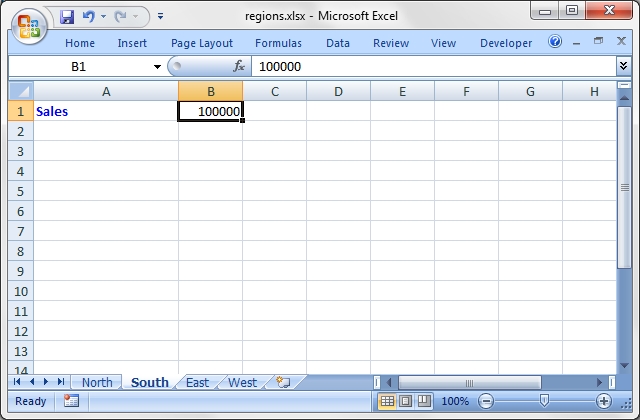
Example 3
Example of how to add conditional formatting to an Excel::Writer::XLSX file. The example below highlights cells that have a value greater than or equal to 50 in red and cells below that value in green.
#!/usr/bin/perl
use strict;
use warnings;
use Excel::Writer::XLSX;
my $workbook = Excel::Writer::XLSX->new( 'conditional_format.xlsx' );
my $worksheet = $workbook->add_worksheet();
# This example below highlights cells that have a value greater than or
# equal to 50 in red and cells below that value in green.
# Light red fill with dark red text.
my $format1 = $workbook->add_format(
bg_color => '#FFC7CE',
color => '#9C0006',
);
# Green fill with dark green text.
my $format2 = $workbook->add_format(
bg_color => '#C6EFCE',
color => '#006100',
);
# Some sample data to run the conditional formatting against.
my $data = [
[ 34, 72, 38, 30, 75, 48, 75, 66, 84, 86 ],
[ 6, 24, 1, 84, 54, 62, 60, 3, 26, 59 ],
[ 28, 79, 97, 13, 85, 93, 93, 22, 5, 14 ],
[ 27, 71, 40, 17, 18, 79, 90, 93, 29, 47 ],
[ 88, 25, 33, 23, 67, 1, 59, 79, 47, 36 ],
[ 24, 100, 20, 88, 29, 33, 38, 54, 54, 88 ],
[ 6, 57, 88, 28, 10, 26, 37, 7, 41, 48 ],
[ 52, 78, 1, 96, 26, 45, 47, 33, 96, 36 ],
[ 60, 54, 81, 66, 81, 90, 80, 93, 12, 55 ],
[ 70, 5, 46, 14, 71, 19, 66, 36, 41, 21 ],
];
my $caption = 'Cells with values >= 50 are in light red. '
. 'Values < 50 are in light green';
# Write the data.
$worksheet->write( 'A1', $caption );
$worksheet->write_col( 'B3', $data );
# Write a conditional format over a range.
$worksheet->conditional_formatting( 'B3:K12',
{
type => 'cell',
criteria => '>=',
value => 50,
format => $format1,
}
);
# Write another conditional format over the same range.
$worksheet->conditional_formatting( 'B3:K12',
{
type => 'cell',
criteria => '<',
value => 50,
format => $format2,
}
);
$workbook->close();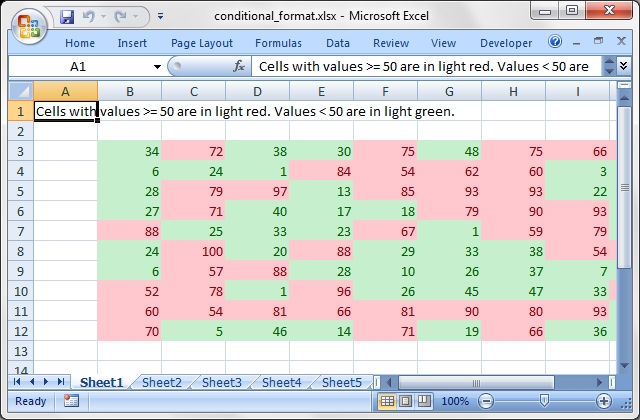
Example 4
The following is a simple example of using functions.
#!/usr/bin/perl -w
use strict;
use Excel::Writer::XLSX;
# Create a new workbook and add a worksheet
my $workbook = Excel::Writer::XLSX->new( 'stats.xlsx' );
my $worksheet = $workbook->add_worksheet( 'Test data' );
# Set the column width for columns 1
$worksheet->set_column( 0, 0, 20 );
# Create a format for the headings
my $format = $workbook->add_format();
$format->set_bold();
# Write the sample data
$worksheet->write( 0, 0, 'Sample', $format );
$worksheet->write( 0, 1, 1 );
$worksheet->write( 0, 2, 2 );
$worksheet->write( 0, 3, 3 );
$worksheet->write( 0, 4, 4 );
$worksheet->write( 0, 5, 5 );
$worksheet->write( 0, 6, 6 );
$worksheet->write( 0, 7, 7 );
$worksheet->write( 0, 8, 8 );
$worksheet->write( 1, 0, 'Length', $format );
$worksheet->write( 1, 1, 25.4 );
$worksheet->write( 1, 2, 25.4 );
$worksheet->write( 1, 3, 24.8 );
$worksheet->write( 1, 4, 25.0 );
$worksheet->write( 1, 5, 25.3 );
$worksheet->write( 1, 6, 24.9 );
$worksheet->write( 1, 7, 25.2 );
$worksheet->write( 1, 8, 24.8 );
# Write some statistical functions
$worksheet->write( 4, 0, 'Count', $format );
$worksheet->write( 4, 1, '=COUNT(B1:I1)' );
$worksheet->write( 5, 0, 'Sum', $format );
$worksheet->write( 5, 1, '=SUM(B2:I2)' );
$worksheet->write( 6, 0, 'Average', $format );
$worksheet->write( 6, 1, '=AVERAGE(B2:I2)' );
$worksheet->write( 7, 0, 'Min', $format );
$worksheet->write( 7, 1, '=MIN(B2:I2)' );
$worksheet->write( 8, 0, 'Max', $format );
$worksheet->write( 8, 1, '=MAX(B2:I2)' );
$worksheet->write( 9, 0, 'Standard Deviation', $format );
$worksheet->write( 9, 1, '=STDEV(B2:I2)' );
$worksheet->write( 10, 0, 'Kurtosis', $format );
$worksheet->write( 10, 1, '=KURT(B2:I2)' );
$workbook->close();
Example 5
The following example converts a tab separated file called tab.txt into an Excel file called tab.xlsx.
#!/usr/bin/perl -w
use strict;
use Excel::Writer::XLSX;
open( TABFILE, 'tab.txt' ) or die "tab.txt: $!";
my $workbook = Excel::Writer::XLSX->new( 'tab.xlsx' );
my $worksheet = $workbook->add_worksheet();
# Row and column are zero indexed
my $row = 0;
while ( <TABFILE> ) {
chomp;
# Split on single tab
my @fields = split( '\t', $_ );
my $col = 0;
for my $token ( @fields ) {
$worksheet->write( $row, $col, $token );
$col++;
}
$row++;
}
$workbook->close();NOTE: This is a simple conversion program for illustrative purposes only. For converting a CSV or Tab separated or any other type of delimited text file to Excel I recommend the more rigorous csv2xls program that is part of H.Merijn Brand's Text::CSV_XS module distro.
See the examples/csv2xls link here: http://search.cpan.org/~hmbrand/Text-CSV_XS/MANIFEST.
Additional Examples
The following is a description of the example files that are provided in the standard Excel::Writer::XLSX distribution. They demonstrate the different features and options of the module. See Excel::Writer::XLSX::Examples for more details.
Getting started
===============
a_simple.pl A simple demo of some of the features.
bug_report.pl A template for submitting bug reports.
demo.pl A demo of some of the available features.
formats.pl All the available formatting on several worksheets.
regions.pl A simple example of multiple worksheets.
stats.pl Basic formulas and functions.
Intermediate
============
autofit.pl Examples of simulated worksheet autofit.
autofilter.pl Examples of worksheet autofilters.
array_formula.pl Examples of how to write array formulas.
cgi.pl A simple CGI program.
chart_area.pl A demo of area style charts.
chart_bar.pl A demo of bar (vertical histogram) style charts.
chart_column.pl A demo of column (histogram) style charts.
chart_line.pl A demo of line style charts.
chart_pie.pl A demo of pie style charts.
chart_doughnut.pl A demo of doughnut style charts.
chart_radar.pl A demo of radar style charts.
chart_scatter.pl A demo of scatter style charts.
chart_secondary_axis.pl A demo of a line chart with a secondary axis.
chart_combined.pl A demo of a combined column and line chart.
chart_pareto.pl A demo of a combined Pareto chart.
chart_stock.pl A demo of stock style charts.
chart_data_table.pl A demo of a chart with a data table on the axis.
chart_data_tools.pl A demo of charts with data highlighting options.
chart_data_labels.pl A demo of standard and custom chart data labels.
chart_clustered.pl A demo of a chart with a clustered axis.
chart_styles.pl A demo of the available chart styles.
chart_gauge.pl A demo of a gauge style chart.
colors.pl A demo of the colour palette and named colours.
comments1.pl Add comments to worksheet cells.
comments2.pl Add comments with advanced options.
conditional_format.pl Add conditional formats to a range of cells.
data_validate.pl An example of data validation and dropdown lists.
date_time.pl Write dates and times with write_date_time().
defined_name.pl Example of how to create defined names.
diag_border.pl A simple example of diagonal cell borders.
dynamic_arrays.pl Example of using new Excel 365 dynamic functions.
embedded_images.pl Example of embedding images in worksheet cells.
filehandle.pl Examples of working with filehandles.
headers.pl Examples of worksheet headers and footers.
hide_row_col.pl Example of hiding rows and columns.
hide_sheet.pl Simple example of hiding a worksheet.
hyperlink1.pl Shows how to create web hyperlinks.
hyperlink2.pl Examples of internal and external hyperlinks.
indent.pl An example of cell indentation.
ignore_errors.pl An example of turning off worksheet cells errors/warnings.
lambda.pl Example of using the Excel 365 LAMBDA() function.
macros.pl An example of adding macros from an existing file.
merge1.pl A simple example of cell merging.
merge2.pl A simple example of cell merging with formatting.
merge3.pl Add hyperlinks to merged cells.
merge4.pl An advanced example of merging with formatting.
merge5.pl An advanced example of merging with formatting.
merge6.pl An example of merging with Unicode strings.
mod_perl1.pl A simple mod_perl 1 program.
mod_perl2.pl A simple mod_perl 2 program.
outline.pl An example of outlines and grouping.
outline_collapsed.pl An example of collapsed outlines.
panes.pl An example of how to create panes.
properties.pl Add document properties to a workbook.
protection.pl Example of cell locking and formula hiding.
rich_strings.pl Example of strings with multiple formats.
right_to_left.pl Change default sheet direction to right to left.
sales.pl An example of a simple sales spreadsheet.
shape1.pl Insert shapes in worksheet.
shape2.pl Insert shapes in worksheet. With properties.
shape3.pl Insert shapes in worksheet. Scaled.
shape4.pl Insert shapes in worksheet. With modification.
shape5.pl Insert shapes in worksheet. With connections.
shape6.pl Insert shapes in worksheet. With connections.
shape7.pl Insert shapes in worksheet. One to many connections.
shape8.pl Insert shapes in worksheet. One to many connections.
shape_all.pl Demo of all the available shape and connector types.
sparklines1.pl Simple sparklines demo.
sparklines2.pl Sparklines demo showing formatting options.
stats_ext.pl Same as stats.pl with external references.
stocks.pl Demonstrates conditional formatting.
watermark.pl Example of how to set a watermark image for a worksheet.
background.pl Example of how to set the background image for a worksheet.
tab_colors.pl Example of how to set worksheet tab colours.
tables.pl Add Excel tables to a worksheet.
write_handler1.pl Example of extending the write() method. Step 1.
write_handler2.pl Example of extending the write() method. Step 2.
write_handler3.pl Example of extending the write() method. Step 3.
write_handler4.pl Example of extending the write() method. Step 4.
write_to_scalar.pl Example of writing an Excel file to a Perl scalar.
Unicode
=======
unicode_2022_jp.pl Japanese: ISO-2022-JP.
unicode_8859_11.pl Thai: ISO-8859_11.
unicode_8859_7.pl Greek: ISO-8859_7.
unicode_big5.pl Chinese: BIG5.
unicode_cp1251.pl Russian: CP1251.
unicode_cp1256.pl Arabic: CP1256.
unicode_cyrillic.pl Russian: Cyrillic.
unicode_koi8r.pl Russian: KOI8-R.
unicode_polish_utf8.pl Polish : UTF8.
unicode_shift_jis.pl Japanese: Shift JIS.LIMITATIONS
The following limits are imposed by Excel 2007+:
Description Limit
-------------------------------------- ------
Maximum number of chars in a string 32,767
Maximum number of columns 16,384
Maximum number of rows 1,048,576
Maximum chars in a sheet name 31
Maximum chars in a header/footer 254
Maximum characters in hyperlink url (1) 2079
Maximum number of unique hyperlinks (2) 65,530(1) Versions of Excel prior to Excel 2015 limited hyperlink links and anchor/locations to 255 characters each. Versions after that support urls up to 2079 characters. Excel::Writer::XLSX versions >= 1.0.2 support the new longer limit by default.
(2) Per worksheet. Excel allows a greater number of non-unique hyperlinks if they are contiguous and can be grouped into a single range. This isn't supported by Excel::Writer::XLSX.
REQUIREMENTS
http://search.cpan.org/search?dist=Archive-Zip/.
Perl 5.8.2.
SPEED AND MEMORY USAGE
Spreadsheet::WriteExcel was written to optimise speed and reduce memory usage. However, these design goals meant that it wasn't easy to implement features that many users requested such as writing formatting and data separately.
As a result Excel::Writer::XLSX takes a different design approach and holds a lot more data in memory so that it is functionally more flexible.
The effect of this is that Excel::Writer::XLSX is about 30% slower than Spreadsheet::WriteExcel and uses 5 times more memory.
In addition the extended row and column ranges in Excel 2007+ mean that it is possible to run out of memory creating large files. This was almost never an issue with Spreadsheet::WriteExcel.
This memory usage can be reduced almost completely by using the Workbook set_optimization() method:
$workbook->set_optimization();The trade-off is that you won't be able to take advantage of features that manipulate cell data after it is written. One such feature is Tables.
DOWNLOADING
The latest version of this module is always available at: http://search.cpan.org/search?dist=Excel-Writer-XLSX/.
INSTALLATION
The module can be installed using the standard Perl procedure:
perl Makefile.PL
make
make test
make install # You may need to be sudo/rootDIAGNOSTICS
- Filename required by Excel::Writer::XLSX->new()
-
A filename must be given in the constructor.
- Can't open filename. It may be in use or protected.
-
The file cannot be opened for writing. The directory that you are writing to may be protected or the file may be in use by another program.
- Can't call method "XXX" on an undefined value at someprogram.pl.
-
On Windows this is usually caused by the file that you are trying to create clashing with a version that is already open and locked by Excel.
- The file you are trying to open 'file.xls' is in a different format than specified by the file extension.
-
This warning occurs when you create an XLSX file but give it an xls extension.
WRITING EXCEL FILES
Depending on your requirements, background and general sensibilities you may prefer one of the following methods of getting data into Excel:
Spreadsheet::WriteExcel
This module is the precursor to Excel::Writer::XLSX and uses the same interface. It produces files in the Excel Biff xls format that was used in Excel versions 97-2003. These files can still be read by Excel 2007 but have some limitations in relation to the number of rows and columns that the format supports.
Win32::OLE module and office automation
This requires a Windows platform and an installed copy of Excel. This is the most powerful and complete method for interfacing with Excel.
CSV, comma separated variables or text
Excel will open and automatically convert files with a
csvextension.To create CSV files refer to the Text::CSV_XS module.
DBI with DBD::ADO or DBD::ODBC
Excel files contain an internal index table that allows them to act like a database file. Using one of the standard Perl database modules you can connect to an Excel file as a database.
For other Perl-Excel modules try the following search: http://search.cpan.org/search?mode=module&query=excel.
READING EXCEL FILES
To read data from Excel files try:
-
A module for reading data from XLSX files. It also imports most, if not all, of the metadata to be found in Excel XLSX files. As its author describes it: "This module is an adaptor for Spreadsheet::ParseExcel that reads XLSX files. For documentation about the various data that you can retrieve from these classes, please see Spreadsheet::ParseExcel, Spreadsheet::ParseExcel::Workbook, Spreadsheet::ParseExcel::Worksheet, and Spreadsheet::ParseExcel::Cell."
Spreadsheet::XLSX
A module for reading formatted or unformatted data from XLSX files.
SimpleXlsx
A lightweight module for reading data from XLSX files.
Spreadsheet::ParseExcel
This module can read data from an Excel XLS file but it doesn't support the XLSX format.
Win32::OLE module and office automation (reading)
See above.
DBI with DBD::ADO or DBD::ODBC.
See above.
For other Perl-Excel modules try the following search: http://search.cpan.org/search?mode=module&query=excel.
BUGS
Memory usage is very high for large worksheets.
If you run out of memory creating large worksheets use the
set_optimization()method. See "SPEED AND MEMORY USAGE" for more information.Perl packaging programs can't find chart modules.
When using Excel::Writer::XLSX charts with Perl packagers such as PAR or Cava you should explicitly include the chart that you are trying to create in your
usestatements. This isn't a bug as such but it might help someone from banging their head off a wall:... use Excel::Writer::XLSX; use Excel::Writer::XLSX::Chart::Column; ...
If you wish to submit a bug report run the bug_report.pl program in the examples directory of the distro.
The bug tracker is on Github: https://github.com/jmcnamara/excel-writer-xlsx/issues.
REPOSITORY
The Excel::Writer::XLSX source code in host on github: http://github.com/jmcnamara/excel-writer-xlsx.
DONATIONS and SPONSORSHIP
If you'd care to donate to the Excel::Writer::XLSX project or sponsor a new feature, you can do so via PayPal: http://tinyurl.com/7ayes.
SEE ALSO
Spreadsheet::WriteExcel: http://search.cpan.org/dist/Spreadsheet-WriteExcel.
Spreadsheet::ParseExcel: http://search.cpan.org/dist/Spreadsheet-ParseExcel.
Spreadsheet::XLSX: http://search.cpan.org/dist/Spreadsheet-XLSX.
ACKNOWLEDGEMENTS
The following people contributed to the debugging, testing or enhancement of Excel::Writer::XLSX:
Rob Messer of IntelliSurvey gave me the initial prompt to port Spreadsheet::WriteExcel to the XLSX format. IntelliSurvey (http://www.intellisurvey.com) also sponsored large files optimisations and the charting feature.
Bariatric Advantage (http://www.bariatricadvantage.com) sponsored work on chart formatting.
Eric Johnson provided the ability to use secondary axes with charts. Thanks to Foxtons (http://foxtons.co.uk) for sponsoring this work.
BuildFax (http://www.buildfax.com) sponsored the Tables feature and the Chart point formatting feature.
DISCLAIMER OF WARRANTY
Because this software is licensed free of charge, there is no warranty for the software, to the extent permitted by applicable law. Except when otherwise stated in writing the copyright holders and/or other parties provide the software "as is" without warranty of any kind, either expressed or implied, including, but not limited to, the implied warranties of merchantability and fitness for a particular purpose. The entire risk as to the quality and performance of the software is with you. Should the software prove defective, you assume the cost of all necessary servicing, repair, or correction.
In no event unless required by applicable law or agreed to in writing will any copyright holder, or any other party who may modify and/or redistribute the software as permitted by the above licence, be liable to you for damages, including any general, special, incidental, or consequential damages arising out of the use or inability to use the software (including but not limited to loss of data or data being rendered inaccurate or losses sustained by you or third parties or a failure of the software to operate with any other software), even if such holder or other party has been advised of the possibility of such damages.
LICENSE
Either the Perl Artistic Licence https://dev.perl.org/licenses/artistic.html or the GNU General Public License v1.0 or later https://dev.perl.org/licenses/gpl1.html.
AUTHOR
John McNamara jmcnamara@cpan.org
COPYRIGHT
Copyright MM-MMXXV, John McNamara.
All Rights Reserved. This module is free software. It may be used, redistributed and/or modified under the same terms as Perl itself.